

Windows 11 offers several built-in tools and supports third-party apps to screen record windows, the complete desktop or selected areas of ít – each catering to different needs and preferences.
Understanding the available options and their features is crucial for selecting the most suitable tool for your specific recording needs. Our guide provides a comprehensive overview of various methods to record your screen on Windows 11, including step-by-step instructions.
We cover native applications like the Snipping Tool and Xbox Game Bar and third-party software such as ShareX and OBS Studio.
By following the methods outlined in this guide, you can choose the most appropriate tool and approach for your screen recording needs, enhancing your productivity and enabling you to create high-quality videos with ease.
How to Screen Record in Windows With the Snipping Tool
The Windows Snipping Tool is a simple, built-in Windows 11 utility best known for capturing screenshots. Its built in windows desktop recorder is ideal for quick, no-frills recordings, making it an excellent windows screen recording tool for casual users or those who need a lightweight solution. However, it lacks advanced features like audio recording or the ability to record the entire screen.
Advantages: Easy to use, no additional downloads required.
Disadvantages: Limited functionality, no audio support.
Step-by-Step Instructions
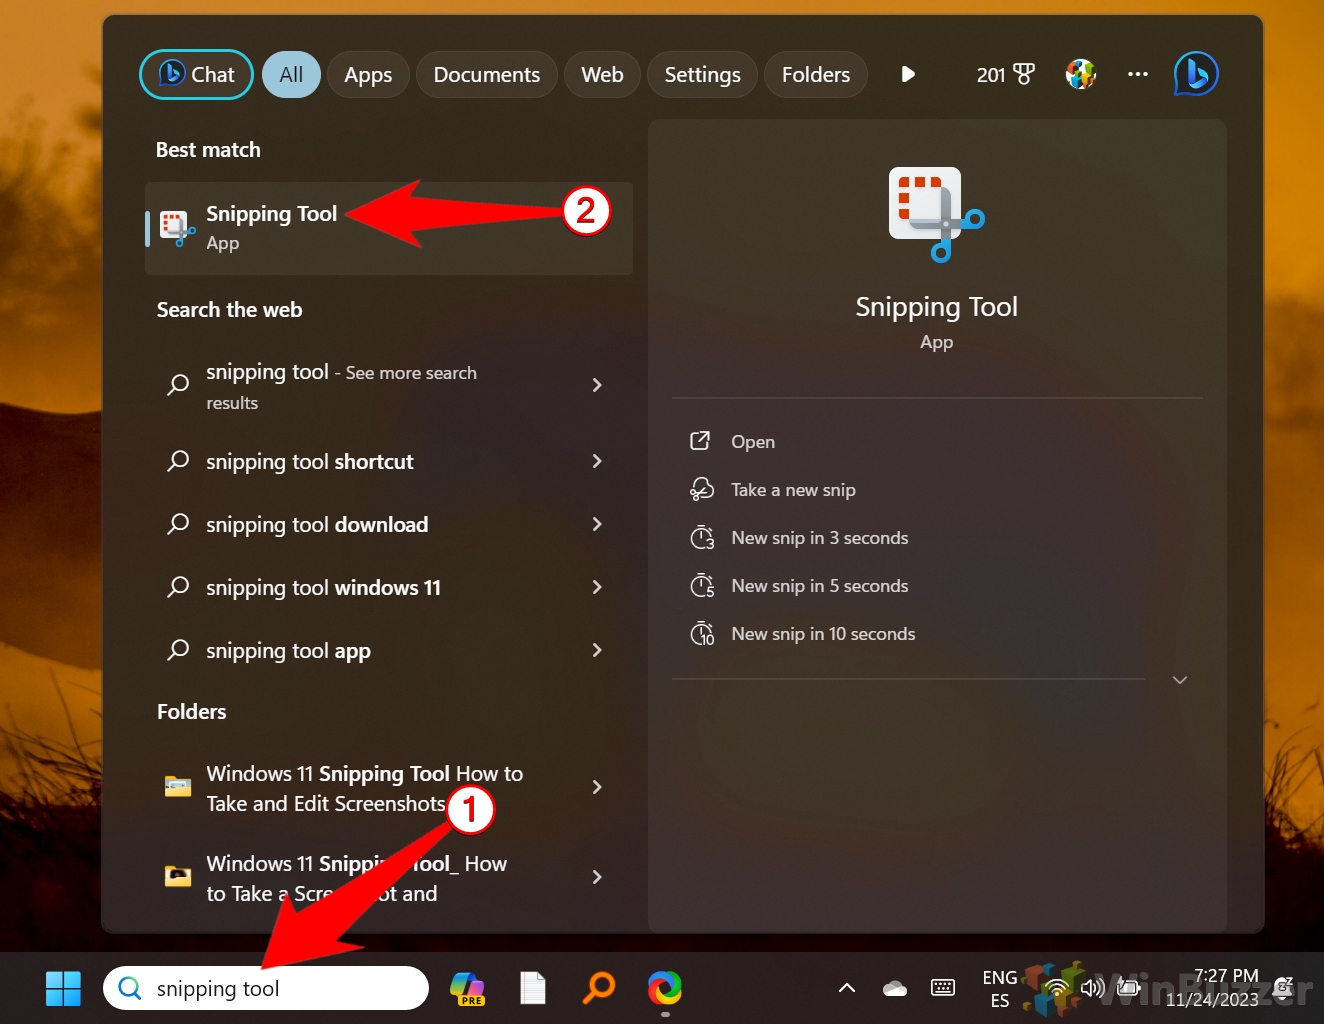
- Launch the Snipping Tool
Open the Start Menu and type “Snipping Tool” into the search bar. Click on the app from the results to open it.

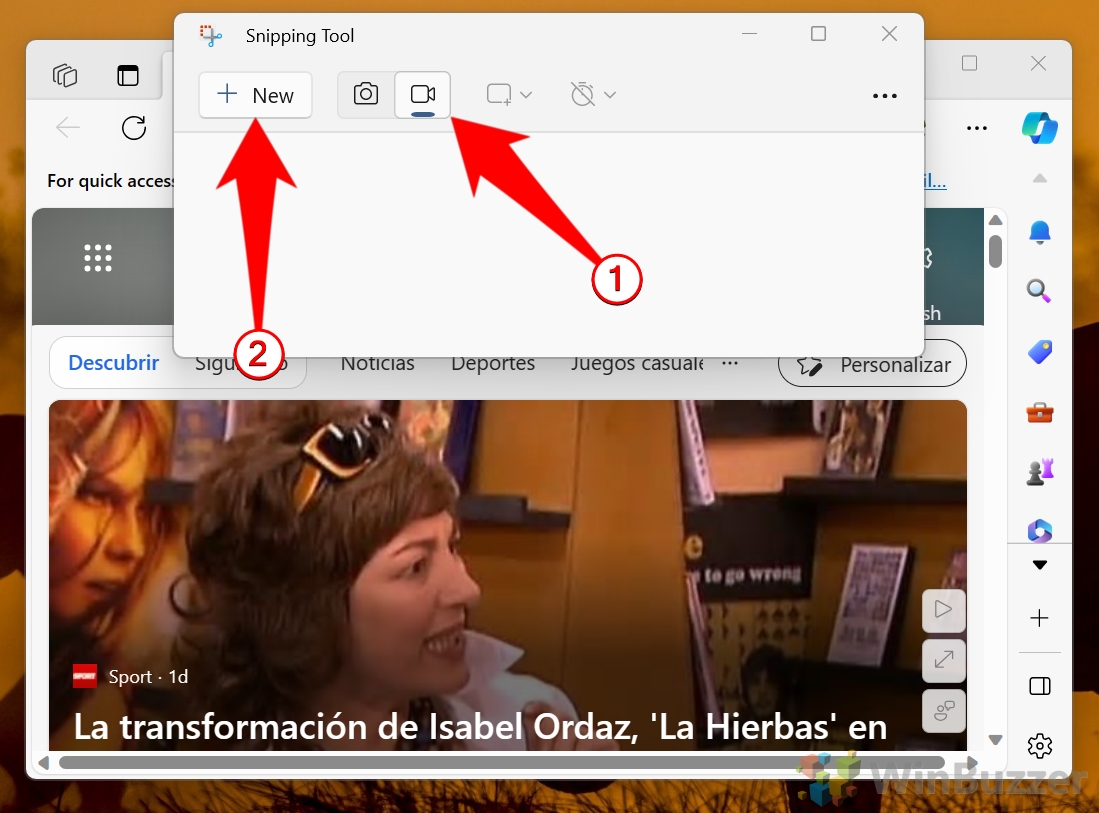
- Switch to Recording Mode
Once the Snipping Tool is open, click the camcorder icon to switch to video recording mode. Then, click the “New” button.
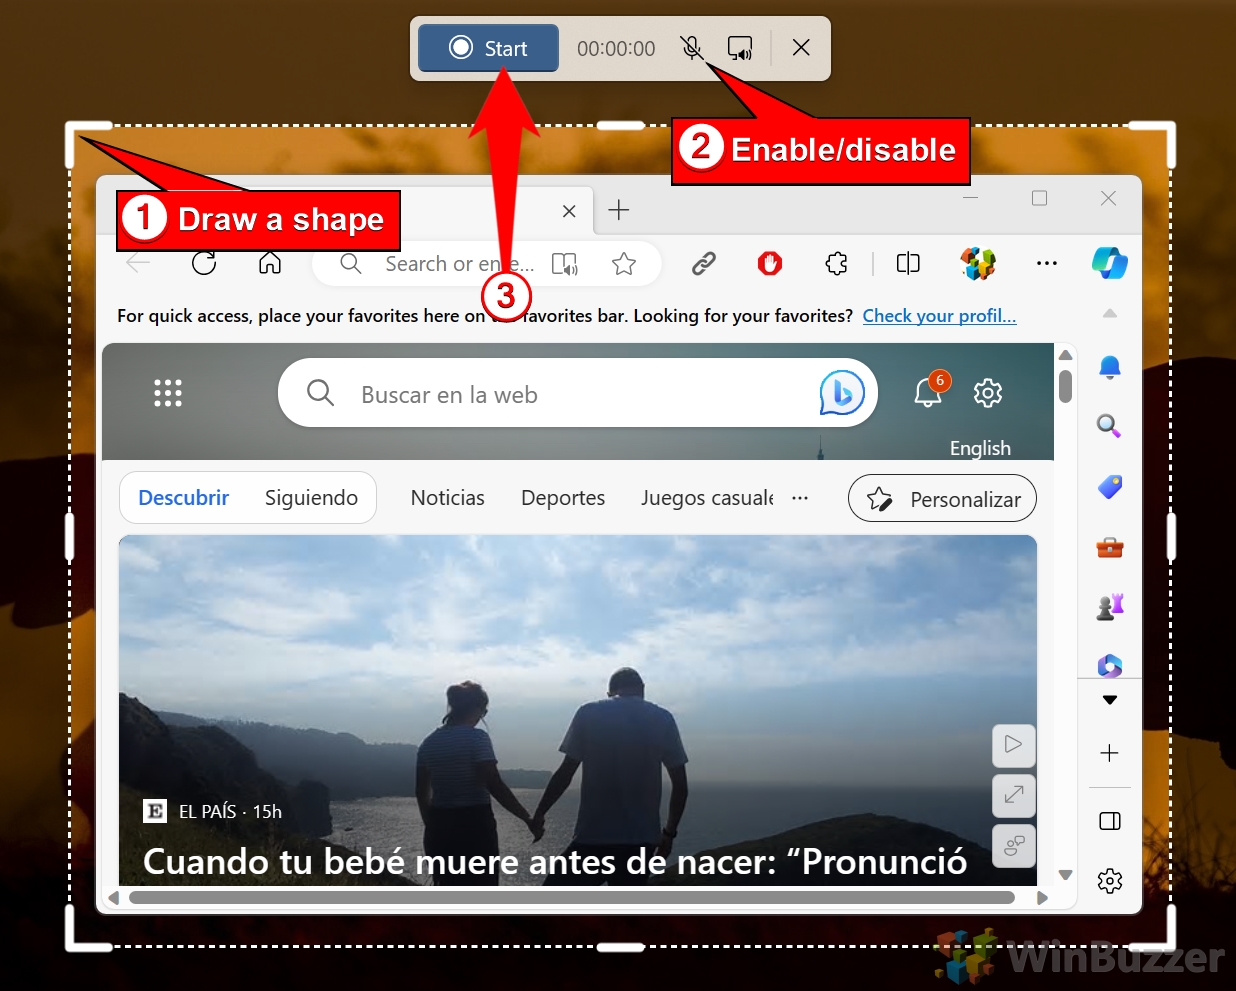
- Select the Recording Area
A floating toolbar will appear. Your mouse cursor will turn into a crosshair. Click and drag to select the specific area of the screen you want to record. Click on the microphone symbol if you also want to record system audio. Click the “Start” button to begin recording.
- Stop or Pause the Recording
When you’re done, click the red square on the toolbar to stop. You can also pause the recording or delete it if needed. - Save or Share the Recording
After stopping, the recording will open in a player window. Here, you can watch it back, save it to your device, or share it directly.
How to Record Your Screen in Windows Using the Xbox Game Bar
The Xbox Game Bar is a versatile tool designed primarily for gamers, especially useful thanks to its built in windows screen recorder. It includes basic audio recording and system integration, making it great for recording gameplay, presentations, or tutorials. However, it can only record a single application at a time, not the entire desktop.
Advantages: Built-in audio support, simple interface, good for gamers.
Disadvantages: Limited to single-window recording, not suitable for multi-window workflows.
Step-by-Step Instructions
- Open the Xbox Game Bar
Type “Xbox Game Bar” into the Start Menu search bar and open the app. You can also press “Windows+G” to open it, which basically serves as the default windows screen recorder shortcut. - Access the Capture Window and Start Recording
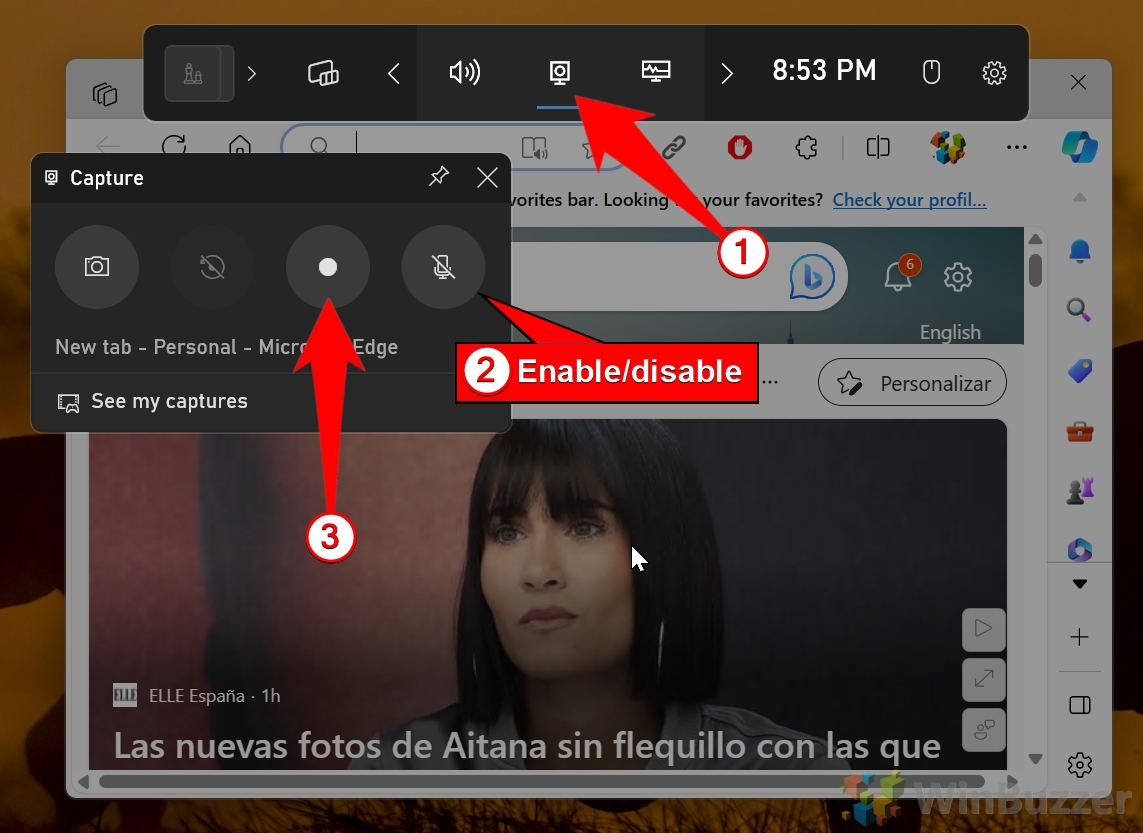
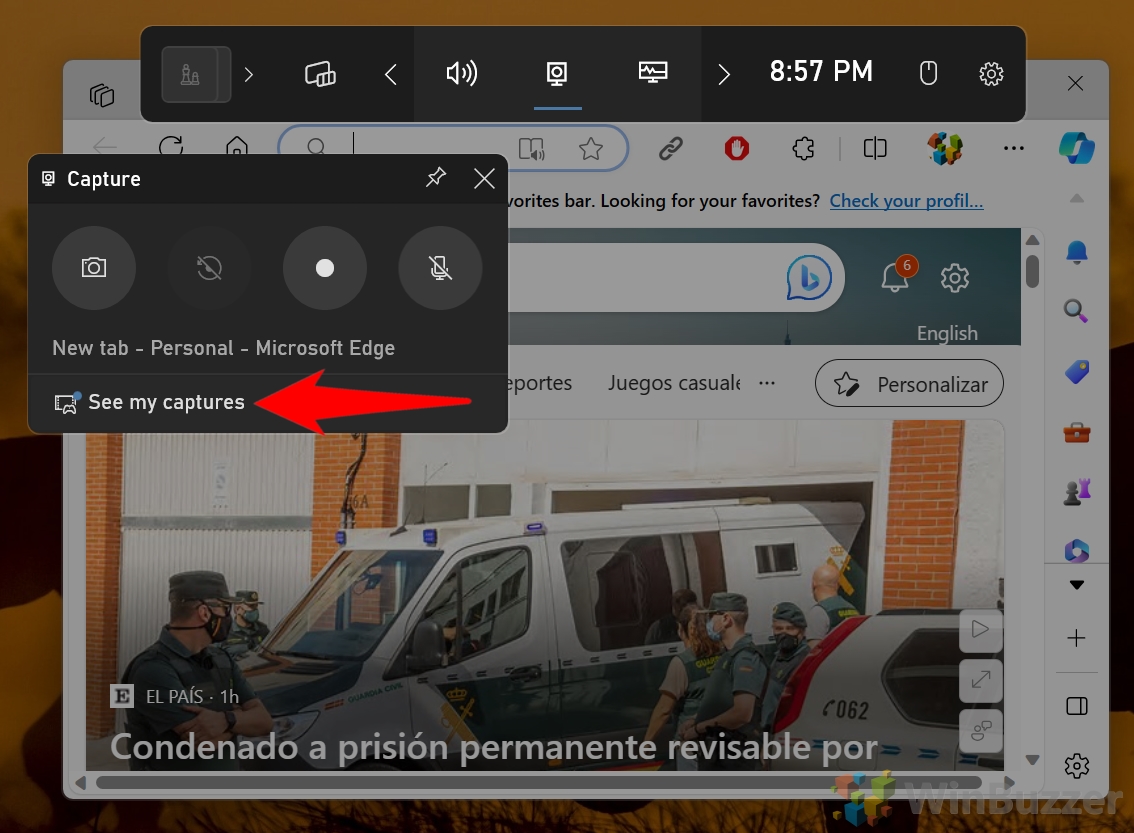
When the Xbox Game Bar opens, locate the toolbar at the top of your screen. Click the camera icon to access the Capture window. If you want to record your voice while capturing the screen, ensure the Microphone icon is not crossed out. Click it to toggle between mute and unmute.
In the Capture window, click the Record button (a solid white circle) to begin recording your screen.
- Stop the Recording
Once you’re finished, click the “Stop” button (a white square) in the same location as the Record button.

- Locate Your Recording
To view your recordings, click “See My Captures” in the Capture window. This will open the folder where your videos are saved by default.
How to Screen Record Using Microsoft PowerPoint
Microsoft PowerPoint offers a hidden screen recording feature, perfect for creating professional presentations. This method allows you to record a defined screen area, include audio, and embed the recording directly into your slides. While it’s convenient for presentation creators, it isn’t the best choice for extended recordings or advanced editing.
Advantages: Integrated with PowerPoint for presentations, audio support.
Disadvantages: Limited customization options, not ideal for general use.
Step-by-Step Instructions
- Open Microsoft PowerPoint
Launch PowerPoint and create a new or open an existing presentation.

- Navigate to Screen Recording
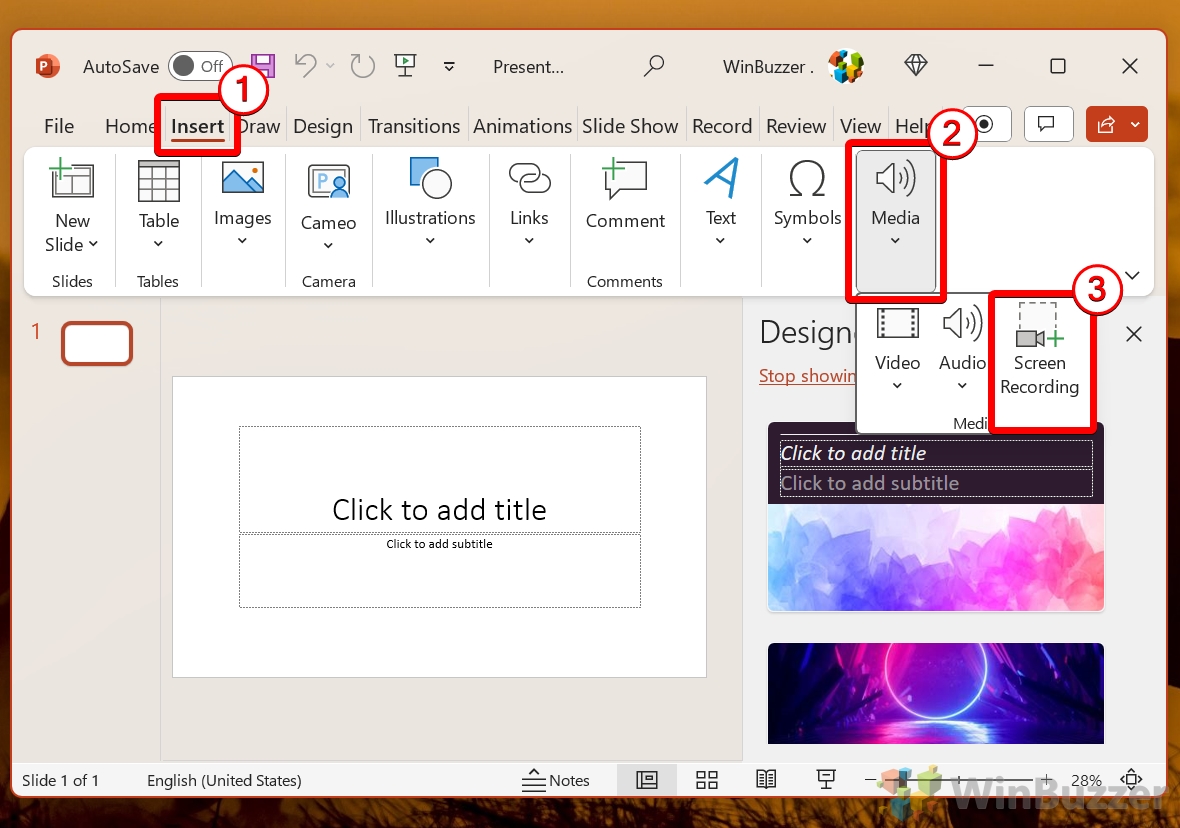
Click the “Insert” tab in the ribbon, then select “Screen Recording” from the “Media” group.
- Select the Recording Area
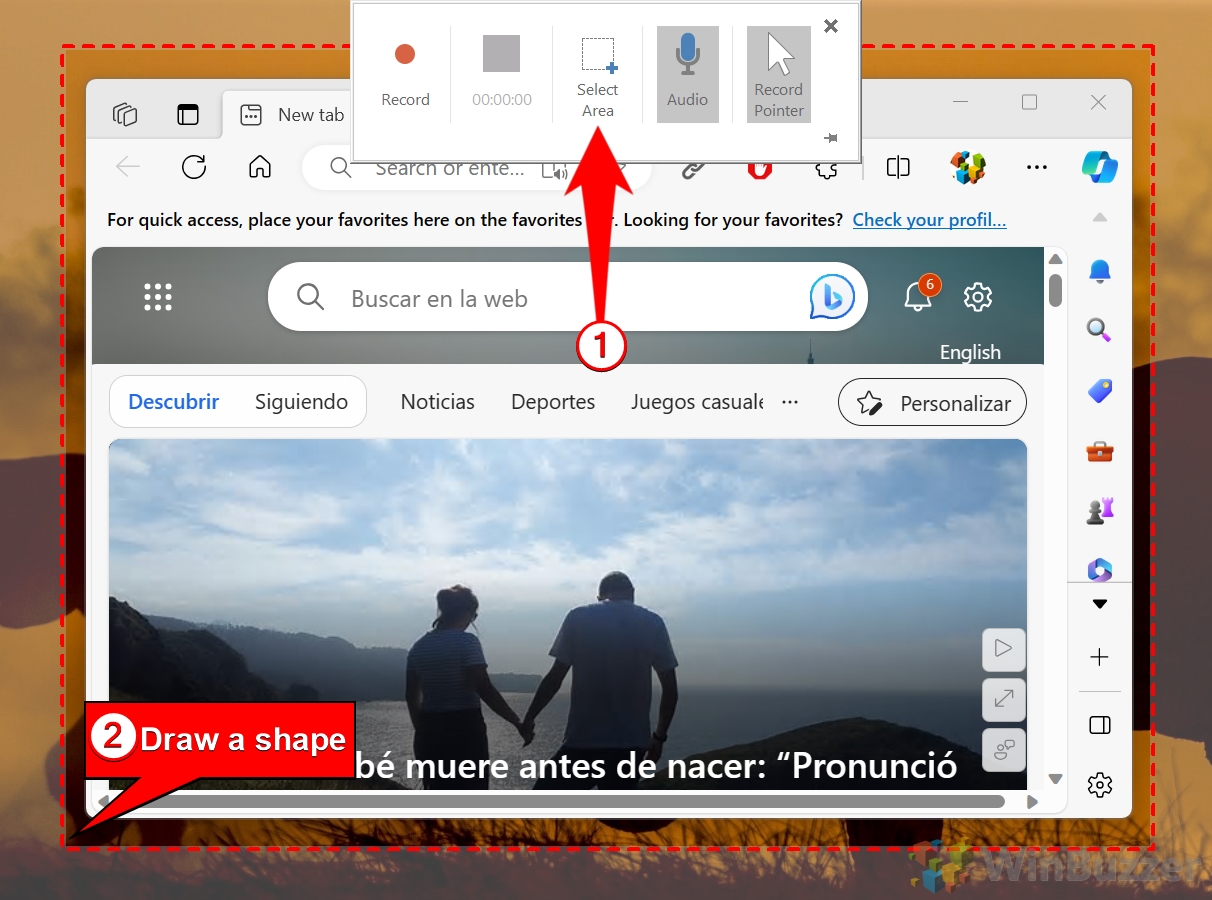
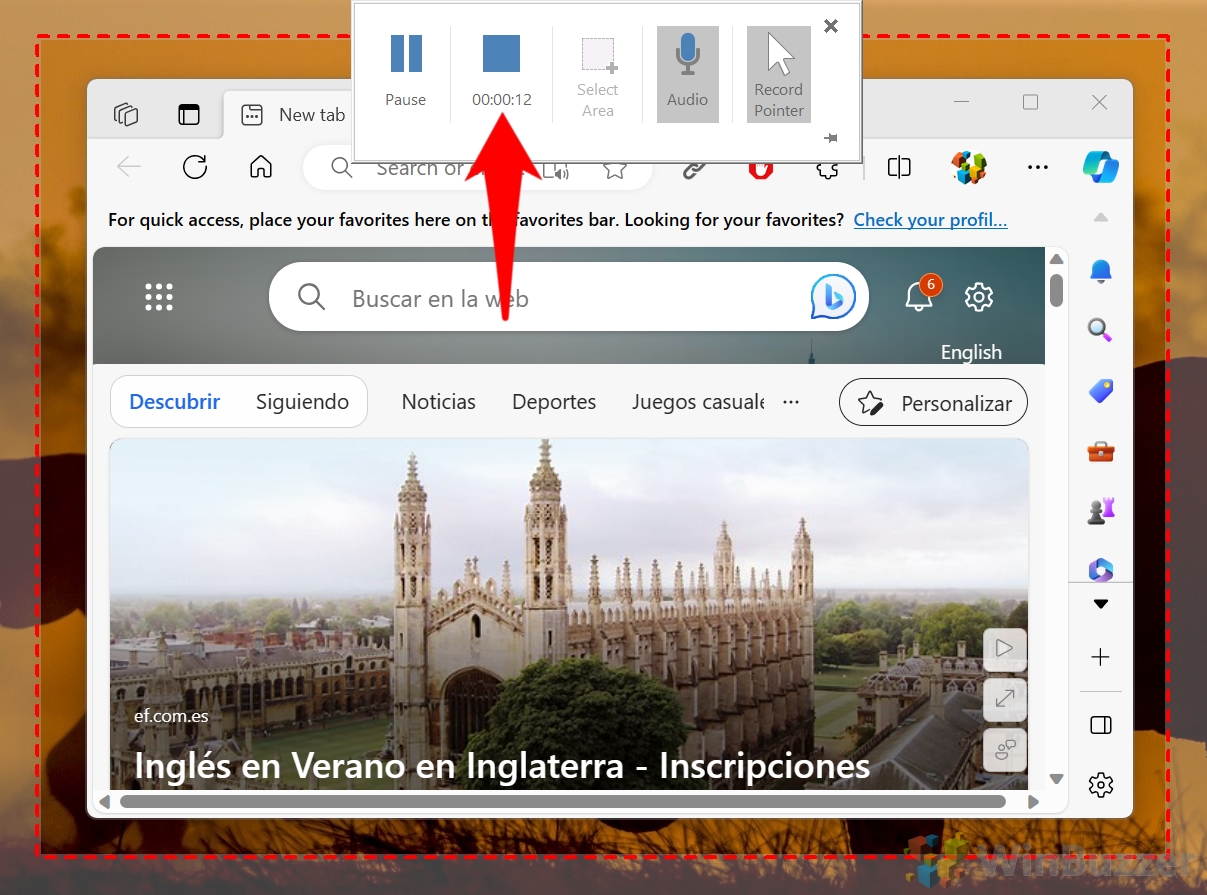
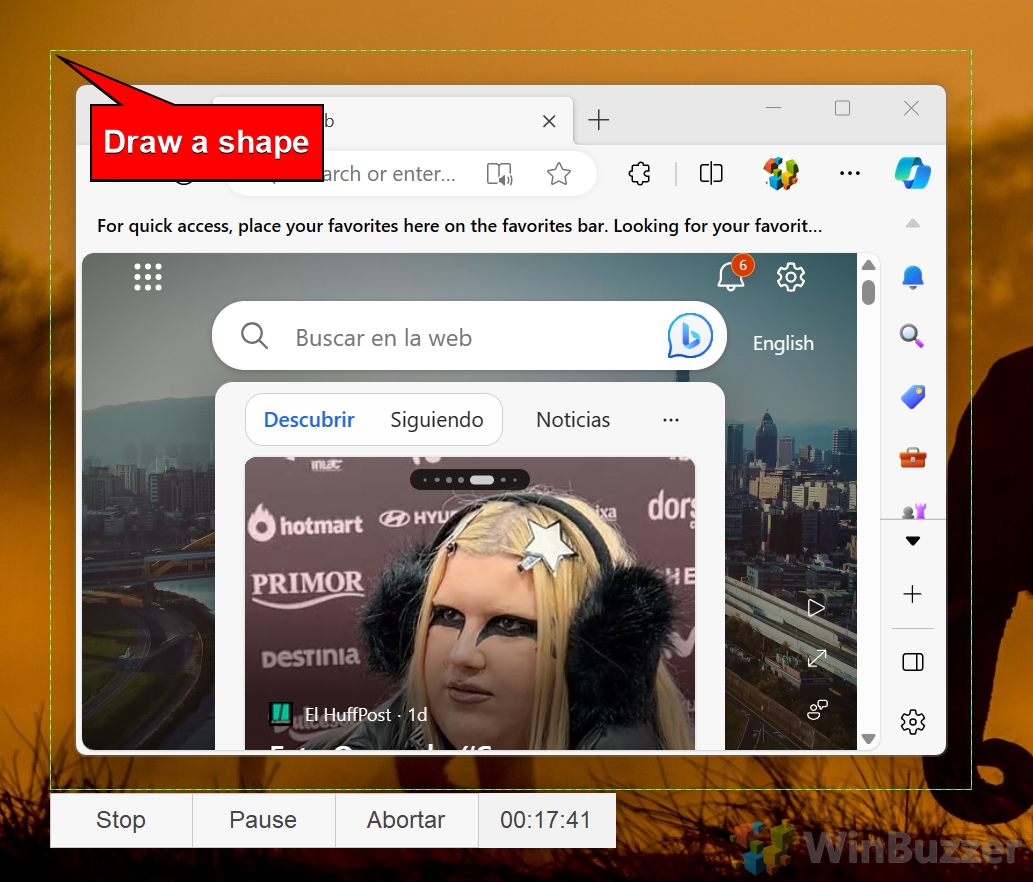
Click and drag your cursor to define the area of the screen you want to record. A red perforated line will outline the selected area.
- Configure Options and Start the Recording
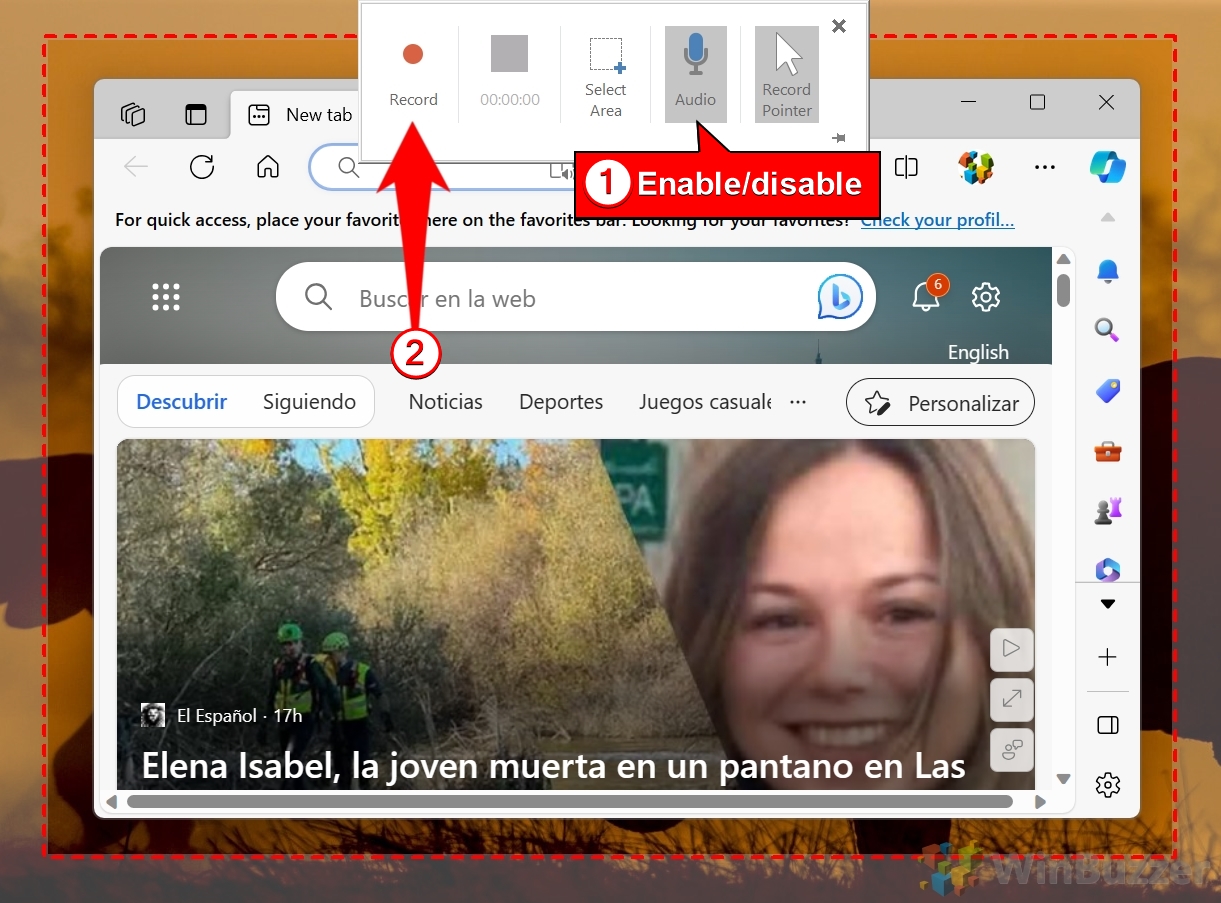
A recording toolbar will appear at the top of your screen. Choose whether to include audio and pointer visibility by toggling the respective buttons. Enabled options will appear highlighted.
Click the “Record” button on the toolbar to begin capturing your screen. The toolbar will automatically minimize but can be restored by moving your mouse to the top of the screen.
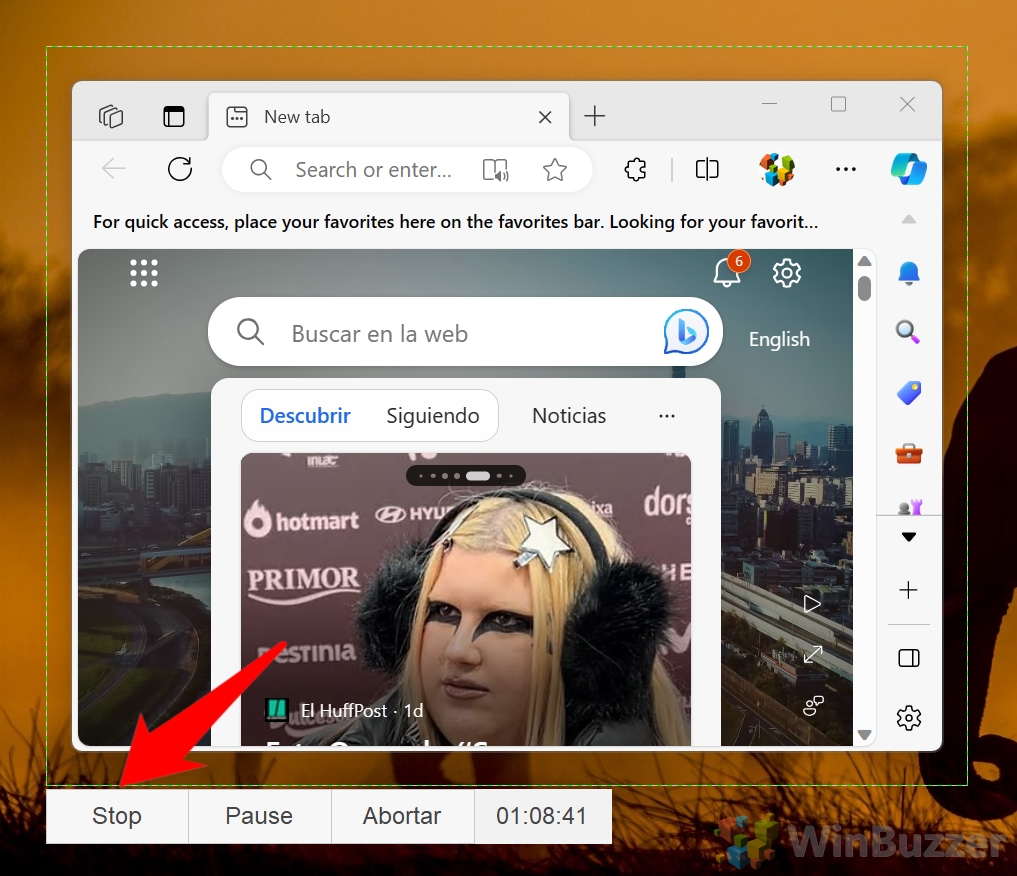
- Stop or Pause the Recording
To stop, click the “Stop” button (a solid blue square) in the toolbar. You can also pause and resume as needed.
- Save the Recording
After stopping, the recording will be embedded into your PowerPoint slide. Right-click the video and select “Save Media As” to save it as a file on your computer.

How to Record Screen with ShareX as a Video
ShareX is a powerful, open-source screen capture tool that excels in flexibility and customization. Its screen recording feature is suitable for users who want to create high-quality videos with extensive format and codec options. While feature-rich, its interface may feel overwhelming to beginners.
Advantages: Free, highly customizable, supports various output formats.
Disadvantages: Steeper learning curve, less intuitive for new users.
Step-by-Step Instructions
- Install and Launch ShareX
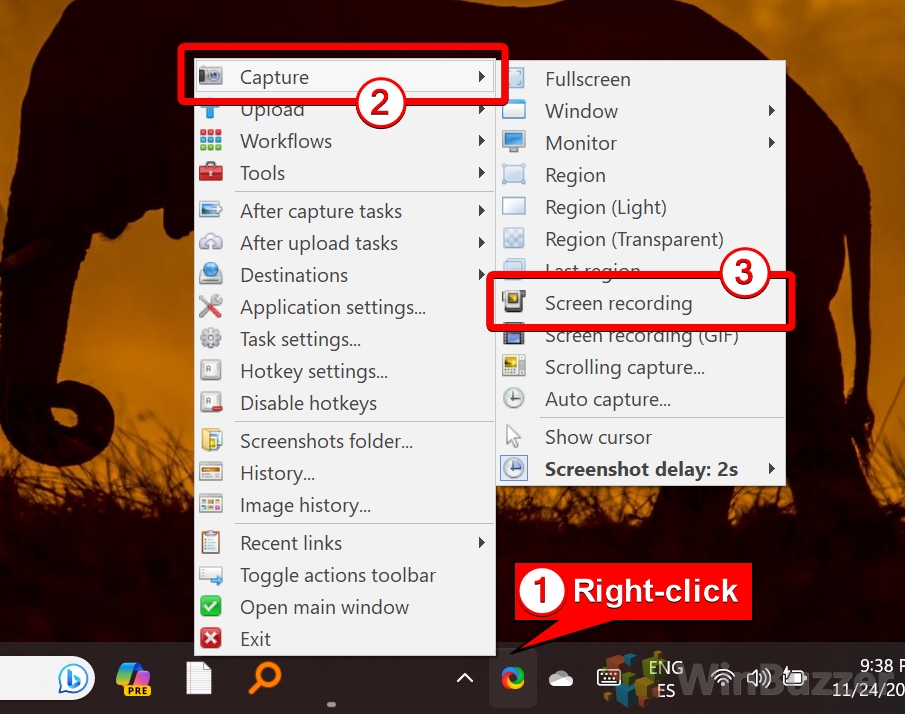
Download ShareX from its official website and install it. Open the application once the installation is complete. - Set the Recording Mode
In the main menu, click “Capture” and select “Screen Recording”.
- Select the Recording Area
Click and drag to specify the portion of the screen you want to record. You can also select the complete screen for a full-screen recording. Once you have selected the area, the screen recording will start automatically.
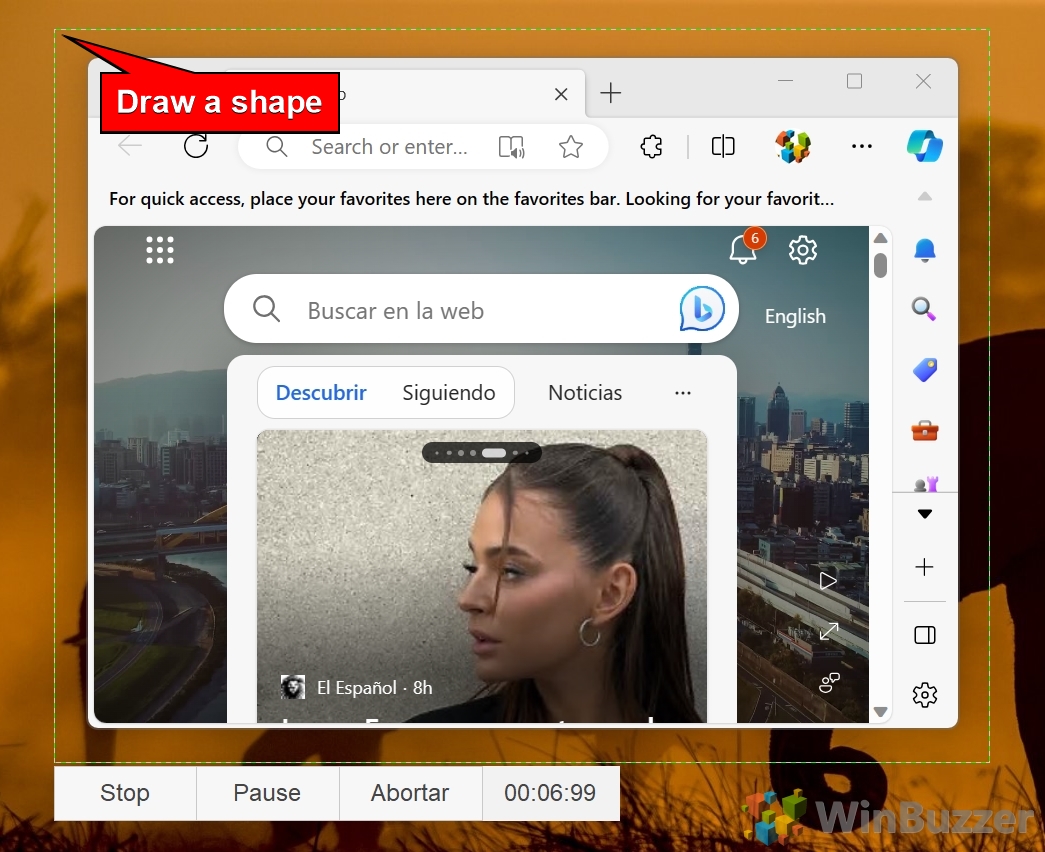
- Stop and Save the Recording
When you’re done, click the Stop button. - Access the Video file of your Screen Recording
ShareX will save the recording to the default folder, or you can choose a custom location in ShareX settings.
How to Record Screen with ShareX as a GIF
ShareX’s ability to create GIFs sets it apart from other tools. This feature is ideal for producing short, looping animations, which are perfect for tutorials or social media content. While it’s great for creating GIFs, it’s not suitable for long or high-resolution recordings.
Advantages: Free, specialized for GIF creation, excellent for short clips.
Disadvantages: Limited to low-resolution, short-duration recordings.
Step-by-Step Instructions
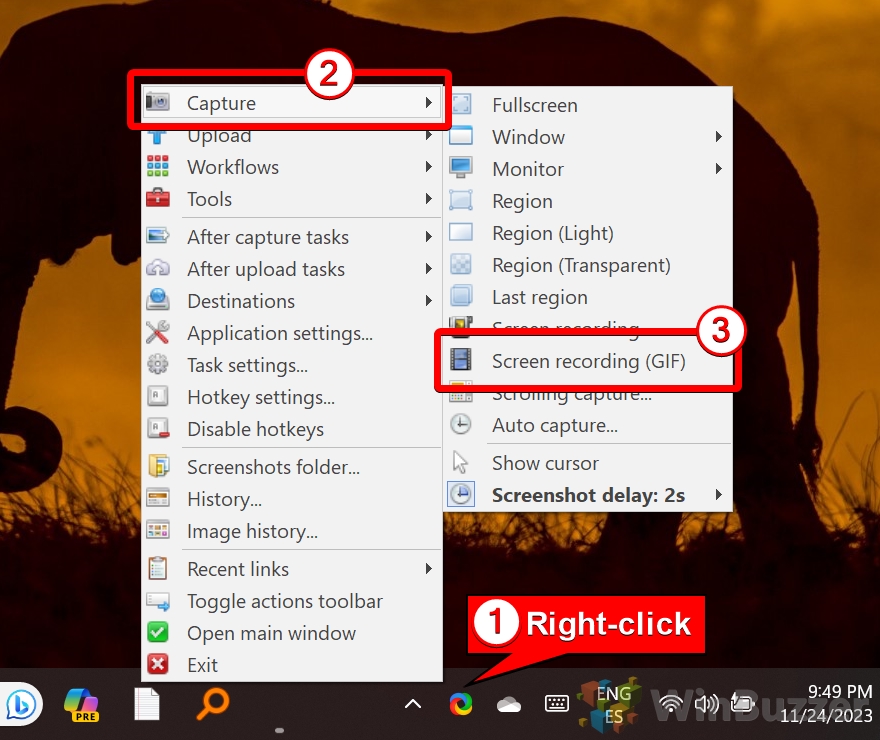
- Open ShareX and Choose GIF Recording
From the main menu, click “Capture” and select “Screen Recording (GIF)”.
- Configure the GIF Settings if needed
Adjust the frame rate and resolution to optimize the GIF quality. ShareX provides a separate configuration menu for these settings. - Select the Recording Area
Click and drag to choose the specific area of the screen to capture as a GIF. Once the area is selected, the screen recording will automatically start.
- Stop Recording and Save File
Click “Stop” to finish the recording. ShareX will save the GIF automatically to the folder specified in ShareX settings.
How to Record Your Screen with OBS Studio
OBS Studio is a free professional-grade screen recording and live streaming tool. It is highly customizable and suitable for advanced users who need precise control over video and audio settings. While powerful, its complexity may be daunting for casual users or beginners.
Advantages: Free, feature-rich, ideal for professional recordings and streaming.
Disadvantages: Requires setup and technical knowledge, overkill for simple tasks.
Step-by-Step Instructions
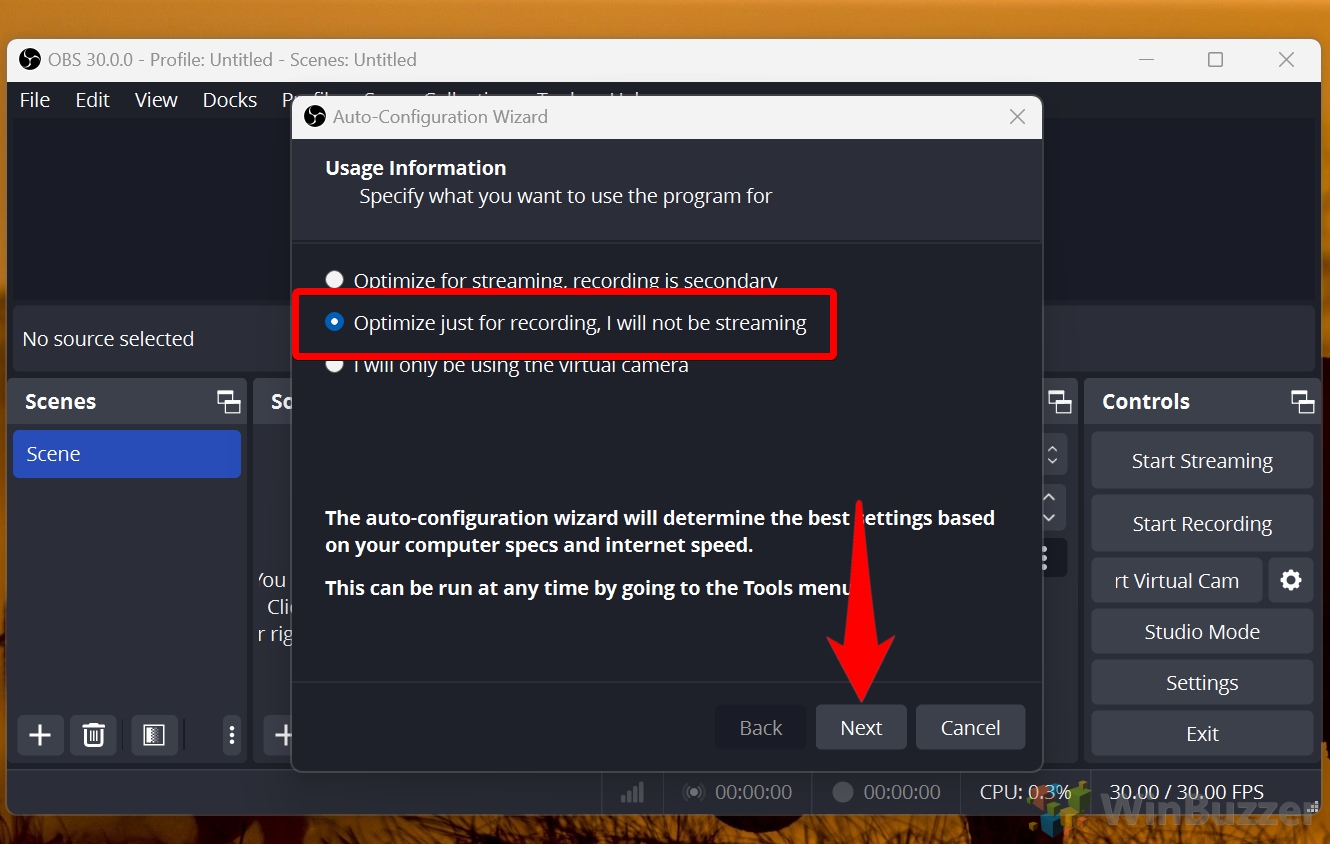
- Install and Launch OBS Studio
Download OBS Studio from the official website or Microsoft Store and install it. Open the app after installation and finish the “Auto-Configuration Wizard”.
- Configure Recording Settings
On the home screen, click Settings and navigate to the Output tab. Adjust the recording path and quality settings as needed.
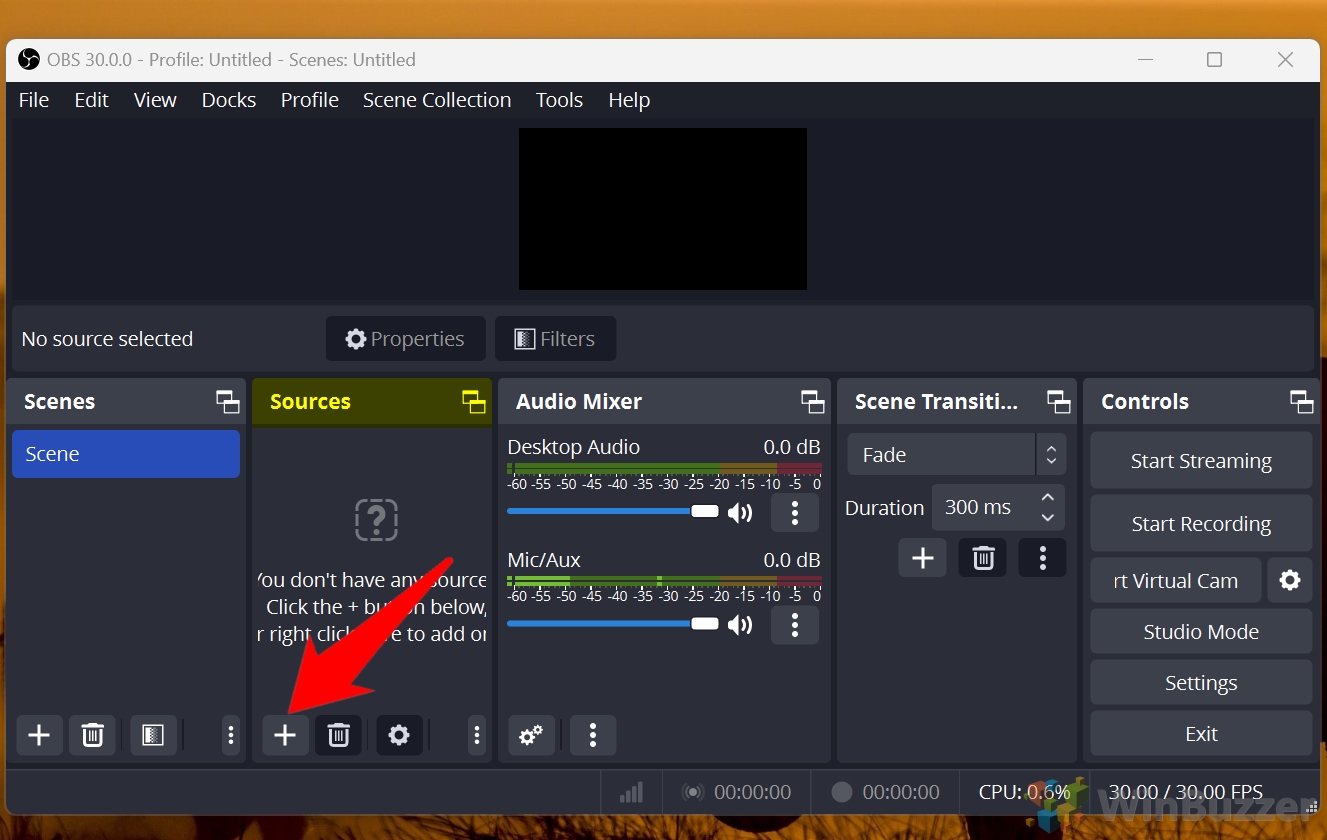
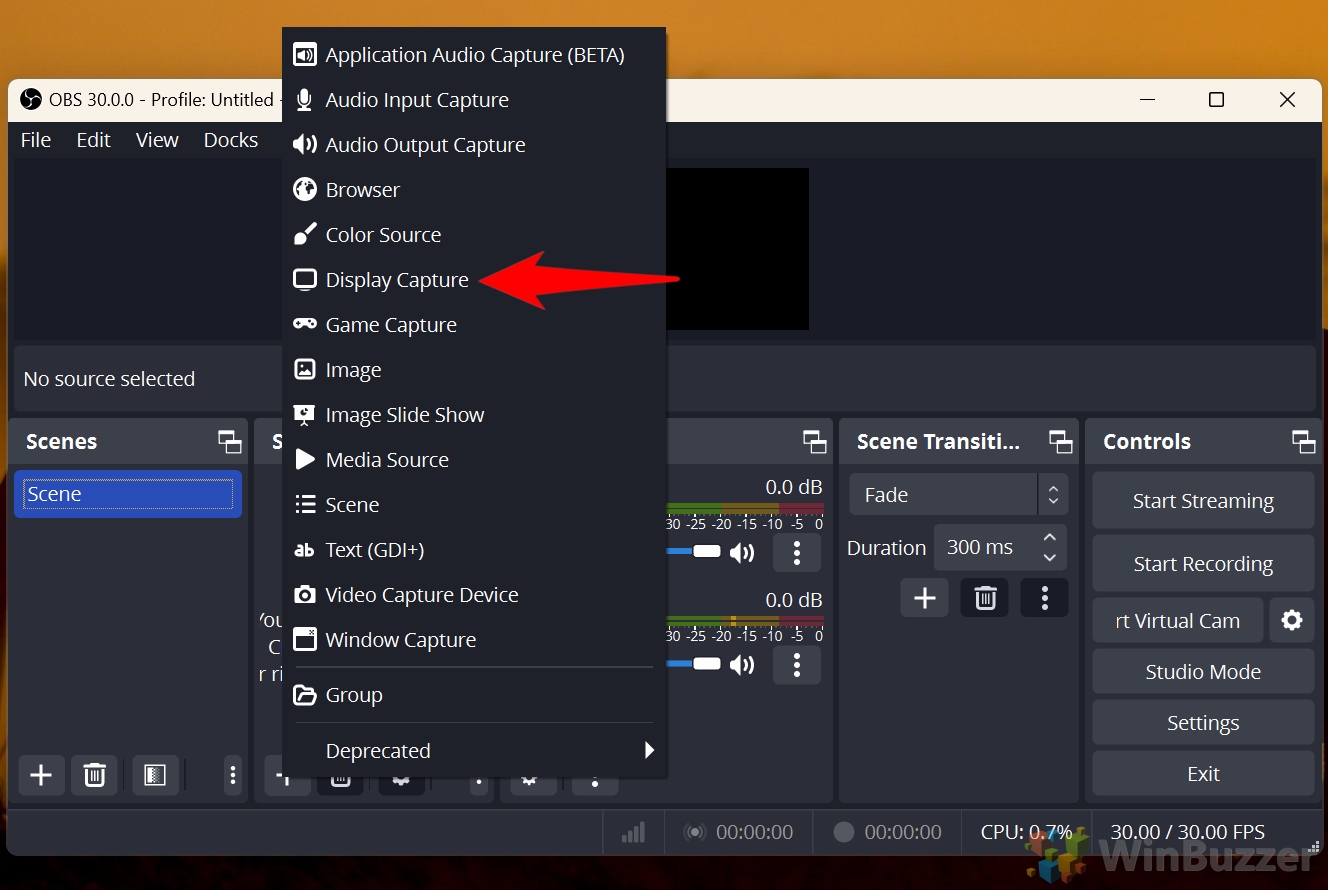
- Open the Sources Menu
Locate the “Sources” box in the main OBS interface. Click the + button to open the “Add Source” menu.
- Select Display Capture
From the dropdown menu, select “Display Capture”. This option allows OBS to record the entire screen.
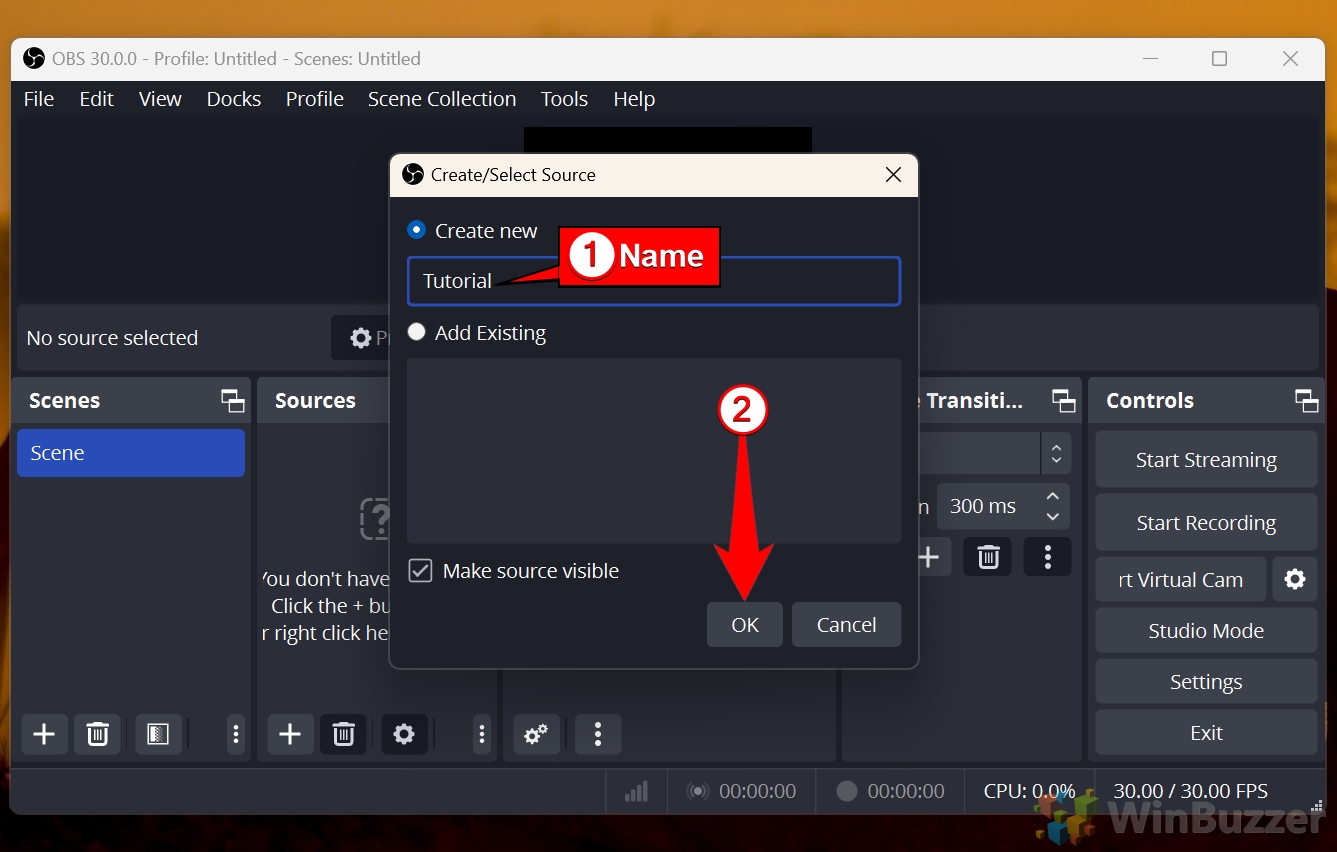
- Configure Display Settings
A dialog box will appear. Name your source (e.g., “Tutorial”) and click “OK”. In the next dialog, choose the monitor you want to capture if you have multiple displays.
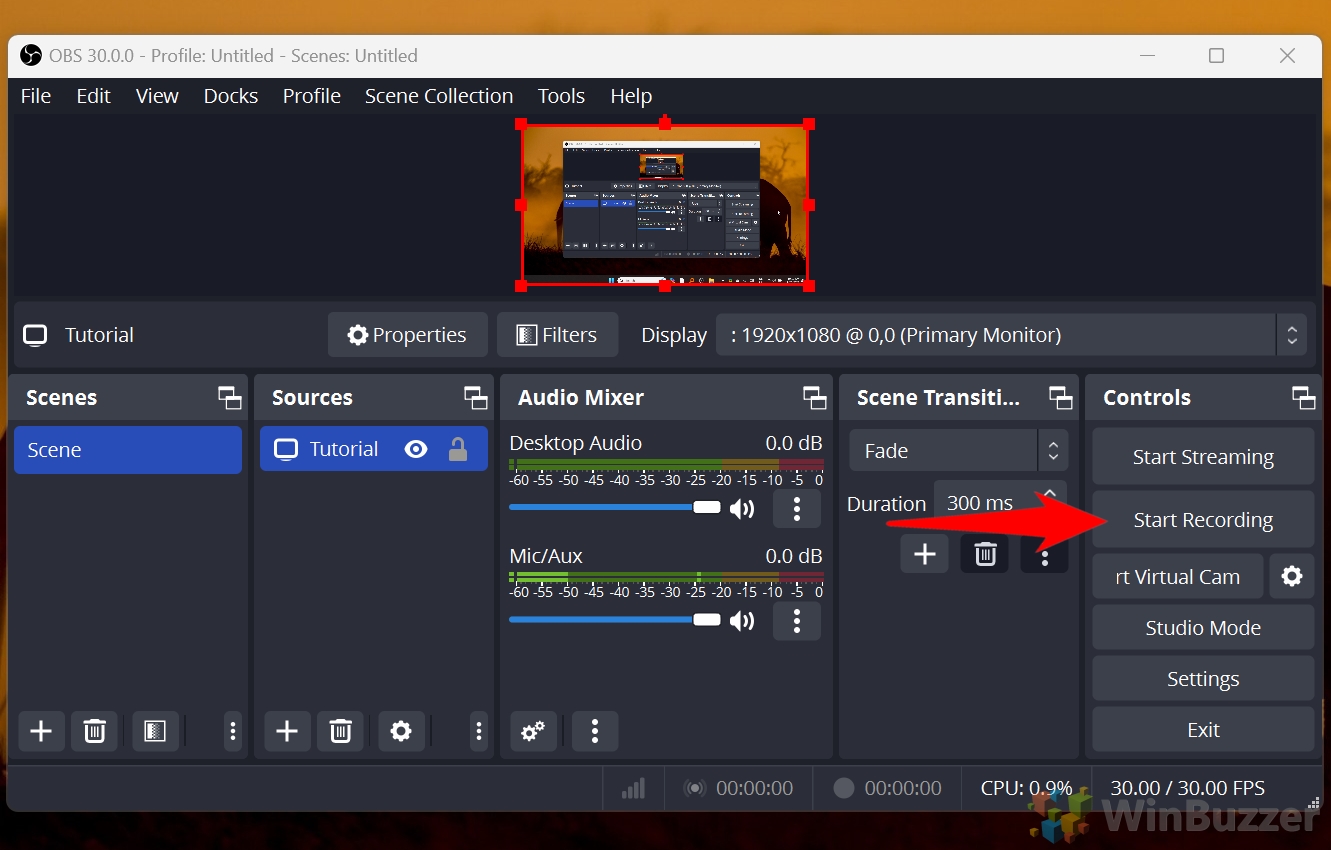
- Start Recording
Click the “Start Recording” button on the bottom-right of the OBS interface.
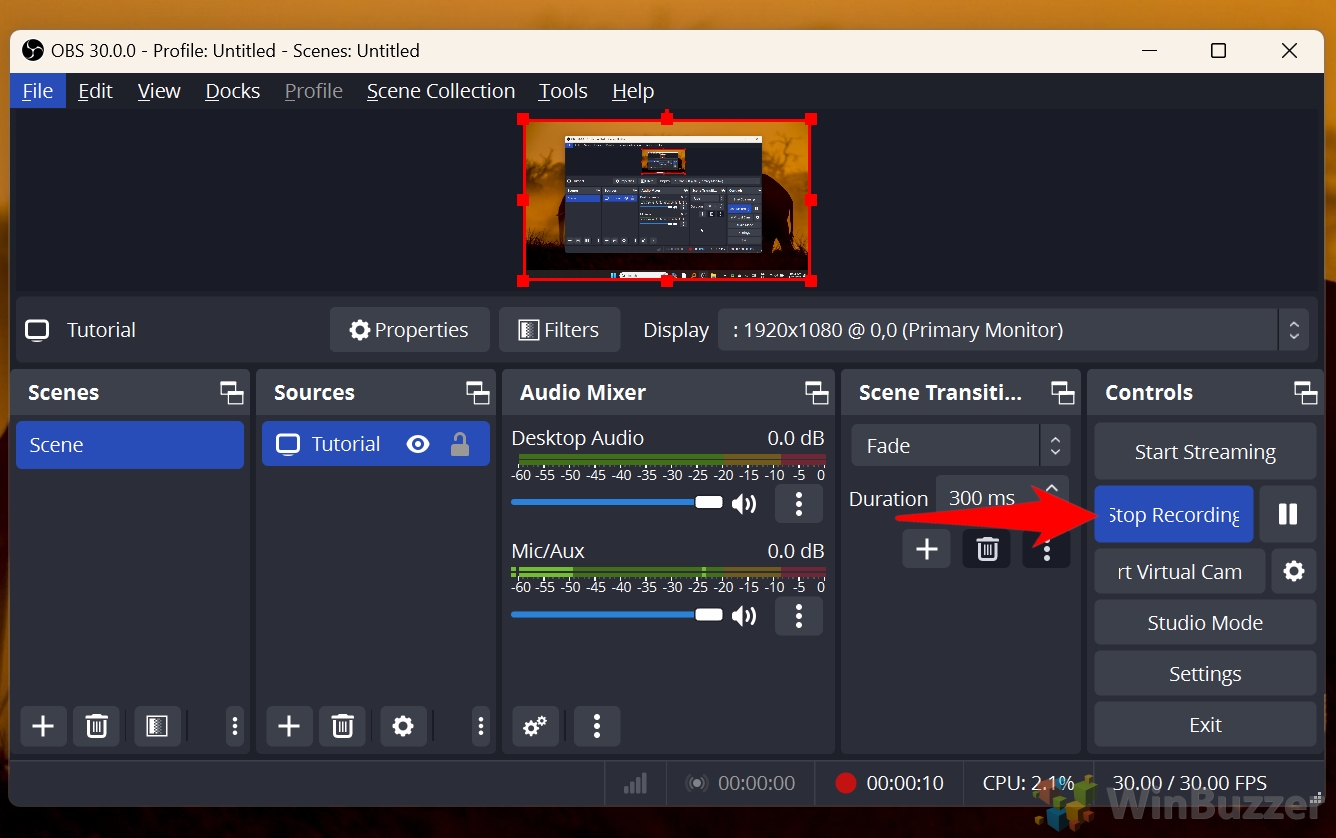
- Stop Recording
When you’re finished, click the “Stop Recording” button. Your videos will be saved to the directory specified in the Output settings.
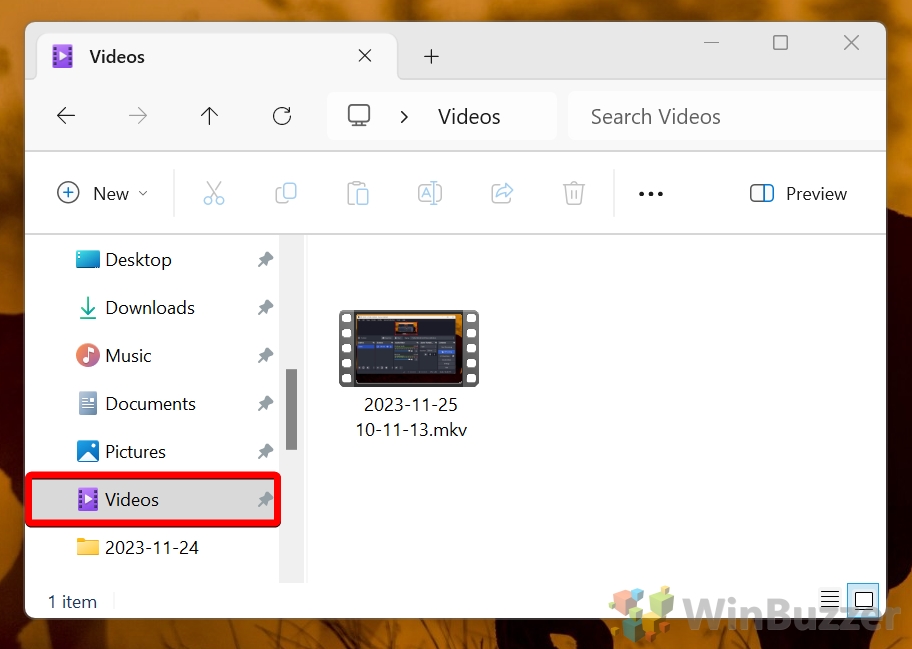
- Locate Your Recording
After stopping the recording, navigate to the folder where OBS Studio saves your files. By default, recordings are stored in C:\Users[YourUsername]\Videos unless you specified a different directory in the Output settings. Open File Explorer and find your file to view or edit it.
FAQ – Frequently Asked Questions About Screen Recording on Windows 11
1. Why is screen recording not working on Windows 11?
Screen recording issues can stem from several factors, such as disabled recording permissions, outdated drivers, or conflicts with other applications. To resolve this:
- Ensure the recording tool is enabled. Go to Settings > Gaming > Xbox Game Bar and toggle it on.
- Verify permissions for screen capture under Settings > Privacy & security > App permissions.
- Update your graphics and audio drivers, as outdated drivers may disrupt screen recording functionality.
- Check for conflicts with third-party apps like overlays, screen-sharing tools, or antivirus software. Close these apps and restart your PC.
If the issue persists, consider reinstalling the tool you’re using or switching to a more robust solution like OBS Studio.
2. How do I record myself and show my screen?
To record both your screen and webcam, OBS Studio offers the most flexibility and quality. Follow these steps:
- Open OBS Studio and click the + icon in the Sources box.
- Add a Display Capture source to record your screen. Configure it to capture your full desktop or a specific monitor.
- Add a Video Capture Device source to include your webcam. Position the webcam feed within the OBS layout to suit your needs (e.g., picture-in-picture format).
- Adjust the audio sources to ensure both your microphone and system audio are included.
- Click Start Recording to capture your screen and webcam simultaneously.
This setup is ideal for presentations, tutorials, or gaming videos where your presence adds a personal touch.
3. How do I turn on background recording in Windows 11?
Background recording is a feature in the Xbox Game Bar that continuously captures your screen and saves the last few minutes of activity. Here’s how to enable it:
- Open Settings and navigate to Gaming > Captures.
- Toggle on Record in the background while I’m playing a game.
- Configure the maximum recording length (e.g., 30 seconds to 10 minutes for most systems). Higher-end PCs may support longer durations.
This feature works best for gaming or full-screen applications and can be triggered with the Windows+Alt+G shortcut to save the last few moments. Note that background recording may impact system performance, so disable it when not needed.
4. How do I record screen activity with audio on Windows 11?
Both the Xbox Game Bar and OBS Studio support audio recording alongside screen capture:
- Xbox Game Bar: Before starting a recording, ensure the microphone icon is enabled. This records your voice along with the system audio.
- OBS Studio: Add an Audio Input Capture source to include your microphone and configure Desktop Audio to capture system sounds. You can adjust individual volume levels for clarity.
These tools allow you to record narration for tutorials or capture in-game audio for gameplay videos.
5. Where are my screen recordings saved in Windows 11?
Screen recordings from different tools are saved in the following locations:
- Xbox Game Bar: Navigate to Videos > Captures in File Explorer.
- OBS Studio: Go to the folder specified under Settings > Output > Recording Path. The default is often Videos.
- ShareX: Open the application settings to find the default save directory, or check the recent recordings section.
If you can’t locate your files, search for recently modified files in File Explorer using the relevant file extension (e.g., .mp4 or .avi).
6. Can I record my screen for free on Windows 11?
Yes, Windows 11 includes several free options for screen recording:
- Xbox Game Bar: A built-in tool for basic recording needs, including system audio and limited editing.
- Snipping Tool: A lightweight app for recording specific areas of the screen, though it doesn’t capture audio.
- ShareX: An open-source program with advanced features, including GIF creation and custom configurations.
- OBS Studio: A professional-grade, free application ideal for high-quality recordings and live streaming.
All these tools are free and require no subscriptions or payments.
7. How can I capture my screen as a GIF?
ShareX is the best tool for creating GIFs from screen recordings. Here’s how:
- Open ShareX and click Capture > Screen Recording (GIF).
- Select the area of the screen you want to record. You can also configure frame rates and resolution under the settings for optimal GIF quality.
- Start and stop the recording as needed. The GIF is saved automatically to the default folder or a custom location you’ve specified.
This is an excellent option for creating short, looping animations for tutorials, bug reports, or social media.
8. How do I capture a specific application window in Windows 11?
You can record a single application window using both the Xbox Game Bar and OBS Studio:
- Xbox Game Bar: Open the application you want to record and press Windows+G. In the Capture window, click Record to capture only the active window.
- OBS Studio: Add a Window Capture source, select the desired application from the dropdown list, and configure its settings.
This method is ideal for creating clean recordings without distractions from other parts of the screen.
9. How long can I record my screen using Windows 11 tools?
The duration of screen recordings depends on the tool you use:
- Xbox Game Bar: Allows up to 4 hours of continuous recording per session.
- OBS Studio: Has no time limits, provided you have sufficient storage space and system resources.
For lengthy recordings, ensure your system is running optimally to prevent interruptions, and check that your drive has adequate free space.
10. How do I record my screen without downloading additional software?
Windows 11 includes built-in tools like the Xbox Game Bar and Snipping Tool, which allow you to record your screen without any downloads. Use Windows+G to launch the Xbox Game Bar for capturing games and other apps. For lightweight tasks, open the Snipping Tool to record specific screen areas. Both options are easy to use and already installed.
Windows 11 and 10 offer several ways to take screenshots. In our other guide, we show you how to take a screenshot using shortcuts, the Snipping tool, the Xbox Game Bar and with the free screenshot tools Greenshot and ShareX.

Related: How to Record Audio on Windows 11 or 10 with Voice Recorder or Audacity
Whether it’s for a presentation, song, or YouTube video, at some point in your life you’ll need to record audio from your computer. In our other guide, we show you how to record audio with the built-in Windows Voice Recorder and Audacity, a free open-source tool.

Related: How to Record System Audio with Stereo Mix