7 Powerful GPU Tweak III Tips for Maximum Gaming Performance
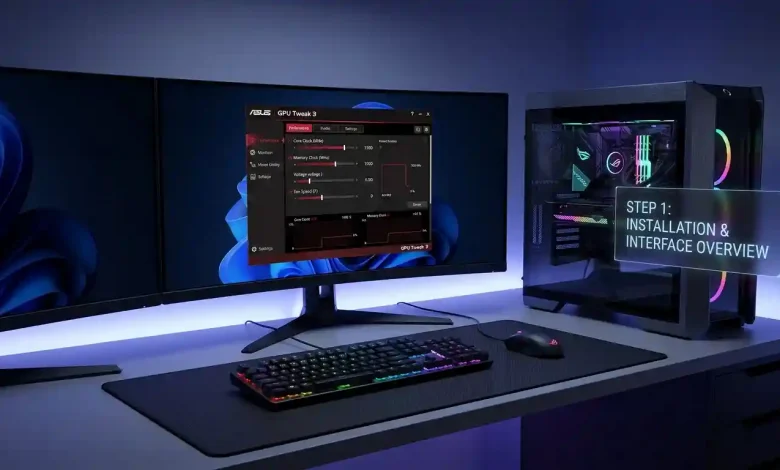
Table of Contents
GPU Tweak 3 stands as a pivotal utility for enthusiasts aiming to extract every ounce of performance from their ASUS graphics cards, unlocking the true potential for maximum gaming performance. In the highly competitive world of PC gaming, even a few extra frames per second can make a significant difference, enhancing fluidity, responsiveness, and overall immersion. This comprehensive guide will delve deep into the intricacies of GPU Tweak 3, providing a detailed setup process, explaining its various features, and offering expert tips to fine-tune your GPU for unparalleled gaming experiences. Whether you are a seasoned overclocker or a newcomer eager to explore performance enhancements, mastering GPU Tweak 3 is an essential step towards elevating your gaming rig beyond factory specifications.
Understanding GPU Tweak 3 and its Interface
GPU Tweak 3 is a proprietary software suite developed by ASUS, designed specifically for monitoring, tweaking, and overclocking ASUS graphics cards. It serves as a centralized hub for managing various aspects of your GPU, from clock speeds and voltage to fan curves and on-screen display (OSD) customization. The software builds upon its predecessors, offering a more refined user interface, enhanced stability, and a broader range of features that cater to both novice users and advanced overclockers alike. Understanding its interface is the first crucial step towards effective utilization.
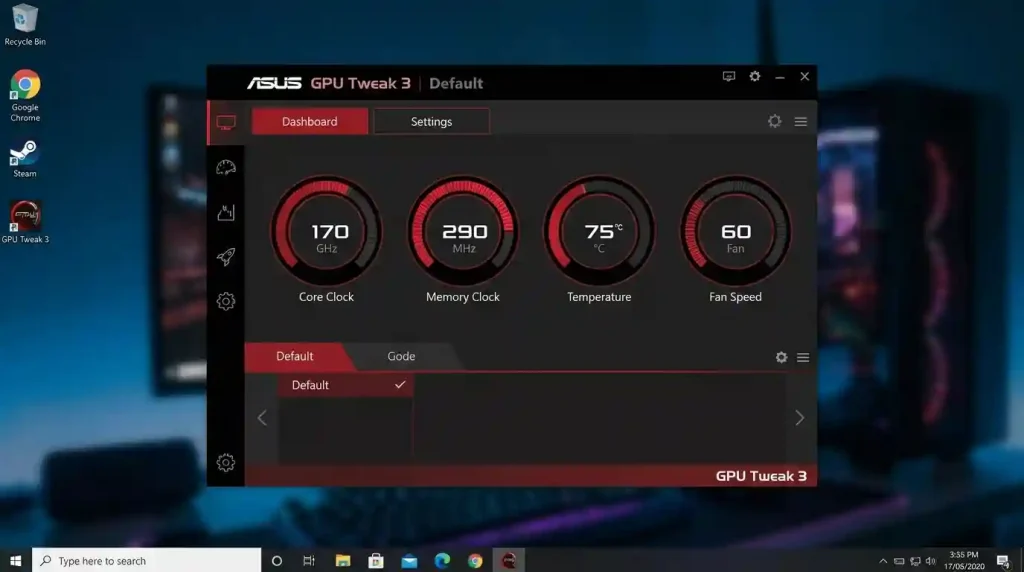
Upon launching GPU Tweak 3, users are greeted with a dashboard that provides a quick overview of their GPU’s current status. This includes real-time readouts of GPU clock speed, memory clock speed, GPU temperature, fan speed, and utilization percentages. The interface is intuitively designed, often featuring a ‘Simple Mode’ for quick adjustments and an ‘Advanced Mode’ for granular control over every parameter. Navigating between these modes and understanding the significance of each displayed metric is fundamental to making informed adjustments. The software also provides access to various profiles, allowing users to switch between different performance settings based on their immediate needs, such as a silent profile for productivity or a gaming profile for demanding titles.
- Monitoring Panel: Displays vital statistics like GPU clock, memory clock, temperature, fan speed, and usage.
- Adjustment Sliders/Inputs: Allows for direct manipulation of core frequencies, voltage, power targets, and fan speeds.
- Profile Management: Enables saving and loading custom configurations for different scenarios.
- OSD Customization: Provides options to display real-time system information during gameplay.
- Tools: Includes features like a GPU-Z integration for detailed hardware information and a stress test utility.
Initial Setup and System Requirements
Before diving into performance tuning, proper installation and system checks are paramount. The journey to maximum gaming performance begins with a smooth and correct initial setup of GPU Tweak 3.
- Download GPU Tweak 3: Always download the latest version of GPU Tweak 3 from the official ASUS support website. This ensures compatibility with your specific ASUS graphics card model and provides access to the newest features and bug fixes. Avoid downloading from unofficial sources to mitigate security risks.
- Check Compatibility: While GPU Tweak 3 is designed for ASUS GPUs, it’s wise to double-check that your specific graphics card model is supported by the current software version. Compatibility information is usually available on the download page.
- Installation Process:
- Once downloaded, run the installer as an administrator.
- Follow the on-screen prompts, accepting the license agreement.
- It’s recommended to perform a clean installation if you are upgrading from an older version of GPU Tweak or another overclocking utility. This often involves uninstalling previous versions and restarting your system before installing GPU Tweak 3.
- Driver Updates: Ensure your graphics card drivers are up-to-date. Outdated drivers can lead to instability, performance bottlenecks, or even prevent GPU Tweak 3 from functioning correctly. NVIDIA GeForce Experience or AMD Adrenalin Software can assist with driver management.
- System Stability Check: Before making any adjustments, ensure your system is stable at stock settings. Run a few demanding games or benchmarks to confirm there are no underlying hardware or software issues that could be misattributed to GPU Tweak 3 adjustments later on. For a comprehensive gaming experience, consider factors beyond just the GPU, such as optimizing Windows for gaming.
A stable foundation ensures that any performance gains achieved through GPU Tweak 3 are genuinely attributable to your adjustments, not merely masking pre-existing system instabilities. Taking the time for this initial setup and verification will save considerable troubleshooting effort down the line.
Core Overclocking Principles for Gaming
Overclocking is the process of increasing a component’s clock rate beyond its factory-specified speed, thereby boosting its performance. For graphics cards, this primarily involves the GPU core clock and the memory clock. While the prospect of free performance is enticing, it’s crucial to approach overclocking with a solid understanding of its underlying principles and potential risks.
- GPU Clock Speed: This dictates how many cycles per second the GPU core completes. Increasing it allows the GPU to process more data and render frames faster. Modern GPUs often feature boost clocks that dynamically increase speeds based on workload and temperature, and overclocking aims to raise this baseline further.
- Memory Clock Speed: Graphics cards utilize dedicated VRAM (Video RAM). Increasing the memory clock speed enhances the bandwidth between the GPU and its memory, allowing for faster data transfer, which is particularly beneficial for high-resolution textures and complex scenes.
- Voltage Control: Supplying more voltage to the GPU and memory can stabilize higher clock speeds. However, increased voltage also generates more heat and can reduce the lifespan of the component if not managed carefully. Most users should exercise extreme caution or avoid manual voltage adjustments entirely, especially when starting out.
- Power Limit and Temperature Target: These are critical parameters that govern how much power the GPU can draw and what temperature it will try to maintain. Increasing the power limit allows the GPU to sustain higher clock speeds for longer durations without throttling. The temperature target sets a maximum temperature the GPU will attempt to stay below, often by reducing clock speeds if exceeded. Balancing these limits is key to stable and sustained overclocking.
The primary risk associated with overclocking is system instability, which can manifest as crashes, artifacts on screen, or even system freezes. In extreme cases, excessive voltage or heat can potentially damage hardware, although modern GPUs have built-in safeguards to prevent catastrophic failure. A cautious, iterative approach is always recommended, making small adjustments and thoroughly testing stability after each change. Understanding these core principles forms the bedrock of a successful and safe overclocking experience with GPU Tweak 3.
Step-by-Step Overclocking with GPU Tweak 3
With an understanding of GPU Tweak 3’s interface and the principles of overclocking, we can now proceed with the practical steps to enhance your GPU’s performance. Remember to make small, incremental changes and test thoroughly.
- Choose Your Mode: For beginners, the ‘Simple Mode’ offers pre-defined profiles like ‘OC Mode’ or ‘Gaming Mode’ which provide a safe performance boost. For more control, switch to ‘Advanced Mode’. We will primarily focus on Advanced Mode for maximum customization.
- Increase Power Limit and Temperature Target: Navigate to the ‘Advanced Mode’ and locate the Power Target (or Power Limit) and Temp Target (or Temperature Limit) sliders. Drag the Power Target to its maximum allowable value (e.g., +15% to +25%). Similarly, set the Temp Target to a reasonable maximum, typically around 80-85°C, ensuring it doesn’t throttle performance unnecessarily. These adjustments allow the GPU more headroom for higher clocks.
- Adjust GPU Boost Clock: This is the primary driver of gaming performance. Incrementally increase the ‘GPU Boost Clock’ slider by small amounts (e.g., +10 to +20 MHz at a time). After each adjustment, apply the changes and run a stability test.
- Test Stability: Use a demanding game or a dedicated benchmarking tool like FurMark, Heaven Benchmark, or 3DMark. Pay close attention to visual artifacts, crashes, or system freezes. If you encounter any instability, reduce the last clock speed increment until stable. For example, if +60 MHz crashes, try +50 MHz.
- Adjust Memory Clock: Once you’ve found a stable GPU clock, repeat the incremental adjustment process for the ‘Memory Clock’. Increase it by small steps (e.g., +50 to +100 MHz at a time), apply, and test stability. Memory overclocking can sometimes introduce visual artifacts before a full crash.
- Voltage Adjustment (Optional, Advanced Users Only): If you’ve hit a wall with clock speeds and still desire more, you can consider a slight increase in ‘Voltage’ (core voltage). However, this significantly increases heat and risk. Proceed with extreme caution and only after extensive research. Many modern GPUs are voltage-locked or offer minimal voltage control within software to protect the hardware.
- Save Your Profile: Once you’ve found a stable and performant overclock, save it as a custom profile within GPU Tweak 3. This allows you to quickly load these settings whenever you want to game. Create separate profiles for different scenarios, such as a high-performance profile for demanding games and a quieter, cooler profile for less intensive tasks.
The process requires patience and a systematic approach. Documenting your changes and observed stability can be helpful. Remember that every GPU is unique, and results will vary even between identical models. The goal is to find the highest stable clock speeds your specific card can achieve without excessive heat or instability.
| Profile Name | GPU Boost Clock Offset (MHz) | Memory Clock Offset (MHz) | Power Limit (%) | Fan Curve | Typical Use Case |
|---|---|---|---|---|---|
| Default | +0 | +0 | 100% | Auto | General use, light gaming |
| Gaming Boost | +50 to +100 | +100 to +200 | 105-115% | Aggressive Auto | Moderate to demanding gaming |
| Max OC | +100 to +200 | +200 to +500 | 120%+ | Custom (Performance) | Competitive gaming, benchmarking |
| Silent Mode | -50 to +0 | +0 | 90-100% | Custom (Silent) | Quiet operation, media consumption |
Advanced Features for Fine-Tuning
Beyond core clock and memory speed adjustments, GPU Tweak 3 offers a suite of advanced features that can further refine your gaming experience, ensuring optimal balance between performance, thermals, and acoustics.
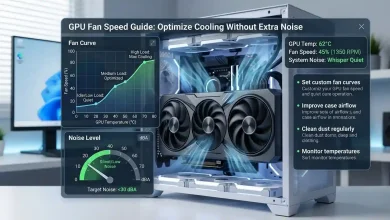
- Fan Control and Custom Fan Curves: The default fan curve is designed for general use, but for maximum gaming performance, a more aggressive fan curve is often beneficial. In Advanced Mode, you can manually adjust the fan speed percentage at various temperature points. Creating a custom fan curve allows you to prioritize cooling and prevent thermal throttling, even if it means slightly increased noise levels. A well-designed custom curve can keep your GPU cooler under load, allowing it to maintain higher boost clocks for longer. Experiment with different fan speeds at idle and under load to find a balance that suits your preference.
- On-Screen Display (OSD): The OSD is an invaluable tool for real-time monitoring of your GPU’s performance while gaming. GPU Tweak 3 allows extensive customization of the OSD, letting you choose which metrics to display (e.g., FPS, GPU temperature, GPU usage, clock speeds, VRAM usage, CPU temperature, RAM usage, etc.) and where on the screen they appear. This immediate feedback helps you gauge the impact of your overclocking efforts and identify any potential bottlenecks or thermal issues during actual gameplay. Being able to see these metrics without tabbing out of your game is crucial for identifying how different game settings or overclocking profiles affect performance.
- Hotkeys: For quick adjustments or switching between profiles without exiting your game, GPU Tweak 3 supports customizable hotkeys. You can assign hotkeys to toggle OSD, apply specific overclocking profiles, or even launch specific applications. This feature enhances convenience and allows for dynamic adjustments during a gaming session.
- Profile Linking: Some advanced users may create specific profiles for individual games. GPU Tweak 3 allows you to link a profile to a game executable. When that game is launched, GPU Tweak 3 will automatically apply the associated profile, ensuring optimal settings without manual intervention. This is particularly useful if different games benefit from different overclocking strategies.
Leveraging these advanced features transforms GPU Tweak 3 from a simple overclocking tool into a comprehensive performance management suite. Mastering these elements allows for a truly personalized and optimized gaming setup, tailored to your specific hardware and gaming preferences. It’s also worth considering that a robust understanding of overclocking principles on Wikipedia can further empower users in their quest for peak performance.
Troubleshooting and Best Practices
Even with a careful approach, you might encounter issues during your overclocking journey. Knowing how to troubleshoot and adhering to best practices can save you from frustration and potential hardware stress.
- Common Issues and Solutions:
- System Instability/Crashes: This is the most common sign of an unstable overclock. The immediate solution is to reduce the last increment you made to either the GPU clock or memory clock. If the system fails to boot, you may need to clear your motherboard’s CMOS (refer to your motherboard manual) or boot into Safe Mode to uninstall GPU Tweak 3 and revert to default settings.
- Visual Artifacts: Flickering, strange textures, or colored dots on screen usually indicate an unstable memory overclock. Reduce the memory clock offset until the artifacts disappear.
- Driver Crashes/Black Screens: Similar to instability, these are often GPU core clock related. Reduce the GPU boost clock. Ensure your graphics drivers are up-to-date.
- Thermal Throttling: If your GPU temperatures reach uncomfortable levels (e.g., above 85°C) and performance drops, it’s likely due to thermal throttling. Improve your case airflow, adjust your fan curve to be more aggressive, or reduce your overclock.
- Reverting to Stable Settings: GPU Tweak 3 typically has a ‘Default’ or ‘Reset’ button that can instantly revert all settings to factory specifications. This is your go-to option if you encounter severe instability. Always save your stable profiles so you can quickly return to a known good configuration.
- Monitoring Temperatures and System Health: Continuously monitor your GPU and CPU temperatures, as well as usage levels, using GPU Tweak 3’s built-in monitoring or external tools like HWMonitor. High temperatures are the biggest enemy of hardware longevity and stable performance. If your temperatures are consistently high, consider improving your PC’s cooling solution, such as adding more case fans or upgrading your CPU cooler, which can indirectly benefit GPU temperatures by reducing overall case heat. A well-built system with good airflow, especially one created after carefully following a guide for building a gaming PC, will provide a better foundation for overclocking.
- Regular Updates: Keep GPU Tweak 3 and your graphics drivers updated. Developers frequently release updates that improve stability, add new features, and enhance compatibility. These updates can also sometimes unlock further performance potential or address issues that might be limiting your current overclock.
- Patience and Iteration: Overclocking is not a one-time setup; it’s an iterative process of tweaking, testing, and refining. Be patient, make small changes, and thoroughly test for extended periods to ensure long-term stability. What appears stable after a 10-minute benchmark might crash after an hour of intense gaming.
By following these troubleshooting tips and best practices, you can navigate the complexities of GPU overclocking with greater confidence and maintain a healthy, high-performing gaming system. The aim is to achieve a stable performance boost that enhances your gaming experience without compromising the longevity or reliability of your hardware.
Conclusion
GPU Tweak 3 serves as an indispensable tool for ASUS graphics card owners eager to push the boundaries of their hardware for maximum gaming performance. From its intuitive interface to its comprehensive suite of advanced features, it provides all the necessary controls to monitor, fine-tune, and overclock your GPU. By diligently following the setup guide, understanding the core principles of overclocking, and applying the step-by-step adjustment process, gamers can unlock significant performance gains, translating into smoother frame rates, enhanced visual fidelity, and a more responsive gaming experience.
However, it is crucial to approach overclocking with caution and a commitment to best practices. Incremental adjustments, thorough stability testing, and vigilant temperature monitoring are the cornerstones of a successful and safe overclock. While the allure of higher clock speeds is strong, prioritizing stability and hardware longevity is paramount. By leveraging GPU Tweak 3 responsibly, you empower yourself to extract the full potential of your ASUS graphics card, ensuring that your gaming rig consistently delivers an elite-tier performance. This dedication to fine-tuning goes hand-in-hand with broader system optimizations, such as optimizing Windows for gaming, to create a truly seamless and high-performing setup. The journey to ultimate gaming performance is continuous, and GPU Tweak 3 is your trusted companion along the way.