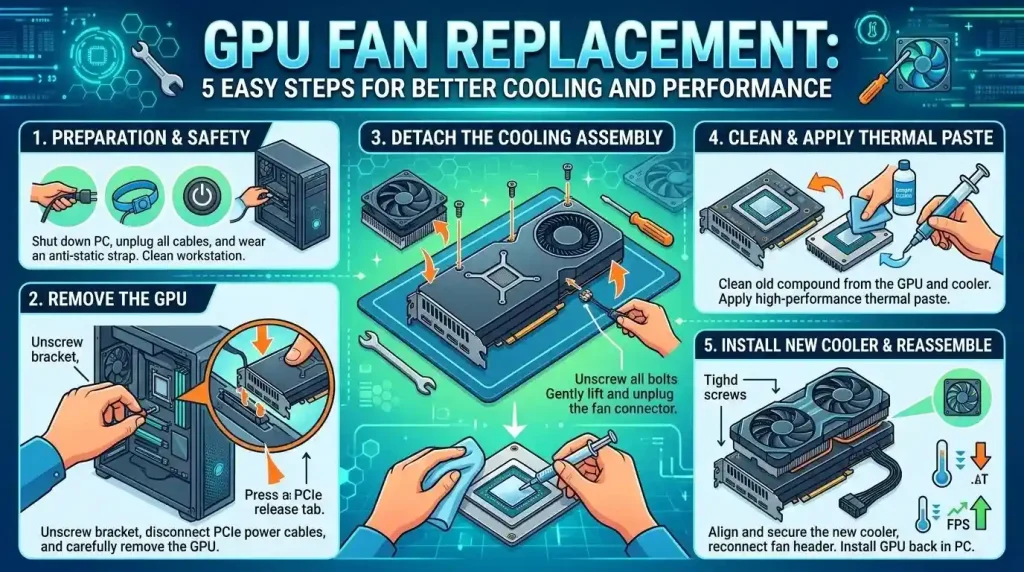
GPU Fan Replacement: 5 Easy Steps for Better Cooling and Performance
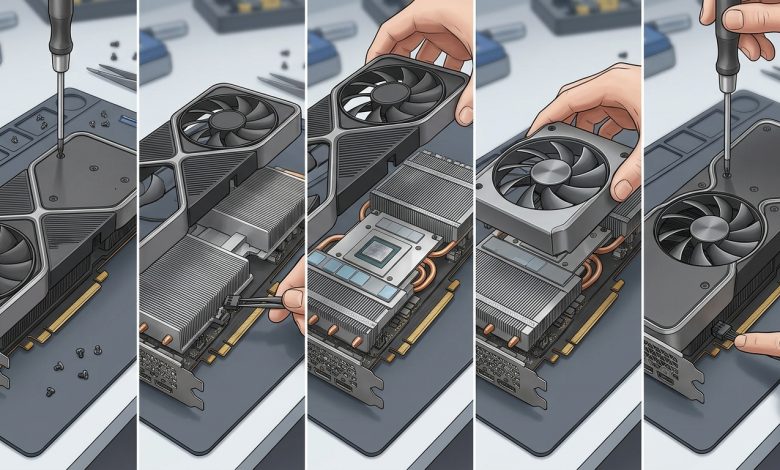
Table of Contents
GPU fan replacement is a critical maintenance task for PC enthusiasts and gamers experiencing issues with their graphics cards. Overheating graphics cards can lead to severe performance degradation, system instability, and even permanent hardware damage. The GPU, or Graphics Processing Unit, is a vital component in any modern computer, especially for tasks involving heavy graphical loads like gaming, video editing, and 3D rendering. When a GPU overheats, its performance is automatically reduced, a process known as thermal throttling, to prevent damage. This article provides a comprehensive, step-by-step tutorial on how to replace GPU fans, ensuring your graphics card runs cool and efficiently once again.
Understanding GPU Overheating: Causes and Symptoms
Overheating in graphics cards is a common problem with various underlying causes. Understanding these causes and recognizing the symptoms is the first step towards resolving the issue. The primary and most direct cause of overheating is a decrease in the cooling system’s efficiency or a design flaw.
Common Causes:
- Dust Buildup: Over time, dust, pet hair, and other debris accumulate on the graphics card fans and heatsink fins, acting as a thermal insulator. This severely hinders heat exchange, preventing heat from being effectively discharged and leading to a sharp drop in cooling efficiency. Dust accumulation is often cited as the most common and overlooked cause of GPU overheating.
- Aging Thermal Paste/Pads: Thermal paste and pads are crucial for filling microscopic gaps between the GPU core and the heatsink base, ensuring efficient heat transfer. After 2-3 years of use, or extended exposure to high-temperature environments, thermal paste can dry out and crack, losing its effectiveness.
- Fan Malfunction or Insufficient Speed: GPU fans are the active component of the cooling system. If a fan stops spinning, has an abnormal speed, or makes strange noises (like clicking), it indicates a malfunction. A complete loss of cooling airflow due to fan malfunction will cause heat to accumulate rapidly inside the graphics card.
- High-Load Operation: Running demanding applications such as AAA games, high-resolution rendering, or AI/deep learning training tasks can push the GPU to its limits, generating significant heat. If the cooling system isn’t adequate for sustained high loads, overheating can occur.
- Poor Case Airflow: Even with a clean GPU, inefficient airflow within the PC case can lead to heat recirculation and buildup. Proper case fan configuration (intake and exhaust) is essential for effective heat removal.
Symptoms of GPU Overheating:
Identifying overheating often involves observing several key symptoms:
- Excessive Fan Noise: Fans spinning at maximum speed and producing loud operation, sometimes described as a “jet engine” sound, is a common indicator.
- Sudden Performance Drops (Thermal Throttling): The GPU automatically reduces its clock speeds and performance when temperatures exceed safe limits (typically 80-85°C) to protect itself. This results in noticeable frame rate drops and stuttering during demanding tasks or gaming.
- Visual Artifacts or Display Glitches: These can manifest as green boxes, flickering textures, random lines, distorted images, or black screens.
- System Freezes or Unexpected Reboots: Overheating can lead to system instability, causing the PC to freeze entirely, or experience unexpected reboots and crashes, sometimes accompanied by a Blue Screen of Death (BSOD).
- High Temperatures Reported by Monitoring Tools: Using software like MSI Afterburner or HWMonitor to monitor GPU temperatures will show readings consistently exceeding 85-90°C under load, indicating a danger zone for long-term use.
When to Consider GPU Fan Replacement
While cleaning dust and optimizing case airflow are often the first steps in troubleshooting GPU overheating, there comes a point where fan replacement becomes necessary. If your GPU is old or the fans are noisy, they may be failing.
Key indicators for fan replacement include:
- Audible Malfunction: Clicking, grinding, or excessive rattling noises from the GPU fans suggest worn-out bearings or physical damage to the fan blades. Even if the fan still spins, abnormal noises indicate it’s not operating optimally and could fail soon.
- Fans Not Spinning: If one or more GPU fans completely stop spinning, even under heavy load, despite verifying no 0dB mode is active or software issues, replacement is usually the only solution.
- Ineffective Cooling After Cleaning and Repasting: If you’ve already thoroughly cleaned the heatsink and fans, and replaced the thermal paste and pads (if necessary), but still experience high temperatures and thermal throttling, the fans themselves might be inefficient or defective.
- Age of the Graphics Card: Fans, like any mechanical component, have a lifespan. Graphics cards used for several years, especially under heavy loads, are more prone to fan failure.
- Physical Damage: Visible damage to fan blades, the fan housing, or the fan’s power cable necessitates replacement.
It’s worth noting that some modern GPUs have a 0dB mode where fans only spin when the temperature reaches a certain threshold. Before concluding fan failure, ensure this mode isn’t active, or manually adjust fan speeds using software like MSI Afterburner to test their operation.
Gathering Your Tools and Materials
Before you begin the GPU fan replacement process, it’s crucial to gather all the necessary tools and materials. Having everything at hand will ensure a smoother and safer operation.
| Category | Item | Purpose |
|---|---|---|
| Essential Tools | Replacement GPU Fan(s) | The core component to be installed. Ensure it’s compatible with your specific GPU model. |
| Small Screwdriver Set (Phillips, Torx) | For removing various screws securing the GPU shroud, heatsink, and fans. | |
| Thermal Paste (High-quality) | To ensure efficient heat transfer between the GPU die and the heatsink. Required if the heatsink is removed. | |
| Thermal Pads (various thicknesses, if necessary) | To replace old, degraded pads on VRAM and VRMs. Essential if you remove the heatsink completely. | |
| Isopropyl Alcohol (90% or higher) | For cleaning old thermal paste and residue from the GPU die and heatsink. | |
| Lint-free Cloths or Cotton Swabs/Q-tips | For applying isopropyl alcohol and wiping away residue. | |
| Recommended Safety & Convenience | Anti-static Wrist Strap | To prevent electrostatic discharge (ESD) damage to sensitive components. |
| Clean, Well-lit Workspace | Essential for visibility and organization, preferably on a flat, static-free surface. | |
| Tweezers | Helpful for handling small screws, connectors, and thermal pads. | |
| Plastic Pry Tool (Spudger) | Useful for gently disconnecting cables or separating plastic components without scratching. | |
| Compressed Air Canister or Blower | For thoroughly cleaning dust from heatsinks and hard-to-reach areas. | |
| Small Containers or Screw Tray | To keep track of different sizes and types of screws, preventing loss and mix-up. |
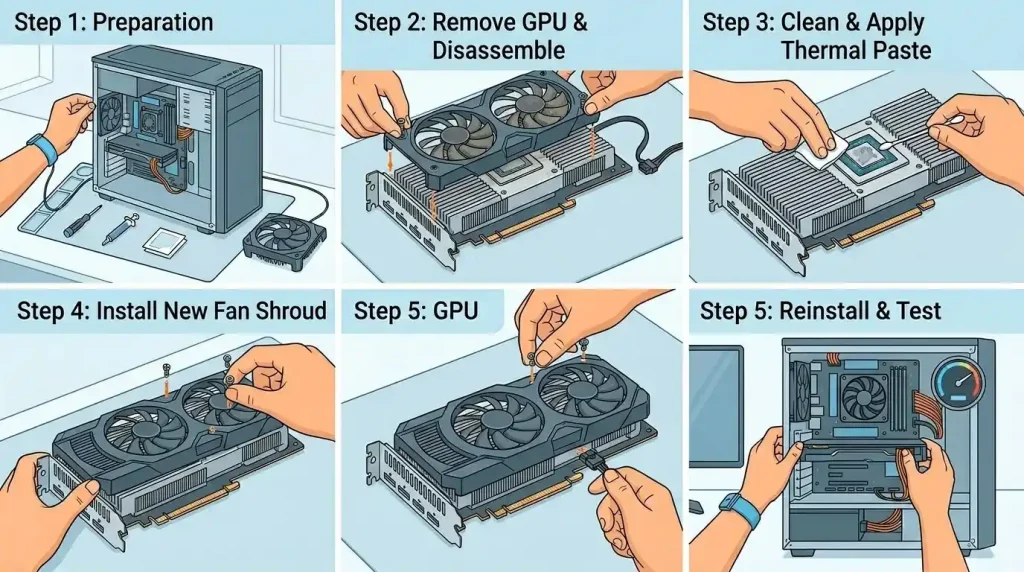
Pre-Replacement Steps: Preparation and Safety
Before you even touch your graphics card, proper preparation and adherence to safety guidelines are paramount. This minimizes the risk of damage to your components and injury to yourself.
1. Prepare Your Workspace:
Set up a clean, well-lit, and organized area. A flat, static-free surface is ideal to prevent damage to your graphics card from electrostatic discharge (ESD).
2. Power Down and Unplug:
Completely shut down your computer and unplug all power cables from the wall outlet. Press the PC’s power button for a few seconds after unplugging to discharge any residual power.
3. Ground Yourself:
Wear an anti-static wrist strap connected to a grounded metal object (like your PC case’s metal frame) to prevent static electricity buildup. If you don’t have one, regularly touch a metal part of the case to discharge static.
4. Open the PC Case:
Remove the side panel of your PC case, typically by unscrewing a few screws at the back.
Step-by-Step GPU Fan Replacement Guide
This section outlines the detailed steps to replace your GPU fans. Remember that specific graphics card models may have slight variations, so it’s always helpful to look for a model-specific teardown video if available.
Removing the Graphics Card
This is the initial phase, isolating the GPU for easier and safer work.
- Locate the GPU: Identify your graphics card, usually situated in a PCIe slot on your motherboard.
- Disconnect Power Cables: Carefully unplug any PCIe power connectors attached to the GPU. These are typically 6-pin or 8-pin connectors.
- Unscrew the GPU: Remove the screw(s) holding the GPU to the PC case’s rear I/O bracket.
- Release the PCIe Latch: Most motherboards have a latch at the end of the PCIe slot that secures the GPU. Gently press or push this latch to release the card.
- Gently Remove the GPU: Hold the graphics card by its edges and gently pull it straight out of the PCIe slot. Place it on your prepared static-free workspace.
Disassembling the GPU Cooler
This step involves accessing the fans and the GPU die.
- Identify Cooler Screws: Locate the screws that hold the fan shroud and heatsink assembly to the GPU’s Printed Circuit Board (PCB). These are often around the edges of the shroud and on the GPU’s backplate (if present). Keep track of different screw types and their locations.
- Remove Backplate (if applicable): If your GPU has a backplate, remove the screws securing it.
- Separate Shroud from Heatsink: On many cards, the fan shroud can be separated from the heatsink without fully detaching the heatsink from the GPU PCB. Look for smaller screws that specifically hold the fan assembly to the heatsink. If possible, this method avoids disturbing the thermal paste and pads.
- Disconnect Fan Cables: Carefully unplug the fan power cable(s) from the small header(s) on the GPU PCB. Use tweezers or a plastic pry tool if the connectors are tight.
- Remove Old Fan(s): Once the shroud or individual fan housings are accessible, unscrew and remove the old fans. Note their orientation and cable routing for easier reassembly. Some fans might be held by plastic clips instead of screws.
Replacing the Fans
With the old fans out, you can now install the new ones.
- Clean the Heatsink: Use compressed air to blow out any dust from the heatsink fins. Hold the heatsink in place to prevent damage while cleaning. For a deeper clean, isopropyl alcohol and a brush can be used.
- Install New Fans: Align the new fan(s) with the screw holes or clips on the heatsink or shroud. Secure them in place with the screws you removed earlier. Ensure they are firmly seated but do not over-tighten, as this can damage the fan or shroud.
- Route Fan Cables: Carefully route the new fan cables through any designated channels in the fan housing to prevent them from interfering with fan blades or other components.
- Connect Fan Cables: Plug the new fan cable(s) into the correct fan header(s) on the GPU PCB. Ensure a secure connection.
Reapplying Thermal Paste and Pads
This step is crucial if you completely separated the heatsink from the GPU PCB. If you only removed the fan shroud and the heatsink remained attached, you might not need to do this.
- Clean Old Thermal Paste: If the heatsink was removed, you’ll see the GPU die with dried thermal paste. Use a lint-free cloth or cotton swab dampened with isopropyl alcohol (90% or higher) to carefully clean off all old thermal paste from both the GPU die and the heatsink’s contact surface. Ensure both surfaces are spotless.
- Inspect and Replace Thermal Pads (if necessary): Examine the thermal pads on memory chips (VRAM) and voltage regulator modules (VRMs). If they appear dried, cracked, or damaged, they should be replaced. Measure the thickness of the old pads to ensure you use new ones of the correct thickness for proper contact. Apply the new thermal pads carefully, avoiding touching the adhesive side too much.
- Apply New Thermal Paste: Apply a small, pea-sized dot of new thermal paste onto the center of the GPU die. While some prefer spreading it, the “dot” method is often sufficient as the pressure from the heatsink will spread it evenly. Some experts suggest spreading a thin, even layer across the entire GPU die, as GPUs lack an Integrated Heat Spreader (IHS) like CPUs.
Reassembling and Reinstalling the GPU
Now, reverse the disassembly process.
- Reattach the Cooler: Carefully position the heatsink and fan assembly back onto the GPU PCB, ensuring all screw holes align. If you removed the entire cooler, make sure it makes even contact with the GPU die and thermal pads.
- Secure the Cooler: Reinstall all screws that hold the cooler to the PCB, often in a crisscross pattern to ensure even pressure. Do not over-tighten.
- Reinstall Backplate (if applicable): Attach the backplate and secure it with its screws.
- Reinstall the Graphics Card: Gently slide the GPU back into its PCIe slot on the motherboard until it’s fully seated and the PCIe latch clicks into place.
- Secure to Case: Reinstall the screw(s) that hold the GPU to the PC case’s rear I/O bracket.
- Reconnect Power Cables: Plug the PCIe power connectors back into the GPU.
- Close the PC Case: Replace the side panel of your PC case and secure it.
Post-Replacement Testing and Monitoring
After all the hardware work is done, it’s essential to test your GPU to ensure everything is functioning correctly and efficiently.
- Initial Power-Up: Reconnect all necessary cables to your PC (monitor, power, peripherals) and power it on. Observe carefully during boot-up. Listen for any unusual noises and visually confirm that the new fans are spinning.
- Monitor Temperatures at Idle: Once Windows or your operating system loads, use GPU monitoring software like MSI Afterburner, HWMonitor, or GPU-Z to check the idle temperatures of your GPU. Compare these to typical idle temperatures (usually 30-45°C for consumer GPUs).
- Run a Stress Test: To confirm stable operation under load, run a GPU stress test using software like FurMark. This will push your GPU to its limits and allow you to monitor temperatures, fan speeds, and check for any visual artifacts or system instability. Let the test run for 20-30 minutes, keeping a close eye on temperatures. A safe temperature during gaming is typically between 65°C and 85°C. If temperatures consistently exceed 85°C, investigate further.
- Test with Demanding Games/Applications: Play a few of your most graphically intensive games or run demanding applications. Monitor the GPU’s performance, temperatures, and fan behavior during these real-world scenarios. You should observe smoother performance and lower temperatures compared to before the fan replacement.
- Adjust Fan Curves (Optional): If your GPU temperatures are still higher than desired or you want to optimize for quieter operation, you can use software like MSI Afterburner to create a custom fan curve. This allows you to set specific fan speeds at different temperature thresholds, balancing cooling performance and noise levels.
Tips for Preventing Future GPU Overheating
Replacing your GPU fans is a great step to restore cooling performance, but ongoing maintenance and good practices can prevent future overheating issues. According to NVIDIA’s official thermal guidelines, GeForce cards are designed to operate efficiently up to the mid-to-high 80°C range, with performance reduction occurring if this threshold is exceeded.
- Regular Cleaning: Make it a habit to regularly clean your PC case, case fans, and especially your GPU heatsinks and fans with compressed air. Aim for cleaning every 3-6 months, or more frequently if you live in a dusty environment or have pets. Remember to hold the fan blades still while blowing with compressed air to prevent damage to the bearings.
- Optimize Case Airflow: Ensure your PC case has good airflow, with sufficient intake and exhaust fans. Cables should be managed neatly to avoid obstructing airflow paths. Consider using a mesh-front case for better intake if your current case restricts airflow.
- Monitor GPU Temperatures: Regularly use monitoring software (e.g., MSI Afterburner, HWMonitor) to keep an eye on your GPU temperatures, especially during gaming or heavy workloads. This helps you catch potential overheating issues early.
- Update Drivers: Keep your graphics card drivers updated to ensure optimal performance and cooling profiles provided by the manufacturer.
- Check Thermal Paste/Pads: If your graphics card is several years old (3-4 years or more), consider inspecting and potentially replacing the thermal paste and pads, even if the fans are still functional. This can significantly improve heat transfer efficiency.
- Limit FPS or Underclock: If you frequently hit 100% GPU usage, limiting your frame rate (FPS) to your monitor’s refresh rate or slightly underclocking your GPU can reduce power draw and, consequently, temperatures without a significant impact on perceived performance.
- Maintain Ambient Room Temperature: Operating your PC in a cooler room will naturally lead to lower component temperatures. Avoid placing your PC in direct sunlight or in enclosed, poorly ventilated spaces.
By implementing these preventative measures, you can extend the lifespan of your GPU and maintain optimal performance, saving you from future hardware hassles. For more detailed information on GPU cooling solutions and their effectiveness, you can refer to resources like Wikipedia’s article on computer cooling.
Conclusion
GPU fan replacement is a manageable yet crucial procedure for anyone looking to rescue an overheating graphics card and extend its operational life. From identifying the tell-tale signs of overheating to meticulously disassembling, replacing, and reassembling components, this tutorial has covered each step in detail. By diligently following these instructions—and prioritizing safety with proper grounding and a clean workspace—you can restore your graphics card’s cooling efficiency, preventing thermal throttling, system crashes, and potential hardware damage. Remember that proactive maintenance, including regular cleaning and monitoring, along with thoughtful consideration of your system’s overall airflow, are key to safeguarding your valuable GPU against the detrimental effects of excessive heat. A well-maintained graphics card ensures stable performance and a more enjoyable computing experience for years to come.