6 Best GPU Holders to Prevent GPU Sag – Support Guide
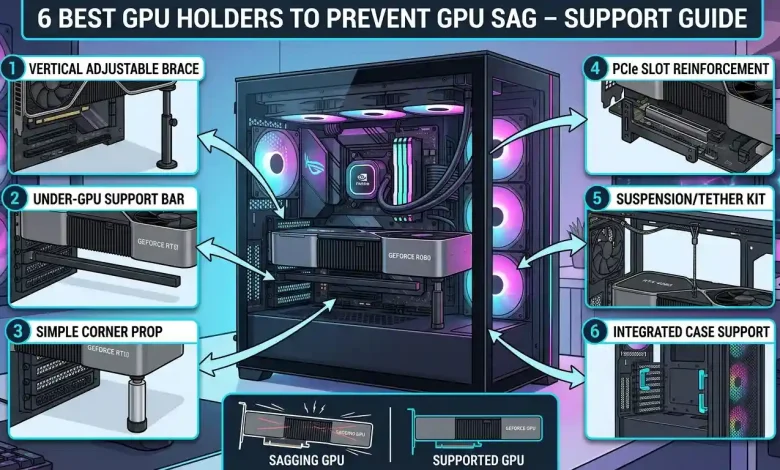
Table of Contents
GPU Holder Guide: In the rapidly evolving world of PC gaming and high-performance computing, graphics cards have become monumental in both power and physical size. Modern GPUs, with their elaborate cooling solutions featuring multiple fans and robust heatsinks, are significantly heavier than their predecessors. While this increased mass contributes to exceptional thermal management and boosted performance, it also introduces a prevalent issue for PC builders and enthusiasts alike: GPU sag. This phenomenon, where the graphics card visibly sags or droops from its PCIe slot, is more than just an aesthetic concern; it poses potential risks to your valuable hardware. This comprehensive guide will delve into the intricacies of GPU sag, explore the various GPU support solutions available, and equip you with the knowledge to select and install the perfect GPU holder to safeguard your system.
Understanding GPU Sag: What It Is and Why It Matters
GPU sag refers to the downward bending of a graphics card when installed horizontally in a PC case, primarily due to its substantial weight. This issue has become increasingly prominent with the advent of massive, triple-slot graphics cards that are now commonplace in high-end builds. When a graphics card becomes too heavy for the motherboard’s PCIe slot to support alone, gravity pulls the card downwards, particularly at the end furthest from the PCIe connection and the case’s mounting screws.
The primary cause of GPU sag is the sheer weight of modern graphics cards, which are often equipped with extensive cooling modules to handle their increased power consumption and heat output. These cooling solutions, featuring large heatsinks and multiple fans, add significant mass. While smaller GPUs with one or two fans might not experience noticeable sag, larger, more powerful cards are highly susceptible.
Is GPU sag a serious issue, or merely a cosmetic imperfection? While a minor dip might not lead to immediate problems, any prominent sagging visible to the naked eye can lead to serious, long-term damage to various hardware components. Even if not immediately apparent, the bending can exert undue pressure on the motherboard’s PCIe slot and the graphics card itself. This stress, if left unaddressed, can compromise the integrity and longevity of your expensive components, making a proactive approach to prevention highly advisable.
The Hidden Dangers: Why You Can’t Ignore GPU Sag
Ignoring GPU sag can have a range of negative consequences, spanning from minor performance degradation to irreversible hardware damage. The core issue lies in the prolonged stress exerted on critical connection points and the structural integrity of the components.
- Damage to the PCIe Slot: The most immediate and common risk is the strain on the motherboard’s PCIe slot. Excessive downward pressure can warp or even break the PCIe slot, leading to a poor or intermittent connection between the GPU and the motherboard. This can manifest as display issues, system instability, or the graphics card simply failing to be detected. Motherboards without reinforced PCIe slots are particularly vulnerable.
- PCB and Solder Joint Damage: The graphics card’s Printed Circuit Board (PCB) itself is also at risk. The bending caused by sag can lead to stress on the PCB, potentially causing microfractures or weakening the solder joints of crucial components like VRAM chips or the GPU die. Such damage can destroy the graphics card, rendering it inoperable and potentially voiding warranties, with some manufacturers reportedly refusing warranty claims due to “improper handling” from sag-related damage.
- Compromised Cooling Performance: In severe cases, GPU sag can cause the card’s fan shroud or heatsink to lose proper contact with the GPU, leading to reduced cooling efficiency. This can result in higher operating temperatures, thermal throttling, and a noticeable dip in performance. Overheating can further accelerate component degradation and potentially lead to premature failure.
- Reduced Bandwidth and Data Transfer: A sagging card may not maintain proper contact with its PCIe slot, leading to reduced bandwidth and slower data transfer speeds. This can negatively impact gaming performance and the efficiency of professional applications that rely heavily on GPU processing.
- Interference with Other Components: In some instances, a severely sagging GPU might come into contact with other components on the motherboard, such as RAM modules or even the chipset heatsink, potentially causing further damage through short circuits or physical obstruction.
Given the significant investment modern graphics cards represent, addressing GPU sag is a critical aspect of responsible PC ownership and maintenance, ensuring both the longevity and optimal performance of your system.
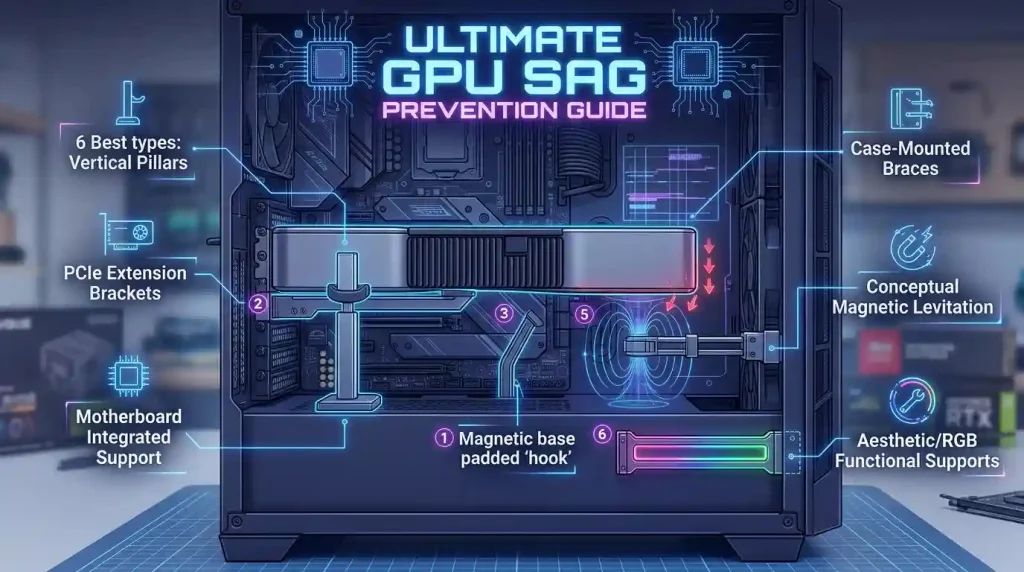
Exploring Your Options: A Guide to GPU Holder Types
Fortunately, several effective solutions exist to combat GPU sag, ranging from simple supports to elaborate mounting systems. Understanding the different types available will help you choose the best fit for your specific PC build and aesthetic preferences.
Vertical/Stand-Style GPU Holders
These are perhaps the most common and straightforward type of GPU support bracket. They typically consist of an adjustable post or stand that sits between the bottom of your PC case (or PSU shroud) and the underside of your graphics card.
- Pros:
- Easy to install, often tool-free.
- Highly adjustable to accommodate various GPU heights.
- Many models offer aesthetic enhancements like RGB lighting.
- Effective at supporting heavy GPUs from below.
- Cons:
- Can take up space in the case, potentially interfering with bottom-mounted fans.
- Some designs might look less integrated into the build.
Popular examples include the EZDIY-FAB GPU Holder and the upHere GL05 GPU Sag Holder, known for their versatility and affordability respectively.
Expansion Slot GPU Brackets
Unlike stand-style holders, these brackets attach directly to the PCIe expansion slots at the back of your PC case, below your graphics card. They typically feature an adjustable arm or shelf that extends outwards to support the GPU.
- Pros:
- Does not occupy space on the case floor, allowing for bottom-mounted fans.
- Offers a cleaner look for some builds.
- Can be very sturdy when properly secured.
- Cons:
- Installation might be slightly more involved, requiring specific screws.
- Support strength can be weaker compared to horizontal brackets in some designs.
- May interfere with airflow around the GPU or adjacent expansion cards.
The Antec GPU Support Bracket is a notable example, often praised for its multipurpose design and durability.
Horizontal Brackets / Jack-Style Supports
These supports are often integrated into the case design or are more discreet. Jack-style brackets use a screw mechanism to raise the support point, offering precise height adjustment in a compact form. Some horizontal brackets attach to the motherboard itself or use existing mounting points within the case.
- Pros:
- Compact and aesthetically pleasing, taking up minimal internal space.
- Precise adjustment capabilities.
- Often made of robust materials like CNC aluminum.
- Cons:
- Adjustable height can be limited by the screw mechanism.
- May not be suitable for all case configurations, especially those with tall bottom sections.
Many premium GPUs, such as certain NVIDIA RTX 40 series cards, now come bundled with dedicated anti-sag brackets designed specifically for their models, highlighting the industry’s recognition of this issue.
Vertical GPU Mounting
While not a “holder” in the traditional sense, vertically mounting your GPU is an excellent preventative measure against sag. This involves using a special bracket and a PCIe riser cable to orient the graphics card vertically, parallel to the motherboard, or perpendicular to it, showcasing the front of the GPU.
- Pros:
- Completely eliminates sag by changing the orientation of the card.
- Offers a unique aesthetic that highlights the GPU’s design.
- Can improve airflow for the GPU in some case designs.
- Cons:
- Requires a compatible case or a vertical mount kit.
- May restrict airflow to other components depending on the case layout.
- The PCIe riser cable quality is crucial for performance.
Many modern cases offer vertical GPU mounting options, or kits can be purchased separately. This method effectively transforms the gravitational force from a downward pull into a force that’s largely supported by the case chassis.
Selecting the Perfect Support: Factors to Consider
With a variety of GPU holders on the market, choosing the right one requires careful consideration of several factors to ensure optimal support, compatibility, and aesthetics for your specific build.
Compatibility
The first and foremost consideration is compatibility with your graphics card and PC case. Most GPU holders are designed to be universally adjustable, but it’s crucial to check the specified height and length ranges to ensure it will fit comfortably under your GPU and within your case. For instance, some brackets might not be suitable for very short GPUs or cases with extremely limited clearance. If your GPU comes with a proprietary anti-sag bracket, using that is often the best choice as it’s specifically designed for the card.
Material and Durability
The material of the GPU holder directly impacts its strength and longevity. Look for holders made from sturdy materials like aluminum or steel, which provide robust support and resist bending over time. While plastic options exist, they may not offer the same level of rigidity, especially for heavier cards. A durable construction ensures long-lasting support for your valuable graphics card.
Adjustability and Ease of Use
Adjustability is key to achieving a perfect fit and proper support. Most stand-style and jack-style holders feature a screw or sliding mechanism for height adjustment. Consider how easy it is to adjust the bracket and lock it into place. Tool-free designs often offer greater convenience. Some brackets also offer adjustable arms or multiple support points for more versatile positioning.
Aesthetics and RGB Lighting
For many PC enthusiasts, the visual appeal of their build is paramount. GPU holders come in various designs, from minimalist black or white to those featuring integrated RGB lighting. If you have an RGB-themed build, a holder with addressable RGB (ARGB) can seamlessly integrate with your motherboard’s lighting ecosystem via software like ASUS Aura Sync or MSI Mystic Light. Ensure the RGB connection (e.g., 5V 3-pin ARGB) is compatible with your motherboard if you plan to sync the lighting.
Case Space and Airflow
Consider how the GPU holder will affect the internal layout and airflow within your PC case. Stand-style holders sit on the case floor, which might interfere with bottom-mounted fans. Expansion slot brackets, while not on the floor, could potentially obstruct airflow around the GPU itself. Vertical GPU mounting completely reorients the card, which can drastically change airflow dynamics, sometimes for the better, but occasionally by placing the GPU too close to a side panel. Carefully assess your case’s internal space and existing fan configuration to avoid creating airflow bottlenecks.
Installation Made Easy: Setting Up Your GPU Holder
Installing a GPU holder is generally a straightforward process, but the specifics can vary depending on the type of bracket you choose. Always refer to the manufacturer’s instructions for your specific model, but here’s a general guide to help you through the process.
Pre-Installation Checks
- Power Down and Disconnect: Before touching any internal components, completely shut down your PC, unplug it from the power outlet, and press the power button a few times to discharge any residual electricity.
- Access the Interior: Open your PC case to gain full access to the motherboard and graphics card. Laying the case on its side can often provide a better working angle.
- Gather Tools: While many holders are tool-free, some may require a Phillips head screwdriver. An anti-static wrist strap is recommended to prevent electrostatic discharge (ESD).
Stand-Style GPU Holder Installation
- Position the Base: Place the base of the stand on the bottom of your PC case or PSU shroud, directly underneath the sagging end of your graphics card.
- Adjust Height: Extend the adjustable post of the holder until it gently makes contact with the underside of your GPU. Be careful not to apply excessive upward force, as this could bend the card upwards. The goal is to lift the GPU just enough so it is level and no longer sagging, relieving pressure on the PCIe slot.
- Secure (if applicable): Some stand-style holders have locking mechanisms or magnetic bases to keep them in place. Ensure it is stable and won’t shift.
- Connect RGB (Optional): If your holder has RGB lighting, connect the appropriate cable (e.g., 5V 3-pin ARGB) to a compatible header on your motherboard or a dedicated RGB controller.
Expansion Slot Bracket Installation
- Identify Slots: Locate the empty PCIe expansion slots directly below your graphics card.
- Mount the Bracket: Align the bracket with the expansion slots and secure it to the case using the provided screws or tool-less retention clips. Ensure it is firmly attached.
- Adjust Support Arm: Extend or adjust the support arm of the bracket until it cradles the graphics card firmly, ensuring the GPU is level. Some brackets might attach to the GPU’s backplate directly.
- Connect RGB (Optional): Similar to stand-style holders, connect any RGB cables to your motherboard or controller.
Dedicated Anti-Sag Bracket Installation (Often included with GPU)
If your graphics card came with its own anti-sag bracket, the installation might involve specific steps tailored to the GPU’s design. For example, some Gigabyte RTX 40 series cards include an L-shaped bracket that mounts to the motherboard and a separate mounting bracket that attaches to the graphics card itself, which then slides into the L-shaped bracket. Always follow the detailed instructions provided with your specific GPU and bracket.
Final Checks
Once the holder is in place and the GPU appears level, gently test the stability of the card. Close your PC case, reconnect all cables, and power on your system. Verify that everything is functioning correctly and that any RGB lighting is working as desired.
Popular GPU Holder Models in 2026
The market offers a diverse range of GPU holders, catering to different budgets and aesthetic preferences. Here’s a look at some of the highly-rated and commonly recommended options as of 2026:
| GPU Holder Model | Type | Key Features | Pros | Cons |
|---|---|---|---|---|
| EZDIY-FAB GPU Holder | Vertical/Stand | Adjustable design, sturdy metal, anti-scratch pads, optional ARGB LED lights. | Versatile, reliable, easy installation, good value. | May take up minimal case floor space. |
| ASUS ROG Herculx | Premium Vertical/Stand | Robust design, sleek gaming aesthetic, adjustable arm, 3D ARGB with Aura Sync. | Top-tier quality, precise support, enhances build aesthetics. | Higher price point. |
| upHere GL05 GPU Sag Holder | Vertical/Stand | Budget-friendly, sturdy design, adjustable features, two kinds of sliding rubber pads. | Very affordable, reliable support, tool-free installation. | More basic aesthetics, less premium feel. |
| Antec GPU Support Bracket | Expansion Slot / Multipurpose | Durable aluminum, wide base plate, cushioned pad, adjustable height, works with vertical GPU installs. | Sturdy, versatile, functional, can support vertical GPUs. | Installation might be slightly more involved than a simple stand. |
| Cooler Master MasterAccessory ARGB | Vertical/Stand with RGB | Edge-lit ARGB tempered glass, universal compatibility, multiple orientations. | Stunning visuals, strong support, easy installation. | Can be pricier than non-RGB options. |
| nkomax GPU Brace Support | Vertical/Stand (Minimalist) | Magnetic base, screw adjustment, precise height control. | Minimalist design, strong hold, precise adjustment. | Less flashy than RGB options. |
DIY Alternatives: Are Homemade Supports Viable?
While dedicated GPU holders offer polished and reliable solutions, some PC users explore DIY (Do-It-Yourself) alternatives, often motivated by cost savings or a desire for a custom touch. Many household items and craft materials can be repurposed to create a makeshift GPU support. Common DIY solutions include:
- Lego Bricks or Other Building Blocks: Stacking Lego bricks under the GPU is a classic and popular DIY method. They are non-conductive, adjustable in height, and readily available for many.
- Wooden Dowels or Pen/Pencil Pieces: A piece of wood or a chopped-up pen can be cut to the exact length needed to prop up the GPU. Ensure the material is non-conductive and stable.
- Fishing Line or String: Tying a strong fishing line or string to the GPU’s power cables or a part of the card and securing it to the top of the case can provide subtle support. This method is almost invisible but requires careful tensioning to avoid stressing the GPU upwards.
- 3D Printed Brackets: For those with access to a 3D printer, custom brackets can be designed and printed to fit specific GPUs and case layouts. This offers a high degree of customization and aesthetic integration.
- Glass Holders: Some users have adapted glass holders, typically used for shelves, as adjustable and sturdy GPU supports.
Pros and Cons of DIY Solutions
- Pros:
- Cost-Effective: Often free or very cheap, using materials you already have.
- Customizable: Can be tailored to exact measurements and aesthetics (especially 3D printed options).
- Immediate Solution: Provides a quick fix in a pinch.
- Cons:
- Less Reliable: DIY solutions may lack the stability, durability, and precise adjustability of purpose-built holders. Materials might degrade over time due to heat.
- Aesthetic Compromise: Unless meticulously crafted, homemade supports might detract from the overall look of your build.
- Potential for Damage: Improperly chosen or poorly secured materials could slip, scratch, or even short-circuit components if they are conductive or unstable. Non-conductive materials are paramount.
- Warranty Concerns: Some manufacturers might view “unofficial” supports as improper handling, potentially affecting warranty claims if damage occurs.
While DIY solutions can be effective for minor sag or as temporary fixes, investing in a dedicated GPU holder is generally recommended for long-term reliability and peace of mind, especially given the high cost of modern graphics cards. For those exploring DIY, prioritize non-conductive, stable, and heat-resistant materials, and ensure the support is secure and won’t scratch your components. For more information on the intricate workings of the components these holders protect, you might find this Wikipedia article on Graphics Processing Units enlightening.
Beyond Installation: Ensuring Long-Term GPU Health
Installing a GPU holder is a significant step towards preventing sag and protecting your hardware, but it’s part of a broader approach to PC maintenance that ensures the longevity and optimal performance of your graphics card and entire system.
Regular Checks and Adjustments
Even with a GPU holder in place, it’s a good practice to periodically inspect your graphics card for any signs of renewed sag, especially after moving your PC or performing other internal maintenance. Over time, slight vibrations or settling of components can sometimes shift supports. Gently check the stability of your GPU and make any necessary minor adjustments to the holder to ensure it continues to provide adequate support.
Overall PC Maintenance
The health of your GPU is intrinsically linked to the overall health of your PC. Regular computer maintenance can prevent numerous issues and extend the lifespan of all components, including your graphics card.
- Dust Management: Dust buildup can impede cooling and add subtle weight over time. Regularly clean your PC’s interior, especially GPU fans and heatsinks, using compressed air.
- Cable Management: Proper cable management not only improves airflow but can also reduce strain on components. Ensure power cables connected to your GPU are routed neatly and not pulling on the card.
- Temperature Monitoring: Use software to monitor your GPU’s temperatures, especially under load. This helps identify if cooling performance is being compromised, which could indirectly relate to sag or other issues.
- Driver Updates: Keep your graphics drivers updated to ensure optimal performance and compatibility.
- System Stability: Ensure your PC is placed on a stable, level surface to minimize any external factors that could contribute to component shifting or sag.
By integrating GPU sag prevention with comprehensive PC maintenance practices, you create an environment where your high-performance graphics card can operate at its best for years to come, protecting your investment and ensuring a smooth computing experience. The general best practices for handling and installing computer components, such as working in a static-free environment and avoiding direct contact with circuitry, are also crucial for overall system integrity.
Conclusion
GPU sag is a legitimate concern for modern PC builds, capable of leading to significant hardware damage and performance issues if left unaddressed. As graphics cards continue to grow in size and power, the need for effective support solutions becomes increasingly critical. From purpose-built vertical stands and expansion slot brackets to more integrated horizontal supports and even the preventative measure of vertical GPU mounting, a wide array of options exists to keep your valuable GPU level and secure. While DIY solutions offer a creative and cost-effective alternative, dedicated GPU holders typically provide superior reliability, adjustability, and aesthetic integration. By understanding the risks, carefully choosing the right support, and ensuring proper installation and ongoing maintenance, you can effectively prevent GPU sag. This proactive approach not only safeguards your significant investment in a high-performance graphics card but also contributes to the overall stability, longevity, and visual appeal of your entire PC system, ensuring you continue to enjoy peak performance for years to come.