6 Powerful GPU Tweak II Tips for Maximum FPS Boost
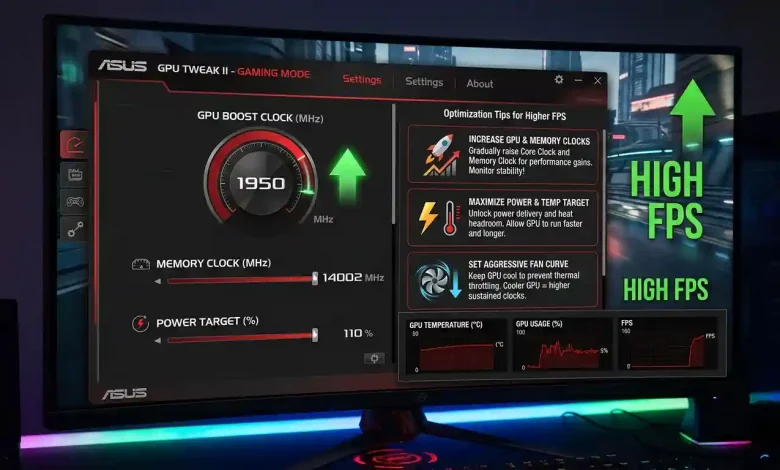
Table of Contents
GPU Tweak 2 Optimization Tips for Higher FPS can transform your gaming experience, turning stuttering frames into fluid motion and pushing your graphics card to its maximum potential. ASUS GPU Tweak II is a powerful utility designed specifically for ASUS graphics cards, offering an intuitive interface to monitor and fine-tune various settings for optimal performance. Whether you’re a seasoned enthusiast looking to squeeze every last megahertz out of your hardware or a casual gamer seeking a quick performance boost, mastering this software is a key step towards achieving higher frame rates and a smoother, more immersive gaming session. This comprehensive guide will walk you through the essential optimization tips and best practices within GPU Tweak II to unlock your card’s true power.
Understanding the Core: What is GPU Tweak II?
ASUS GPU Tweak II is a proprietary software utility that provides users with comprehensive control over their ASUS graphics cards. It serves as a central hub for monitoring vital GPU statistics and adjusting performance-related parameters. The software is compatible with a wide range of ASUS GPUs, including both NVIDIA GeForce and AMD Radeon series cards, provided you have the appropriate drivers installed. Its primary purpose is to allow users to enhance their graphics card’s capabilities beyond factory default settings, thereby improving in-game performance and responsiveness.
Upon installation, which typically involves downloading the utility from the ASUS support website and following on-screen instructions, users are greeted with an interface that is both informative and functional. GPU Tweak II operates with two distinct user interfaces: Simple Mode and Professional Mode. These modes cater to different levels of user expertise, making the software accessible to a broad audience, from those who prefer quick, one-click optimizations to advanced users who demand granular control over every aspect of their GPU’s operation. The ability to monitor critical parameters like GPU clock speed, memory clock, temperature, and fan speed in real-time is fundamental to making informed optimization decisions.
Navigating the Interface: Simple vs. Professional Mode
The distinction between Simple Mode and Professional Mode in GPU Tweak II is crucial for effective optimization. Simple Mode is designed for quick, hassle-free adjustments and monitoring. It presents a streamlined view of your GPU’s current status, offering easily accessible preset profiles such as OC Mode, Gaming Mode, and Silent Mode. These one-click options allow users to instantly switch between configurations optimized for maximum performance, a balance between performance and silence, or quiet operation, respectively. Simple Mode also prominently features the “Gaming Booster” function, a set of tools aimed at enhancing system performance with minimal user input.
For those who require more intricate control and wish to push their hardware further, Professional Mode unlocks a wealth of advanced settings. This mode provides individual sliders and input fields for parameters such as GPU Clock, Memory Clock, GPU Voltage, and Power Target. It also offers extensive fan control options, allowing for the creation of custom fan curves. Professional Mode is where seasoned overclockers spend most of their time, as it enables precise adjustments necessary for maximizing performance while maintaining stability. The ability to save custom profiles in Professional Mode is invaluable, allowing users to switch between optimized settings for different games or applications with ease.
Gaming Booster: Quick FPS Gains
The Gaming Booster feature, accessible through Simple Mode, offers a convenient way to achieve a quick performance uplift without diving into complex overclocking. It works by optimizing your system resources to prioritize gaming. This mode typically includes three main sections:
- Visual Effects: This option allows you to boost performance by temporarily disabling non-essential Windows visual effects, freeing up GPU and CPU cycles for your games.
- System Services: Gaming Booster can automatically or manually turn off redundant Windows services or background processes that consume system resources, thereby reducing overhead and allocating more power to your game.
- System Memory Defragmentation: This feature helps to rearrange and free up system memory, potentially improving game loading times and overall system responsiveness without requiring you to close running applications.
While these optimizations might not offer the dramatic FPS increases that manual overclocking can provide, they are an excellent starting point for any gamer looking for an immediate and safe performance boost.
Mastering the Overclock: Core Clock and Memory Clock
Overclocking your graphics card involves increasing its operating frequencies beyond the manufacturer’s default specifications to achieve higher performance. In GPU Tweak II, the two primary parameters for this are the GPU Clock (Core Clock) and Memory Clock. These adjustments directly impact the frames per second (FPS) you experience in games.
The GPU Clock (MHz) dictates how fast the graphics processing unit itself operates. A higher GPU clock value generally leads to more stable performance and increased FPS. When tweaking this setting, it’s crucial to make small, incremental adjustments. Start by increasing the GPU Clock in steps of 5-10 MHz, applying the changes, and then testing for stability using a benchmark or a demanding game. This iterative process helps identify the stable limit of your GPU.
The Memory Clock (MHz) controls the speed at which your graphics card’s VRAM (Video Random Access Memory) processes data. Increasing the memory clock can improve texture loading times and overall data throughput, contributing to higher FPS, especially in games with high-resolution textures. Similar to the GPU clock, memory clock adjustments should be made gradually, typically in increments of 50-100 MHz. It’s important to note that very high memory overclocks can sometimes lead to visual artifacts or system instability, even if the core clock appears stable. Constant monitoring of both GPU and memory temperatures is paramount throughout this process to prevent overheating and potential hardware damage.
One of the advantages of GPU Tweak II is its broad compatibility. It can effectively overclock dedicated graphics cards from both NVIDIA and AMD, making it a versatile tool regardless of your GPU manufacturer, as long as it’s an ASUS card. Patience and methodical testing are key to successfully mastering these core clock adjustments for optimal performance.
Power and Stability: Voltage and Power Target Adjustments
Beyond simply increasing clock speeds, advanced users can fine-tune their GPU’s performance by adjusting voltage and power target settings within GPU Tweak II. These parameters play a critical role in maintaining stability at higher clock speeds and ensuring sustained performance under heavy loads.
The GPU Voltage (mV) setting allows for fine-tuning the voltage supplied to the GPU core. Increasing the GPU voltage can provide the necessary stability for higher core clock speeds, especially when pushing the card to its limits. However, increasing voltage also directly correlates with increased heat generation and power consumption. Excessive voltage can potentially reduce the lifespan of your GPU, so this adjustment should be approached with extreme caution and paired with robust cooling. It’s often linked with the GPU Clock, though they can be unlinked for independent adjustment in Professional Mode.
The Power Target (%), sometimes referred to as Power Limit (PT), is a crucial setting that dictates the maximum power consumption allowed for your GPU. Most GPUs have a factory-set power limit, and when the card reaches this limit, it will automatically throttle its clock speeds to stay within that boundary. By increasing the power target, you allow the GPU to draw more power, which in turn enables it to maintain higher boost clock speeds for longer periods, especially during demanding gaming sessions. Typically, this value can be increased from 100% up to a certain percentage (e.g., 120% or 133% on some cards), providing more headroom for overclocking. Conversely, reducing the power target can make the GPU run cooler and consume less power, albeit at the cost of some performance.
It’s important to monitor GPU temperature closely when adjusting voltage and power target. Overheating can lead to system instability, crashes, or even permanent hardware damage. Always make small adjustments and thoroughly test for stability after each change.
| Setting | Impact on Performance | Recommendation for Higher FPS | Caution/Consideration |
|---|---|---|---|
| GPU Clock (MHz) | Directly increases processing speed, leading to higher FPS. | Increase incrementally (e.g., +5-10 MHz). | Monitor stability, temperature, and artifacts. |
| Memory Clock (MHz) | Improves data throughput and texture loading. | Increase incrementally (e.g., +50-100 MHz). | Monitor for visual artifacts; potential for instability. |
| GPU Voltage (mV) | Enhances stability for higher clock speeds. | Small increments, only if necessary for stability. | Increases heat and power consumption; can reduce GPU lifespan. |
| Power Target (%) | Allows GPU to draw more power, sustaining boost clocks. | Increase to maximum safe limit (e.g., 120-133%). | Increases power consumption and heat; ensure adequate PSU. |
| Fan Speed / Curve | Controls cooling efficiency. | Custom aggressive curve for lower temps under load. | Increased noise; consider fan lifespan at very high speeds. |
Keeping it Cool: Custom Fan Control for Optimal Thermals
Temperature is the ultimate enemy of performance when it comes to graphics cards. High temperatures can cause your GPU to “throttle,” meaning it automatically reduces its clock speeds to prevent overheating, which directly translates to lower FPS. Effective cooling is therefore paramount for sustained high performance and successful overclocking. GPU Tweak II provides robust fan control options that allow you to manage your card’s thermals effectively.
While the “Auto” fan mode uses a default curve based on GPU temperature, it is often designed for a balance between noise and cooling, not maximum performance. For optimal FPS, especially during demanding gaming or benchmarking, creating a custom fan curve in Professional Mode is highly recommended.
To create a custom fan curve:
- Navigate to the fan control section in Professional Mode.
- Select “User Define” or “Custom” mode.
- Click the gear or pencil icon next to the fan speed slider to open the fan curve editor.
- You’ll see a graph with temperature on the X-axis and fan speed percentage on the Y-axis. You can add or drag points on this curve to specify how fast your fans spin at different temperature thresholds.
A common strategy for performance-oriented users is to create a more aggressive curve: keep the fans relatively quiet at low temperatures (e.g., 0% up to 50-55°C if your card supports 0dB mode), then have them ramp up quickly and significantly as temperatures rise. For instance, you might aim for 100% fan speed once the GPU reaches a certain temperature, like 65-70°C, to ensure maximum heat dissipation during intense loads. This proactive cooling helps prevent thermal throttling and allows your GPU to maintain higher clock speeds.
Some ASUS cards also feature 0dB fan technology, which keeps the fans completely off when the GPU temperature is below a certain threshold (e.g., 50-55°C) for silent operation during light tasks. This can be integrated into your custom curve. Additionally, some advanced ASUS cards offer FanConnect headers, allowing you to control external case fans based on GPU temperatures, further enhancing overall system cooling. Experiment with different curves and monitor your temperatures to find the perfect balance between cooling efficiency and acceptable noise levels for your setup.
Saving Your Settings: Profiles and Advanced Features
One of the most practical features of GPU Tweak II is its robust profile management system. This allows users to save and quickly switch between different optimization settings tailored for various scenarios, from demanding gaming to quiet productivity.
GPU Tweak II comes with several ASUS-exclusive preset profiles:
- OC Mode: Designed for maximum performance, often with a slight factory overclock applied, ideal for benchmarking or critical gaming sessions.
- Gaming Mode: Offers a balanced approach between performance and thermal efficiency, suitable for extended gaming sessions. This is often the default setting on many ASUS cards.
- Silent Mode: Prioritizes quiet operation by reducing fan speeds and potentially clock speeds, perfect for media consumption or light tasks where noise is a concern.
- My Profile (User1 Mode): This is your canvas for creating and saving your own customized overclocking profiles. Once you’ve painstakingly found stable core clock, memory clock, voltage, power target, and fan curve settings, you can save them under a custom profile. This eliminates the need to manually re-enter settings every time you want to switch.
The ability to save multiple custom profiles means you could have one profile for competitive gaming (aggressive overclock, high fan speeds), another for single-player story games (moderate overclock, balanced fan curve), and perhaps even an undervolted profile for maximum efficiency. Switching between these profiles is quick and easy, even on-the-fly, which enhances the user experience significantly.
Another powerful feature is the in-game overlay, which integrates with compatible games (often via XSplit Gamecaster, which is sometimes bundled). This overlay displays real-time GPU statistics such as clock speed, temperature, and FPS directly on your screen while you’re gaming. More importantly, it can also provide quick access to GPU Tweak II controls, allowing you to change profiles or make minor adjustments without tabbing out of your game. This immediate feedback and control are invaluable for optimizing performance during actual gameplay.
Monitoring and Validation: Ensuring Stability and Performance
The process of optimizing your GPU with GPU Tweak II is not a one-time setup; it’s an iterative cycle of tweaking, monitoring, and validating. Achieving higher FPS is only beneficial if it comes with system stability. Therefore, continuous monitoring and rigorous validation are essential steps in your optimization journey.
GPU Tweak II’s built-in monitoring panel is a critical tool. It provides real-time graphs and numerical data for key metrics such as GPU Clock, Memory Clock, GPU Temperature, Fan Speed, GPU Usage, and Voltage. Keeping a close eye on these values during and after making changes helps you understand the impact of your adjustments. For instance, if you increase the core clock, you should immediately check if the GPU temperature rises excessively or if the voltage fluctuates wildly, indicating potential instability.
Beyond simply observing numbers, validating your optimizations requires using benchmarking tools. Benchmarks simulate demanding workloads, pushing your GPU to its limits and providing quantifiable scores that reflect its performance. Popular benchmarking software like 3DMark (Fire Strike, Time Spy), Heaven Benchmark, or Superposition Benchmark can be used.
The process involves:
- Establishing a baseline: Run a benchmark with your GPU at stock settings and record the score and average FPS.
- Applying optimizations: Make a small adjustment in GPU Tweak II (e.g., increase GPU Clock by 10 MHz).
- Testing for stability: Run a demanding game or a stress test for an extended period (e.g., 30-60 minutes). Look for crashes, visual artifacts, or freezes.
- Benchmarking: Rerun the same benchmark and compare the scores and FPS to your baseline.
- Iterate: If stable and performance improved, repeat the process with another small adjustment. If unstable, revert to the last stable settings and try a smaller increment or a different parameter.
This methodical approach is crucial because pushing hardware beyond its safe limits without proper testing can lead to system instability or even hardware damage. Overclocking, in essence, is the practice of tuning a component to operate faster than its official specifications, a process that inherently carries risks if not approached carefully. The goal is to find the sweet spot where you achieve maximum performance gains while maintaining rock-solid stability and acceptable temperatures.
Troubleshooting Common Issues and Best Practices
While GPU Tweak II is a powerful tool, users may occasionally encounter issues. Understanding how to troubleshoot these problems and adhering to best practices can save you from frustration and potential hardware damage.
Common issues include:
- System Instability/Crashes: This is the most common sign of an unstable overclock. If your system crashes, freezes, or displays visual artifacts, your current settings are too aggressive. Immediately revert to your last stable settings or use the “Default” button in GPU Tweak II to restore factory defaults.
- Fan Curve Not Saving or Applying on Startup: Some users have reported issues with custom fan curves not persisting after a reboot or after switching profiles. Ensure that the “Apply settings each time GPU Tweak II starts” option is checked in the settings. If the issue persists, try saving your profile, then switch to another preset (like Gaming Mode), apply, and then switch back to your custom profile and apply again. Sometimes, a clean reinstallation of GPU Tweak II can resolve such glitches.
- Settings Not Applying: If sliders appear locked or changes don’t take effect, ensure you are in Professional Mode and that any lock icons next to the parameters are unlocked (they should not be red).
- GPU Tweak II Not Launching or Crashing: In rare cases, the software itself might not launch correctly or may crash. Ensure your Windows OS and graphics drivers are up to date. A clean reinstallation of GPU Tweak II, sometimes preceded by using Display Driver Uninstaller (DDU) to completely remove old graphics drivers, can often fix this.
- Overclocked Settings Persisting After Uninstall: In some instances, settings applied by GPU Tweak II might persist even after the software is uninstalled, as they can be written to the GPU’s BIOS. If this happens, reinstalling GPU Tweak II, reverting to default settings, and then uninstalling again, or using DDU and reinstalling graphics drivers, might be necessary.
Best Practices:
- Start Small: Always make minimal, incremental adjustments to clock speeds, voltage, and power targets.
- Test Thoroughly: After each change, run stress tests and benchmarks to confirm stability and performance gains.
- Monitor Constantly: Keep an eye on temperatures, clock speeds, and voltage during testing to prevent overheating or instability.
- Ensure Adequate Cooling: Your case airflow and GPU cooler must be able to handle the increased heat generated by overclocking.
- Backup Settings: Before making significant changes, note down your stable settings or save them as a profile.
- Update Drivers: Ensure your graphics drivers and GPU Tweak II software are always updated to the latest stable versions.
Conclusion
GPU Tweak 2 Optimization Tips for Higher FPS offers a pathway to significantly enhance your gaming performance and overall system responsiveness. By leveraging the intuitive interface and powerful features of ASUS GPU Tweak II, you can unlock the full potential of your ASUS graphics card. From mastering basic overclocking of core and memory clocks to fine-tuning voltage and power targets, and implementing custom fan curves for optimal thermal management, each adjustment contributes to a smoother and more immersive gaming experience. Remember that the journey to higher FPS is a delicate balance of pushing limits while maintaining stability and managing heat. Approach the process methodically, with small, incremental changes, diligent monitoring, and thorough validation using benchmarks. With patience and adherence to best practices, GPU Tweak II empowers you to extract every last drop of performance from your GPU, transforming your gameplay and achieving those coveted higher frame rates.