ASUS GPU Tweak Tutorial: 10 Easy Steps for Safe Overclocking and Fan Control
Table of Contents
ASUS GPU Tweak is a powerful and comprehensive software utility designed to provide users with unparalleled control over their graphics card’s performance. Whether you are a casual gamer seeking a slight frame rate boost or a dedicated enthusiast aiming to extract every ounce of performance from your hardware, GPU Tweak III offers the tools necessary for overclocking, undervolting, and precise fan control. This tutorial will guide you through the intricacies of ASUS GPU Tweak III, empowering you to optimize your graphics card for a superior computing and gaming experience.
Understanding ASUS GPU Tweak III: The Essential Tool for Performance
ASUS GPU Tweak III represents the latest iteration of ASUS’s renowned graphics card utility, succeeding GPU Tweak II with a significantly refined interface and expanded functionalities. This all-encompassing software works with graphics cards from any manufacturer, not exclusively ASUS and ROG, making it a versatile choice for a broad user base. Its primary purpose is to allow users to adjust various parameters of NVIDIA and AMD desktop graphics cards, including core clock speeds, memory clock speeds, voltage, and fan speeds. Beyond simple adjustments, GPU Tweak III provides real-time monitoring of critical metrics such as GPU temperature, usage, power consumption, and frame rates, offering a comprehensive overview of your GPU’s operational status.
Key enhancements in GPU Tweak III include one-click ASUS Preset Modes like “OC Mode” for an instant performance boost, “Silent Mode” for quieter operation, and “User Mode” for saving custom configurations. For those seeking more advanced optimization, the “OC Scanner” feature, particularly useful for NVIDIA cards, automates the overclocking process by running stress tests to find the maximum stable overclock for your specific chip. The software also integrates essential tools such as GPU-Z for detailed hardware information and ROG FurMark for stability testing. Furthermore, features like Profile Connect allow users to assign different tuning profiles to individual games or applications, automatically applying them when launched, offering dynamic performance management tailored to specific needs. This level of detailed control and automation makes GPU Tweak III an indispensable utility for any PC enthusiast looking to fine-tune their graphics card.
Installation and Initial Setup of ASUS GPU Tweak III
Before embarking on any performance enhancements, the first crucial step is to properly install ASUS GPU Tweak III. The software can be downloaded directly from the official ASUS support website or through dedicated utility download portals. Ensure you download the latest version to benefit from bug fixes, updated compatibility, and the newest features. As of June 8, 2026, version 2.1.2.1 for Windows 10 and 11 (64-bit) was released, focusing on OSD stability and performance optimization.
The installation process is straightforward:
- Download the
GPU-Tweak-III.exefile and unzip it if necessary. - Double-click the executable to begin the installation.
- Follow the on-screen prompts, clicking “Install” and “Next” as guided by the program.
- A system restart is typically required to complete the installation and ensure all components are correctly initialized.
Once installed, launch GPU Tweak III. Upon the first launch, it is advisable to familiarize yourself with the default settings and run a benchmark test to establish a baseline for your GPU’s performance. This initial benchmark will serve as a reference point to measure the effectiveness of any subsequent overclocking or fan control adjustments. Ensuring your GPU drivers are up-to-date is also a critical preparatory step, as updated drivers often bring performance improvements and enhanced stability, which are vital for successful overclocking.
Navigating the Interface: A Comprehensive Walkthrough
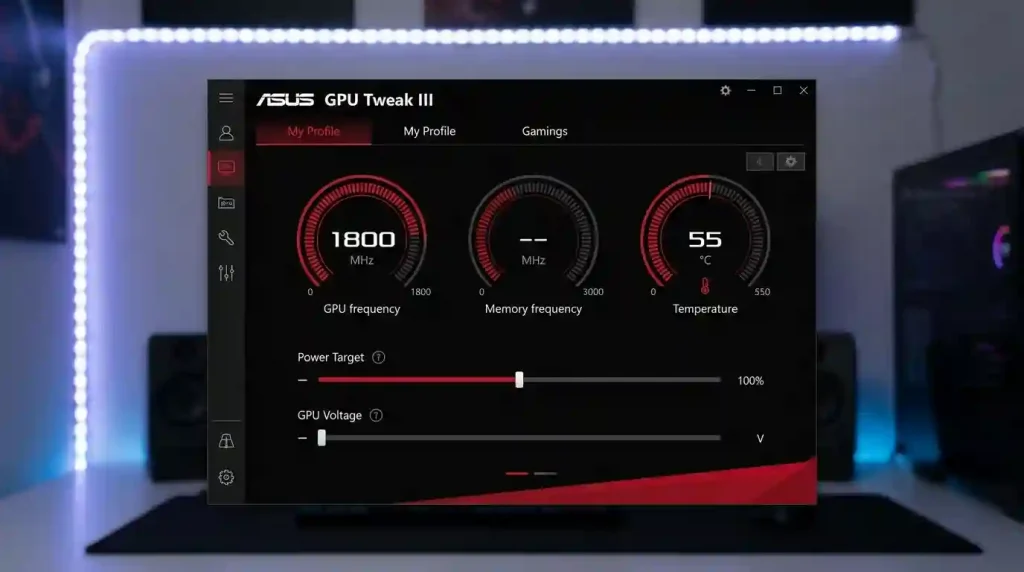
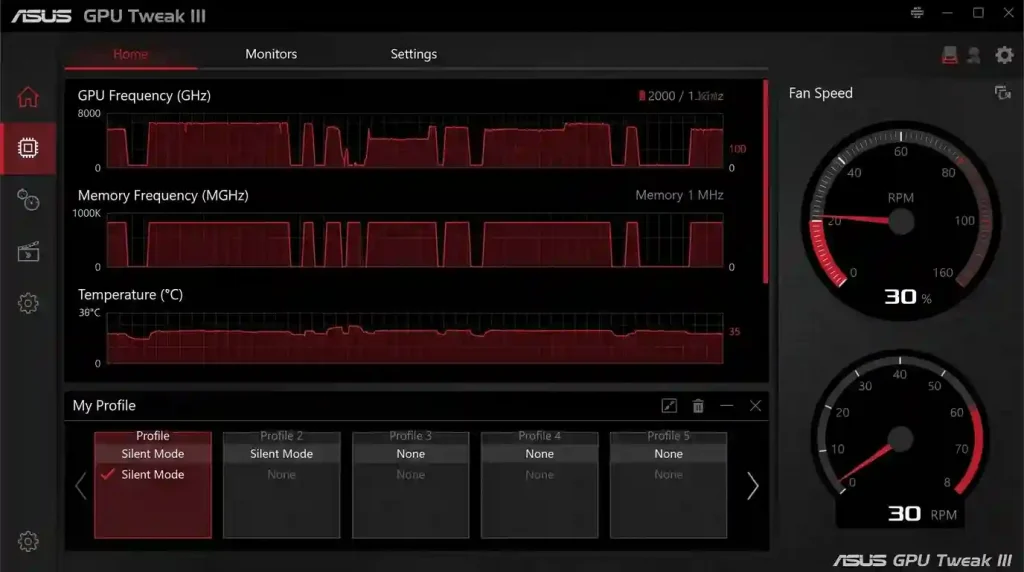
Upon opening ASUS GPU Tweak III, you’ll be greeted by a redesigned interface that aims to be both intuitive and feature-rich. The main window typically presents a dual-pane layout: a monitoring window on the left displaying real-time statistics and a function setting window on the right for adjustments. These windows can be linked or detached for flexible arrangement on your desktop.
The top section of the main screen usually features one-click preset modes: Default Mode, OC Mode, and Silent Mode. These presets offer quick, pre-configured performance profiles. For instance, OC Mode provides an immediate performance boost, while Silent Mode prioritizes quiet operation by lowering clock speeds and power targets. A “User Mode” also allows you to save and quickly switch to your custom settings.
Below these presets, you’ll find a dashboard with several meters displaying vital GPU statistics such as GPU frequency, memory frequency, GPU temperature, GPU power, and GPU voltage. These meters can be customized, allowing you to show, hide, and rearrange items to keep essential information front and center.
The primary adjustment sliders for manual tweaking are located in the lower sections of the interface, providing control over parameters like Power Target, GPU Boost Clock, Memory Clock, and GPU Voltage. The interface also includes dedicated icons in the left sidebar for accessing the Monitor window, OSD settings, the built-in GPU-Z, and the OC Scanner. These sections are pivotal for detailed monitoring, fine-tuning, and automated optimization, ensuring that every aspect of your GPU’s performance is within your control.
Safe Overclocking Principles: Maximizing Performance Responsibly
Overclocking your GPU can significantly enhance gaming performance and rendering times, but it’s crucial to approach it with caution to avoid instability or potential hardware degradation. Modern GPUs have built-in protections, such as thermal throttling, that will reduce clock speeds if temperatures become excessive, preventing permanent damage. However, prolonged operation at the edge of stability or with unnecessarily high voltages can reduce hardware longevity.
Here are fundamental principles for safe and effective overclocking:
- Start with a Baseline: Always begin by running a benchmark or demanding game at stock settings to establish a performance baseline. This helps you quantify any gains and quickly identify issues.
- Ensure Adequate Cooling: Overclocking increases power consumption and heat output. Verify that your PC case has good airflow and your GPU cooler is functioning optimally to prevent overheating. Aim to keep temperatures below 80-85°C under load.
- Update Drivers: Ensure your graphics drivers are up to date, as newer drivers can improve performance and stability for overclocking.
- Incremental Adjustments: Make small, incremental changes to clock speeds (e.g., 10-20 MHz for core clock, 50-100 MHz for memory clock). Avoid adjusting multiple settings simultaneously, as this makes it difficult to pinpoint the cause of any instability.
- Stress Test Each Change: After each adjustment, run a dedicated stress test (like ROG FurMark, Unigine Superposition, or 3DMark TimeSpy, which can be found in GPU Tweak III’s toolbox) or a demanding game to check for stability and artifacts. If crashes or graphical glitches occur, dial back the last change.
- Monitor Constantly: Keep a close eye on GPU temperature, clock speeds, and power draw using GPU Tweak III’s monitoring tools throughout the process.
- Save Profiles: Once you find stable settings, save them as a custom profile in GPU Tweak III for easy recall. Always keep a copy of your default settings.
Remember that the “silicon lottery” means every GPU will overclock differently, even identical models, so your results may vary from others. Patience and careful testing are key to a successful and safe overclock.
Core Clock and Memory Clock Overclocking: Boosting Your GPU’s Power
The core and memory clocks are the primary parameters you’ll adjust to boost your GPU’s performance. Increasing these speeds allows the GPU to process more data per cycle, leading to higher frame rates and faster rendering. GPU Tweak III provides both automated and manual methods to achieve this.
1. Easy Overclocking with OC Mode and Power Target:
For beginners or those who prefer a quick boost with minimal effort, GPU Tweak III offers the “OC Mode” preset. Clicking this button automatically increases the GPU clock speed and power target to a preset amount, offering an immediate performance uplift. Additionally, manually moving the “Power Target” slider all the way to the right (often up to 133% for high-end cards) allows the card’s built-in boosting algorithm to sustain higher clock speeds for longer periods by providing more headroom for power consumption. Remember to click “Apply” after making changes.
2. Automated Overclocking with OC Scanner (NVIDIA GPUs):
If you have an NVIDIA-based card, the “OC Scanner” is an excellent tool for automatically finding the optimal stable overclock. This feature runs a series of stress tests, incrementally increasing the clock speed and testing for stability at different voltage levels to generate an optimized voltage-frequency curve. To use it:
- Click the “OC Scanner” button in the upper-right corner of the GPU Tweak III window.
- (Optional) In “Advanced Settings,” you can increase the Temperature Target and/or Power Target to give the scanner more headroom.
- Click “Start” and let the software run its tests. This process can take some time but requires no manual intervention.
- Once complete, the scanner will apply the most stable overclock it found.
3. Manual Overclocking (Sliders Method):
For maximum control and the highest potential performance gains, manual overclocking using the sliders is the way to go.
- Reset to Default: Always start by clicking the “Default” button in the lower-right corner to ensure you’re working from stock settings.
- Increase Power Target: Move the “Power Target” slider to its maximum allowable value to provide ample power for higher clock speeds.
- Adjust GPU Boost Clock: Increase the “GPU Boost Clock” slider by small increments, typically 10-20 MHz at a time.
- Test for Stability: After each increment, click “Apply” and run a stress test or a demanding game for 10-15 minutes. Look for crashes, freezes, or graphical artifacts (sparkles, black flashes).
- Find the Limit: Continue increasing the GPU Boost Clock and testing until you encounter instability. Once you hit this limit, reduce the clock speed to the last stable value.
- Adjust Memory Clock: Once your core clock is stable, repeat the incremental process for the “Memory Clock” slider, typically in larger steps of 50-100 MHz. Test thoroughly after each increase. Memory overclocking issues often manifest as artifacts or visual corruption rather than outright crashes.
- Fine-tune and Save: After finding stable core and memory overclocks, you can make minor adjustments to balance performance and stability. Once satisfied, save your settings as a “User Mode” profile.
Voltage Adjustment: Advanced Overclocking Techniques
Adjusting the GPU voltage is an advanced overclocking technique that can unlock higher stable clock speeds, but it comes with increased risks if not handled carefully. Higher voltage typically generates more heat and can put additional stress on the GPU components, potentially shortening their lifespan if pushed excessively. For many modern GPUs, maximizing the power limit is often sufficient to achieve significant overclocks without needing to touch voltage. However, for those seeking to extract every last bit of performance, GPU Tweak III offers robust voltage control through the GPU Voltage slider and the VF Tuner.
In GPU Tweak III, the “GPU Voltage” slider allows direct adjustment of the GPU core voltage. If your GPU Voltage is measured in percentages, moving the slider to the right is generally safe as modern cards have built-in protections. However, if it’s measured in millivolts (mV), thorough research into safe voltage values for your specific GPU model is highly recommended. Always increase voltage in very small increments and monitor temperatures meticulously.
The VF Tuner (Voltage-Frequency Tuner) is a more sophisticated tool within GPU Tweak III, particularly useful for experienced overclockers. It allows you to fine-tune the GPU’s voltage-frequency curve, essentially telling the GPU what frequency to run at for a given voltage. This enables precise optimization, and it can also be used for undervolting to achieve lower temperatures and power consumption at similar performance levels.
To use the VF Tuner for overclocking:
- First, slightly increase your GPU Boost Clock (e.g., by 20MHz) and click “Apply” to shift the entire curve upwards.
- Click the “VF Tuner” button to open its dedicated window.
- You’ll see a graph plotting voltage against frequency. You can manually adjust points on this curve to find the optimal voltage for higher frequencies. The goal is often to “flatten” the curve at desired higher frequencies by aligning points down at a lower voltage for those frequencies.
- Always test thoroughly after making changes within the VF Tuner using stress tests to ensure stability.
Proceed with caution when adjusting voltage. If you experience crashes or instability, revert to the last stable settings. Consult reputable community guides specific to your GPU model for safe voltage ranges if you intend to delve deep into manual voltage tuning.
| Feature Category | ASUS GPU Tweak III Function | Benefit | Risk (if not managed) |
|---|---|---|---|
| Overclocking | OC Mode (One-Click) | Instant performance boost for gaming and demanding tasks. | Slightly increased temperature, minimal instability risk. |
| Overclocking | OC Scanner (Automated) | Optimized, stable overclock for NVIDIA GPUs with minimal user effort. | Requires waiting time; potential for minor instability if limits are aggressive. |
| Overclocking | Manual Core Clock Adjustment | Maximum performance customization; fine-tuned gains. | System crashes, artifacts, overheating, reduced hardware lifespan if excessive. |
| Overclocking | Manual Memory Clock Adjustment | Improved texture loading and overall rendering efficiency. | Graphical artifacts, visual corruption, instability. |
| Advanced Tuning | GPU Voltage Adjustment | Increased stability for higher clock speeds. | Significantly increased heat, accelerated hardware degradation, instability. |
| Advanced Tuning | VF Tuner | Precise voltage/frequency curve customization for optimal efficiency or maximum performance. | Complex to master; improper settings can lead to instability or crashes. |
| Cooling Control | Custom Fan Curves | Optimal balance between cooling performance and noise levels. | Suboptimal cooling leading to throttling, excessive noise at idle. |
| Monitoring | Real-time System Stats | In-depth understanding of GPU behavior (temps, usage, clocks, power). | None. |
Mastering Fan Control: Keeping Your GPU Cool and Quiet
Effective fan control is paramount for maintaining optimal GPU temperatures, ensuring stability during overclocking, and managing noise levels. ASUS GPU Tweak III provides a comprehensive suite of fan management tools, allowing you to choose between automatic, manual, or fully customized fan speed settings.
By default, most GPUs, especially ROG and TUF Gaming cards, operate in a 0dB Fan Mode, meaning the fans remain off for silent operation until the GPU reaches a certain temperature (often around 50-55°C). This is ideal for quiet computing during light loads, but fans will ramp up automatically under heavier loads to prevent overheating.
To access fan controls, click the fan icon within the GPU Tweak III interface. Here you’ll typically find a fan speed slider. For NVIDIA GeForce cards from ROG and TUF Gaming, you might see two sliders—one for side fans and one for the center fan, designed to optimize airflow. For other cards, a single slider controls all fans.
You can choose a Manual fan speed by dragging the slider to a constant percentage. While not ideal for everyday use, this can help you determine the acoustics at different fan speeds, aiding in custom curve creation. Clicking the “Auto” button will revert to the default automatic fan behavior.
GPU Tweak III also includes features like “Fan Speed Update Period” and “Temperature Hysteresis” which help prevent overly frequent fan speed changes, contributing to a smoother and quieter operation by adding a slight delay to fan reactions to temperature fluctuations. For owners of ROG Strix graphics cards, GPU Tweak III can even control certain case fans via FanConnect II headers on the card, allowing case fan speeds to be dictated by GPU temperature rather than CPU temperature.
Custom Fan Curves: Tailoring Cooling to Your Needs
Creating a custom fan curve is where you can truly fine-tune the balance between cooling performance and acoustic comfort. This feature allows you to define how your GPU fans respond to specific temperature thresholds.
To access the fan curve editor, click the pencil icon located under the fan speed slider in the Fan Control section of GPU Tweak III. This will open a graph where the horizontal axis represents GPU temperature (°C) and the vertical axis represents fan speed (%).
Here’s how to create and adjust a custom fan curve:
- Add Points: Click anywhere on the graph to add a new control point.
- Drag and Adjust: Drag these points to your desired temperature/fan speed combinations. For example, you might want fans to remain off (0%) until 50-55°C, then slowly ramp up to 30-40% at 60°C, and reach 60-70% at 75°C, and so on. The goal is to keep your GPU under a safe operating temperature (typically below 80-85°C) while minimizing fan noise when possible.
- Smooth Transitions: Try to create a smooth curve without abrupt changes, as sudden jumps in fan speed can be audibly noticeable.
- Test and Monitor: After adjusting the curve, click “Apply” and run a demanding application or game. Continuously monitor your GPU temperatures and listen to the fan noise. Make further adjustments as needed until you find a satisfactory balance.
- Save Your Profile: Once you’ve perfected your custom fan curve, save it as part of a “User Mode” profile. This allows you to quickly switch to your optimized cooling settings whenever required.
Experimentation is key, as the “best” fan curve depends on your specific GPU, case airflow, and personal preference for noise versus temperature. A 2021 study from the University of Texas highlights that heat can cause GPUs to slow down, reinforcing the importance of balancing GPU temperature and noise. For more detailed information on cooling optimization, you may refer to resources like Wikipedia’s article on Computer Cooling.
Monitoring and Stress Testing: Ensuring Stability and Performance
Continuous monitoring and rigorous stress testing are indispensable steps in any GPU tuning process, especially when overclocking. They ensure the stability of your settings, prevent hardware damage, and allow you to accurately measure performance gains. ASUS GPU Tweak III provides robust tools for both.
Monitoring Capabilities:
GPU Tweak III features a dedicated “Monitor” window, accessible via the graph icon in the left sidebar. This window displays real-time graphs and current, maximum, and minimum values for numerous metrics, including:
- GPU Clock (MHz)
- GPU Voltage (mV)
- Fan Speed (RPM and %)
- Memory Clock (MHz)
- GPU Temperature (°C)
- Power Target Status
- GPU Usage (%)
- Memory Usage (MB)
- Frame Time (ms) and FPS (including 1% low and 0.1% low metrics)
You can customize which stats are displayed and their order. The Monitor window can be used on a second display or even via a mobile device using the “Mobile Monitor” feature, where you scan a QR code to view real-time stats on your phone.
For in-game monitoring, the On-Screen Display (OSD) function overlays chosen metrics directly onto your game screen. The OSD is highly customizable, allowing you to adjust text size, color, effects, and the information displayed. GPU Tweak III can also import detailed system metrics from HWMonitor via a built-in plugin, offering even more comprehensive data like SSD temperatures and additional voltage information.
Stress Testing:
After making any adjustments to your GPU settings, it’s critical to conduct stress tests to verify stability. GPU Tweak III integrates ROG FurMark, a demanding benchmarking tool, into its toolbox. Other popular third-party benchmarks like Unigine Superposition or 3DMark TimeSpy are also excellent choices.
During stress tests:
- Run the chosen benchmark at very high settings to push your GPU to 99% usage.
- Continuously monitor temperatures and clock speeds using the GPU Tweak III Monitor or OSD.
- Watch for signs of instability such as game crashes, system freezes, driver timeouts, or visual artifacts (sparkles, flickering, distorted textures).
- If any instability occurs, immediately reduce your overclock settings to the last known stable configuration and retest.
Regular monitoring and thorough stress testing help you find the “sweet spot” where your GPU delivers maximum performance without compromising stability or risking hardware damage.
Troubleshooting Common Issues and Reverting Settings
Even with careful adjustments, you might encounter issues during overclocking or fan curve customization. Common problems include system crashes, graphical artifacts, or instability in games. Thankfully, GPU Tweak III offers several straightforward ways to troubleshoot and revert settings, minimizing potential risks.
1. Instant Reversion to Default:
The quickest way to resolve instability after an aggressive overclock is to click the “Default” button in the lower-right corner of the GPU Tweak III interface. This immediately resets all GPU parameters to their factory stock settings, often resolving crashes and allowing your system to stabilize. For fan settings, a dedicated “Auto” button in the fan control section will revert to the default automatic fan behavior.
2. Using Saved Profiles:
If you’ve saved stable custom profiles (User Modes), you can easily switch back to one of them if your current experimental settings cause issues. This is why it’s recommended to save your successful configurations, allowing for quick and reliable restoration.
3. Identifying the Cause of Instability:
When troubleshooting, it’s crucial to identify which specific adjustment led to the problem. This is why incremental adjustments are vital.
- If a benchmark or game crashes outright, it’s often an indication that the core clock speed is too high or the voltage is insufficient.
- If you observe graphical artifacts, such as flickering textures, sparkles, or screen corruption, the memory clock speed is likely too high.
- Overheating can lead to thermal throttling, where the GPU automatically reduces its clock speed to prevent damage. If temperatures are consistently high, your fan curve may be too conservative, or your case airflow needs improvement.
4. Power Cycling and Reinstallation:
In rare cases where GPU Tweak III itself becomes unresponsive or buggy, a full system reboot can sometimes resolve the issue. If persistent problems arise with the software, a clean reinstallation of GPU Tweak III might be necessary. Ensure you completely uninstall the previous version before installing a fresh copy.
Remember that modern graphics cards have robust built-in protections against permanent damage from overclocking. The primary risks are instability, crashes, and a potentially shortened lifespan if extreme settings are maintained over long periods without adequate cooling or voltage. Always prioritize stability and reasonable temperatures over chasing marginal performance gains.
Conclusion
ASUS GPU Tweak III is an exceptionally powerful and versatile tool for anyone looking to optimize their graphics card’s performance. By providing comprehensive control over overclocking, voltage adjustment, and fan speeds, alongside detailed monitoring capabilities, it empowers users to unlock their GPU’s full potential. Whether you opt for the simplicity of one-click OC Mode, the automated efficiency of OC Scanner, or the granular control of manual tuning and custom fan curves, GPU Tweak III caters to all levels of expertise. Remember to approach overclocking responsibly, prioritize stable performance and optimal temperatures, and utilize the robust monitoring and troubleshooting features at your disposal. With a thoughtful approach and the guidance provided in this tutorial, you can significantly enhance your computing and gaming experience, pushing your hardware to new heights while ensuring its longevity.