eGPU for Laptop Setup Guide: 10 Powerful Steps for Thunderbolt Gaming Upgrade

Table of Contents
An eGPU for laptop setup, or external Graphics Processing Unit, is transforming the landscape of mobile computing by allowing users to augment their laptop’s graphical capabilities with a desktop-grade graphics card. This innovative technology enables compact, portable laptops to achieve performance levels traditionally reserved for bulky desktop PCs, making high-end gaming, video editing, 3D rendering, and AI workloads accessible on the go. The key to this transformation lies in high-speed connectivity, predominantly facilitated by Thunderbolt technology.
Laptops, while offering unparalleled portability, often come with integrated graphics or less powerful discrete GPUs to maintain their thin and light profiles and battery life. This can be a significant limitation for users who demand serious graphical horsepower for their professional or recreational activities. An eGPU bridges this gap, providing a dedicated external graphics solution that bypasses the limitations of a laptop’s internal hardware. By connecting an eGPU enclosure housing a powerful graphics card to a laptop via a Thunderbolt port, users can unlock enhanced visual fidelity and processing speeds without needing to invest in a completely new, high-performance desktop system.
eGPU for Laptop Setup and Thunderbolt Technology
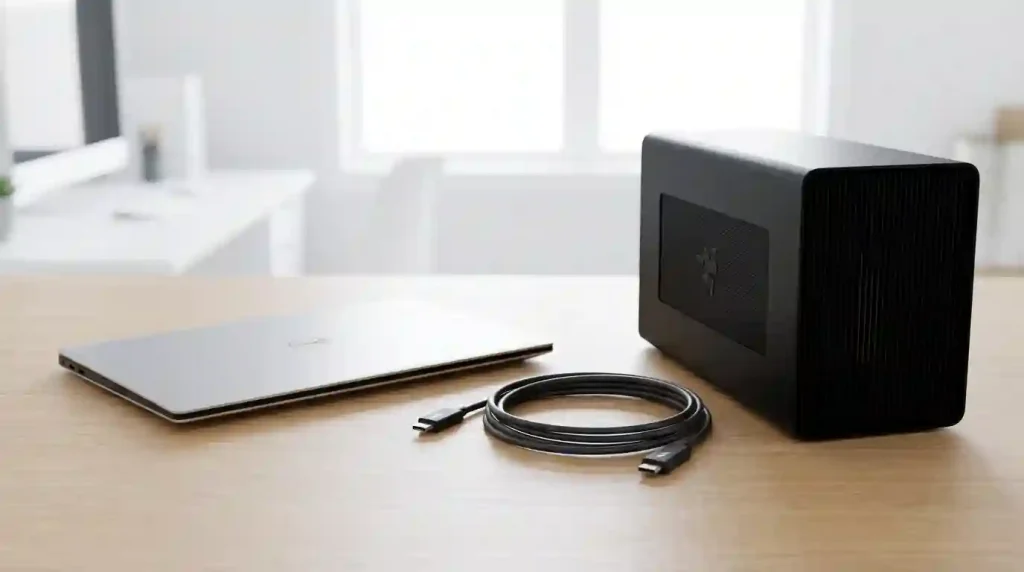
At its core, an eGPU setup consists of an external enclosure, a desktop graphics card, and a laptop with Thunderbolt connectivity. The eGPU enclosure acts as a housing for the graphics card, providing it with power and cooling, and connecting it to the laptop. This modular approach allows users to select a graphics card based on their specific needs and budget, much like building a custom desktop PC. The magic that enables this high-bandwidth connection is Thunderbolt technology.
Thunderbolt, co-developed by Intel and Apple, is a high-speed input/output (I/O) interface that unifies data transfer, video output, and power delivery into a single cable and port. Its evolution has seen significant improvements in bandwidth and capabilities across generations:
- Thunderbolt 1 (2011): Introduced with 10 Gbps data transfer speed per channel, offering a total of 20 Gbps by aggregating two channels, and using the Mini DisplayPort connector.
- Thunderbolt 2 (2013): Doubled the bandwidth to 20 Gbps total by aggregating channels, still using the Mini DisplayPort, and supporting DisplayPort 1.2 for 4K displays.
- Thunderbolt 3 (2015): A game-changer, achieving 40 Gbps bidirectional bandwidth and adopting the versatile USB-C connector. It supports 100W power delivery, dual 4K display output, and connection to external GPUs, while allowing daisy-chaining of up to six devices. While offering 40 Gbps, this bandwidth is shared between data (PCIe) and video (DisplayPort) signals, and the PCIe link provided a maximum of 32 Gbit/s.
- Thunderbolt 4 (2020): Maintains the 40 Gbps maximum bandwidth of Thunderbolt 3 but introduces stricter requirements for minimum performance and features, guaranteeing 32 Gbps for PCIe links and support for dual 4K displays. It also enhances security features like Intel VT-d-based direct memory access (DMA) protection.
- Thunderbolt 5 (2023/2024): The latest iteration, significantly boosting bandwidth to 80 Gbps bidirectional, with a “Bandwidth Boost” mode that can reach up to 120 Gbps for display-intensive tasks. It supports DisplayPort 2.1, two times (64 Gbit/s) the PCI Express data-throughput using PCI Express Gen. 4 x 4, and up to 240W of charging power downstream. This version is designed to minimize eGPU performance bottlenecks and handle multiple 8K displays or even a single 16K display.
The high bandwidth of Thunderbolt is crucial for eGPUs because a desktop graphics card requires a significant amount of data transfer to communicate effectively with the laptop’s CPU. While even the fastest Thunderbolt connections will present some performance overhead compared to a direct PCIe x16 slot in a desktop, the advancements in Thunderbolt 3, 4, and especially 5, have made eGPU solutions remarkably viable for demanding applications.
Why Consider an eGPU for Your Laptop?
The appeal of an eGPU lies in its ability to deliver desktop-class graphics performance to laptops without compromising their portability or requiring a complete system overhaul. This makes eGPUs a compelling solution for various user profiles and use cases.
Firstly, for gamers, an eGPU can transform an ultrabook or a business laptop with integrated graphics into a formidable gaming machine capable of running demanding AAA titles at higher resolutions and frame rates. This is particularly beneficial for those who desire a lightweight laptop for daily use but want to enjoy immersive gaming experiences when docked at home.
Creative professionals, including video editors, 3D artists, and graphic designers, also stand to gain immensely. Tasks such as 4K video rendering, complex 3D modeling, and GPU-accelerated effects can be significantly sped up, dramatically reducing project completion times. The ability to harness the raw power of a high-end graphics card means less waiting and more creating.
Furthermore, eGPUs offer a degree of future-proofing. As graphics technology rapidly advances, upgrading a laptop’s internal GPU is typically impossible. With an eGPU, users can simply swap out the graphics card in the enclosure for a newer, more powerful model, extending the lifespan and utility of their existing laptop. This modularity also provides versatility, allowing the eGPU to be used with multiple compatible laptops, making it a flexible investment. For instance, a student might use a lightweight laptop for classes and then connect it to an eGPU for demanding graphic design work or gaming in their dorm room.
While eGPUs offer substantial benefits, it’s important to acknowledge that performance will typically be around 10-25% lower than the same GPU directly installed in a desktop due to Thunderbolt bandwidth limitations and overhead. However, for many, the trade-off is well worth the flexibility and performance boost an eGPU provides over a laptop’s built-in graphics.
Essential Components for Your eGPU Setup
Setting up an eGPU requires a few key components to ensure a functional and powerful external graphics solution. Understanding each part is crucial for compatibility and optimal performance.
- eGPU Enclosure: This is the housing for your desktop graphics card. Enclosures vary in size, features, and power supply capacity. Key considerations include:
- Power Supply Unit (PSU): Most eGPU enclosures come with a built-in PSU, typically ranging from 400W to 850W or higher, to power the graphics card and sometimes charge the laptop. Ensure the PSU capacity is sufficient for your chosen GPU.
- Cooling System: Adequate cooling is essential to prevent overheating of the high-performance GPU. Enclosures may feature passive or active cooling solutions.
- Connectivity: The enclosure must support the Thunderbolt version of your laptop (Thunderbolt 3, 4, or 5). Some enclosures also offer additional USB ports, Ethernet, and display outputs.
- GPU Compatibility: Check the physical dimensions and power requirements of the enclosure to ensure it can accommodate your desired graphics card.
- Desktop Graphics Card (GPU): This is the heart of your eGPU setup. You’ll need a desktop-grade graphics card from NVIDIA or AMD. The choice of GPU depends on your performance needs and budget. For example, NVIDIA RTX 40-series or AMD RX 7000-series cards are popular high-performance choices. While very high-end cards like the RTX 4090 can be used, there might be diminishing returns due to Thunderbolt bandwidth limitations; mid-range to high-end cards like the RTX 4070 often offer the best balance of price and performance for eGPU setups.
- Thunderbolt Cable: A high-quality, certified Thunderbolt cable is critical for stable and fast data transfer between your laptop and the eGPU. For Thunderbolt 3 and 4, these cables support up to 40 Gbps. For Thunderbolt 5, a certified Thunderbolt 5 cable is required to achieve the full 80 Gbps or 120 Gbps bandwidth. Not all USB-C cables are Thunderbolt compatible, so look for the lightning bolt symbol.
- Laptop with Thunderbolt Port: Your laptop must have a Thunderbolt 3, 4, or 5 port. Look for the lightning bolt icon next to the USB-C port to confirm Thunderbolt support.
- External Monitor (Recommended): While you can use your laptop’s internal display, connecting an external monitor directly to the eGPU’s display outputs (HDMI, DisplayPort) often provides a significant performance boost (15-25% or more). This is because the rendered frames don’t need to be sent back through the Thunderbolt connection to the laptop’s integrated display, reducing bandwidth bottlenecks and latency.
Compatibility Checklist: Ensuring a Seamless Setup
Before investing in an eGPU setup, it’s crucial to verify compatibility across all components to ensure a smooth and frustration-free experience. A thorough compatibility check can save you time, money, and potential headaches.
- Laptop Requirements:
- Thunderbolt Port: The most critical requirement is a Thunderbolt 3, Thunderbolt 4, or Thunderbolt 5 port on your laptop. These ports typically feature a small lightning bolt icon next to them. Be aware that a USB-C port does not automatically mean it’s a Thunderbolt port.
- Thunderbolt Version: While Thunderbolt 3, 4, and 5 are generally backward compatible, matching the latest Thunderbolt version on your laptop with your eGPU enclosure is ideal for maximizing performance.
- CPU and RAM: While the eGPU handles graphics, a sufficiently powerful CPU and adequate RAM in your laptop are still essential to prevent bottlenecks. An older laptop with a weak CPU might not fully utilize a high-end eGPU.
- Operating System: Ensure your operating system (Windows 10/11 or macOS) supports eGPUs. Most modern versions do, but specific driver support can vary. For macOS, Apple typically supports AMD GPUs more robustly than NVIDIA.
- eGPU Enclosure Compatibility:
- Thunderbolt Version: Confirm the enclosure supports your laptop’s Thunderbolt version.
- GPU Dimensions & Power: Double-check the physical dimensions of the graphics card you plan to use against the enclosure’s specifications, including length, height, and width (slot count). Also, ensure the enclosure’s built-in power supply (PSU) can adequately power your chosen GPU, considering its TDP (Thermal Design Power) and any peak power draw.
- Graphics Card Compatibility:
- Driver Support: Both NVIDIA and AMD provide drivers for their desktop GPUs. Ensure that drivers for your chosen card are available and regularly updated for your operating system.
- macOS Specifics: If you’re a Mac user, be aware that macOS has more limited support for NVIDIA cards compared to AMD. Always verify specific GPU models are supported by your macOS version.
- Cable Quality: Use a certified Thunderbolt cable. Inferior cables can lead to connection issues, instability, or reduced performance.
Many modern laptops from brands like Apple (MacBook Pro), Dell (XPS series), and HP (Spectre x360, ENVY series) are known for their strong eGPU compatibility. However, it’s always best to consult your laptop’s manufacturer specifications or user forums for definitive eGPU support details.
| Thunderbolt Version | Release Year | Max Bidirectional Bandwidth | PCIe Bandwidth | Display Support | Max Power Delivery | Connector Type |
|---|---|---|---|---|---|---|
| Thunderbolt 1 | 2011 | 20 Gbps (2x 10 Gbps channels) | N/A (Integrated PCIe & DP) | HD Displays | 10W | Mini DisplayPort |
| Thunderbolt 2 | 2013 | 20 Gbps | N/A (Aggregated PCIe & DP) | Single 4K or Dual QHD | 10W | Mini DisplayPort |
| Thunderbolt 3 | 2015 | 40 Gbps | 32 Gbps (PCIe 3.0 x4) | Dual 4K @ 60Hz or Single 5K | 100W | USB-C |
| Thunderbolt 4 | 2020 | 40 Gbps | 32 Gbps (PCIe 3.0 x4 minimum) | Dual 4K @ 60Hz or Single 8K | 100W | USB-C |
| Thunderbolt 5 | 2023 | 80 Gbps (up to 120 Gbps with Boost) | 64 Gbps (PCIe 4.0 x4) | Multiple 8K or Single 16K | 240W | USB-C |
Step-by-Step eGPU Setup Process
Once you have all your compatible components, the actual eGPU setup process is relatively straightforward. Following these steps will help ensure a smooth installation and initial operation.
- Prepare Your eGPU Enclosure and Graphics Card:
- If your eGPU enclosure did not come with a pre-installed graphics card, carefully install your chosen desktop GPU into the enclosure’s PCIe slot. Secure it with screws as per the enclosure’s instructions.
- Connect any auxiliary power connectors from the enclosure’s power supply to the graphics card if required.
- Close the enclosure securely.
- Update Your Laptop’s Software and Drivers:
- BIOS/UEFI Firmware: Visit your laptop manufacturer’s website and install the latest BIOS/UEFI firmware update. This is crucial for Thunderbolt stability and eGPU detection.
- Thunderbolt Drivers and Firmware: Ensure your laptop has the latest Thunderbolt drivers and firmware (NVM) installed. These are usually available from your laptop manufacturer’s support page or Intel’s website.
- Operating System Updates: Make sure your Windows operating system is fully updated.
- Initial Connection:
- Connect the eGPU enclosure to a power outlet and turn it on (if it has a power switch).
- Using a certified Thunderbolt cable, connect the eGPU enclosure to your laptop’s Thunderbolt port. It’s recommended to temporarily disconnect other peripherals during the first connection.
- Your laptop should detect the new Thunderbolt device. You may receive a prompt from the Thunderbolt Software application (e.g., Thunderbolt Control Center on Windows) to authorize the device. Select “Always Connect” or “Connect Only Once” as desired.
- Install Graphics Card Drivers:
- If your laptop doesn’t automatically install the correct drivers, download the latest graphics drivers directly from NVIDIA’s or AMD’s official websites for your specific GPU model.
- Perform a clean installation of these drivers. Uninstall any existing GPU drivers (especially if you had a different dGPU) before installing the new ones.
- Restart and Verify:
- After driver installation, it’s often recommended to unplug the eGPU and restart your laptop.
- Once your laptop has fully restarted, reconnect the eGPU.
- Verify that the eGPU is recognized in Windows Device Manager under “Display adapters” without any caution signs. You should see your new desktop GPU listed alongside your laptop’s integrated graphics.
- Configure Graphics Settings (Optional but Recommended):
- For optimal performance, especially in games or demanding applications, connect your external monitor directly to the eGPU’s video outputs.
- In Windows Graphics Settings (Right-click desktop -> Display settings -> Graphics settings), you can manually assign specific applications to use the “High performance” (eGPU) graphics processor.
With these steps completed, your eGPU setup should be ready to deliver enhanced graphical performance. For more general information on Thunderbolt technology and its capabilities, you can refer to Wikipedia’s Thunderbolt interface article.
Optimizing Your eGPU Performance
While an eGPU significantly boosts your laptop’s graphical capabilities, a few optimization techniques can help you squeeze every last frame and ounce of performance out of your setup.
- Use an External Monitor Connected Directly to the eGPU: This is arguably the most impactful optimization. Connecting your monitor directly to the display outputs (HDMI, DisplayPort) on the eGPU enclosure bypasses the need to send rendered frames back through the Thunderbolt cable to your laptop’s internal display. This “round-trip” significantly reduces bandwidth bottlenecks and latency, leading to a substantial performance increase, often 15-25% or more.
- Keep Drivers Updated: Regularly check for and install the latest graphics drivers from NVIDIA or AMD, as well as updated Thunderbolt drivers and firmware from your laptop manufacturer. These updates often include performance improvements and bug fixes specifically for eGPU configurations.
- Configure Power Settings for Maximum Performance:
- In Windows Power & Sleep Settings, ensure that “PCI Express -> Link State Power Management” is set to “Off” for both “On Battery” and “Plugged In” options.
- For NVIDIA GPUs, open the NVIDIA Control Panel. Navigate to “3D Settings -> Global Settings” and set “Power Management Mode” to “Prefer Maximum Performance.”
- Disable any power-saving features related to your Thunderbolt controller in Device Manager by unchecking “Allow the computer to turn off this device to save power.”
- Ensure Proper Cooling for the eGPU: While the enclosure provides cooling, ensure it has adequate airflow. Avoid placing objects on top of or too close to the enclosure’s vents. Overheating can lead to performance throttling.
- Close Unnecessary Background Applications: Freeing up CPU and RAM resources on your laptop can help prevent bottlenecks, especially in CPU-intensive games or applications.
- Check Thunderbolt Security Settings in BIOS: Some BIOS settings might restrict Thunderbolt performance or device authorization. Ensure Thunderbolt is enabled and consider setting the Thunderbolt Security Level to “User” or “No Security” (with caution) and enabling “Pre-Boot ACL” for faster eGPU connection.
- Consider CPU Limitations: Even with an eGPU, a weak laptop CPU can still bottleneck performance. If you have an older laptop with a significantly less powerful CPU, a new laptop with a strong integrated GPU or a more modern mobile CPU might offer better overall value and performance than an eGPU upgrade.
Troubleshooting Common eGPU Issues
Even with careful setup, you might encounter issues with your eGPU. Here are some common problems and troubleshooting steps:
- eGPU Not Detected by Laptop:
- Check Connections: Ensure the Thunderbolt cable is securely plugged into both the laptop and the eGPU enclosure. Try a different, certified Thunderbolt cable if possible.
- Power Cycle: Turn off everything (laptop, eGPU), unplug the eGPU from the wall and laptop, wait a minute, then plug everything back in and restart.
- Thunderbolt Software Authorization: On Windows, open the “Thunderbolt Control Center” or similar application and ensure the eGPU device is authorized to connect.
- BIOS Settings: Verify that Thunderbolt is enabled in your laptop’s BIOS/UEFI settings and that Thunderbolt security levels are not set to restrict device connections.
- Drivers & Firmware: Ensure all laptop BIOS, Thunderbolt drivers, and Thunderbolt firmware (NVM) are up to date.
- Device Manager: Check Device Manager for any unknown devices or devices with yellow exclamation marks. This could indicate a driver issue.
- Random Disconnects or Instability:
- Cable Quality: A faulty or uncertified Thunderbolt cable is a common culprit. Replace it with a known good, certified cable.
- Power Issues: Ensure the eGPU enclosure is receiving stable power. Consider using a UPS (Uninterruptible Power Supply) if you experience power fluctuations. Make sure the enclosure’s PSU is sufficient for your GPU.
- Power Management Settings: As mentioned in optimization, disable “PCI Express Link State Power Management” and ensure the Thunderbolt controller isn’t set to turn off to save power in Device Manager.
- Overheating: Monitor the eGPU and laptop temperatures during demanding tasks. Ensure proper ventilation for the enclosure.
- Poor Performance (Lower than Expected):
- External Monitor: Connect an external monitor directly to the eGPU’s outputs for a significant performance boost.
- Driver Optimization: Ensure you have the latest, dedicated GPU drivers installed and that power management settings are configured for “Maximum Performance.”
- CPU Bottleneck: A weaker laptop CPU can limit the eGPU’s potential. Monitor CPU utilization during benchmarks or games.
- Game/Application Specific Settings: Ensure that the game or application is configured to use the “High-performance” (eGPU) graphics card in Windows Graphics settings.
- Thunderbolt Bandwidth: Understand that there will always be some performance loss compared to an internal PCIe x16 slot due to Thunderbolt’s x4 PCIe lane limitation and protocol overhead.
- Driver Conflicts (e.g., Error 43 on Windows):
- Clean Driver Installation: Use a tool like Display Driver Uninstaller (DDU) to completely remove all graphics drivers (both integrated and dedicated, if applicable) before performing a fresh installation of only the eGPU’s drivers.
- Disable Integrated GPU: In some cases, especially if your laptop has a discrete internal GPU (dGPU), temporarily disabling it in Device Manager can resolve conflicts with the eGPU.
If problems persist, consulting online eGPU communities (like r/eGPU on Reddit) and your specific hardware manufacturers’ support resources can provide more tailored solutions.
Conclusion
The eGPU for laptop setup, particularly with robust Thunderbolt support, offers a compelling solution for extending the graphical prowess of portable computers. By understanding the essential components, ensuring compatibility, and following a methodical setup and optimization process, users can transform their lightweight laptops into powerful workstations or gaming rigs. While some performance overhead is inherent to the external connection, the flexibility, upgradeability, and sheer performance boost provided by eGPUs make them an invaluable asset for gamers, content creators, and professionals alike. As Thunderbolt technology continues to evolve with versions like Thunderbolt 5 pushing bandwidth boundaries, the future of eGPUs looks brighter than ever, promising even more seamless and powerful external graphics experiences for laptop users.