GPU Box Setup Guide for External Graphics Performance: 7 Easy Tips for Maximum Speed
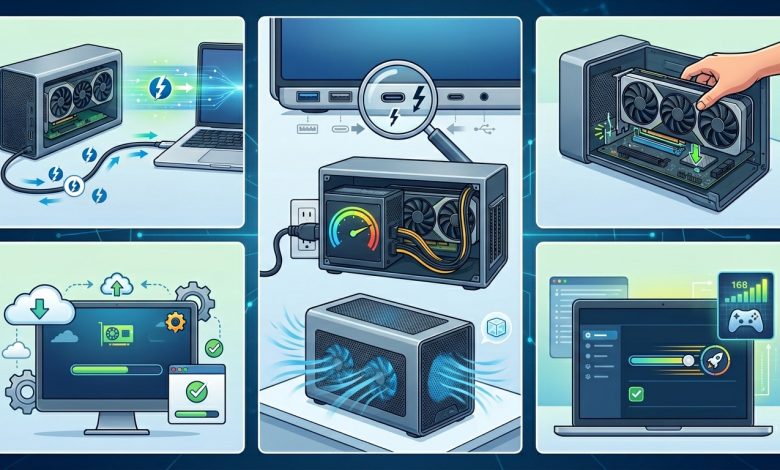
Table of Contents
GPU Box setups, also known as external Graphics Processing Unit (eGPU) enclosures, have revolutionized the way laptop users can experience desktop-level graphics performance. For individuals who rely on the portability of a laptop but demand the robust graphical capabilities typically found in desktop PCs for tasks like gaming, video editing, 3D rendering, or AI workloads, an eGPU offers a compelling solution. This comprehensive guide will walk you through everything you need to know about setting up a GPU box, from understanding the underlying technology to optimizing its performance for an unparalleled external graphics experience.
Introduction to External GPU Box (eGPUs)
An external GPU (eGPU) is a standalone graphics card housed in an external enclosure that connects to a laptop or small desktop computer, typically via a high-speed port like Thunderbolt 3, 4, or USB4. This innovative technology allows your portable device to offload graphics processing to a more powerful, desktop-grade GPU, significantly boosting its graphical capabilities. The core appeal of an eGPU lies in its ability to deliver desktop-class performance while maintaining the portability of your laptop.
The primary components of an eGPU setup include the eGPU enclosure, a desktop graphics card, a robust power supply, and a high-speed connection cable. While laptops are designed for mobility, they often have limitations in terms of integrated graphics power, size, and thermal management for high-end GPUs. An eGPU bridges this gap, providing enhanced performance for graphically intensive applications without the need to replace your entire laptop.
Benefits of integrating an eGPU into your workflow are numerous. You can upgrade your graphics without buying a new laptop, making it a cost-effective solution for extending the life and capabilities of your current machine. It offers versatility, allowing you to use a lightweight laptop on the go and connect to a powerful external GPU at your desk. This setup can dramatically improve frame rates in demanding games, accelerate video and 3D rendering, and enhance performance for AI and machine learning tasks. While offering significant advantages, it’s important to note that eGPUs may not always achieve 100% of the performance of the same GPU installed directly in a desktop PC, primarily due to bandwidth limitations of the connection interface. Typically, users might see about a 10-25% performance reduction compared to a native desktop setup.
Understanding eGPU Technology: Thunderbolt vs. OCuLink
The performance and compatibility of your eGPU setup largely depend on the connection technology used. Currently, the two principal interfaces for eGPUs are Thunderbolt and OCuLink, each with distinct characteristics regarding bandwidth, versatility, and prevalence.
Thunderbolt Connections
Thunderbolt, developed by Intel, has been the most common interface for eGPUs, particularly Thunderbolt 3 and 4. These versions typically offer a maximum bandwidth of 40 Gigabits per second (Gbps) over four PCIe lanes.
- Thunderbolt 3: This version, introduced in 2015, made eGPU enclosures truly viable. It provides 40 Gbps bandwidth and can deliver up to 100W of power, supporting 4 PCIe 3.0 lanes. However, this bandwidth represents only about 25% of a desktop PCIe x16 slot’s bandwidth, often creating a performance bottleneck.
- Thunderbolt 4: Launched in 2020, Thunderbolt 4 maintains the same 40 Gbps bandwidth as Thunderbolt 3 but brings improvements in reliability, cross-device compatibility, and enhanced security features. It also supports 100W charging and guarantees 4K display compatibility. For eGPUs, the raw performance boost over Thunderbolt 3 is generally minimal due to the consistent bandwidth cap.
- Thunderbolt 5: The latest iteration, Thunderbolt 5 (released in 2024), marks a significant leap, offering 80 Gbps bandwidth, with a “Bandwidth Boost” mode that can reach up to 120 Gbps. It also provides up to 240W of power delivery and native support for multiple 4K or 8K displays. This version is expected to significantly minimize eGPU performance bottlenecks, although its availability in laptops and enclosures is still emerging. Even with Thunderbolt 5, the 120 Gbps bandwidth still doesn’t quite match a desktop PCIe x16 slot’s 256 Gbps, leading to some performance disparity.
OCuLink Connections
OCuLink (Optical Copper Link) is another interface that has gained traction in the eGPU space, particularly with mini PCs and custom setups. OCuLink typically provides 64 Gbps bandwidth over four PCIe 4.0 lanes, offering a higher raw data transfer rate compared to Thunderbolt 3/4’s 40 Gbps (PCIe 3.0 x4 equivalent).
- Higher Bandwidth: The primary advantage of OCuLink is its superior bandwidth and lower latency, directly utilizing PCIe 4.0 x4, which can offer better performance for bandwidth-hungry applications and games compared to Thunderbolt 3/4.
- Less Device-Friendly: Despite its technical advantages, OCuLink is less common as an external I/O port on consumer laptops and PCs, making consumer-friendly eGPU enclosures less prevalent. However, adapters and docks are available, especially from online retailers, allowing machines with M.2 ports to connect to external GPUs via OCuLink. Devices like the GTBox G-Dock and OneXGPU now offer both OCuLink and USB4 connectivity, adding to their versatility.
- Hot-Swapping: One key difference is that OCuLink typically does not support hot-swapping, meaning the system needs to be booted with the connection already in place, unlike Thunderbolt eGPUs which can often be hot-swapped.
When choosing between Thunderbolt and OCuLink, consider the ports available on your host device, the GPU’s potential bandwidth demands, and your willingness for a potentially more DIY setup with OCuLink. For most mainstream laptop users, Thunderbolt remains the more accessible and widely supported option, especially with the advent of Thunderbolt 5 promising significant performance gains.
Choosing the Right eGPU Enclosure
The eGPU enclosure is a critical component that houses your graphics card and connects it to your laptop, acting as the bridge that facilitates desktop-level graphics performance. Selecting the right enclosure involves considering several factors to ensure compatibility, optimal performance, and longevity.
Compatibility with Your Laptop’s Port
First and foremost, the enclosure must be compatible with your laptop’s external port. Most modern eGPU setups rely on Thunderbolt 3, 4, or USB4 ports.
- Thunderbolt 3/4/5: Ensure your laptop has a Thunderbolt 3, 4, or 5 port. Not all USB-C ports are Thunderbolt compatible; verify your laptop’s specifications. Thunderbolt ports are typically indicated by a lightning bolt symbol next to the USB-C port. For Windows PCs, Intel Core processors from the 7th generation or newer often support Thunderbolt 3, and 11th generation or newer for Thunderbolt 4. Macs with Intel processors and Thunderbolt 3 ports running macOS High Sierra 10.13.5 or later are compatible.
- USB4: Some newer eGPU enclosures and laptops support USB4, which can also provide the necessary bandwidth for eGPUs, often at 40 Gbps. When using USB4, confirm your laptop’s USB4 implementation supports the same data rate as the enclosure.
- OCuLink: If your mini PC or laptop features an OCuLink port, an OCuLink eGPU dock can offer higher bandwidth. However, OCuLink ports are less common on consumer laptops.
Power Supply Unit (PSU) Capacity
The eGPU enclosure needs to provide sufficient power to the graphics card you plan to install. Graphics cards, especially high-end models, can be power-hungry.
- Look for enclosures with a PSU rated at 400W or higher for optimal performance, though some mid-range GPUs may require less.
- High-end cards like the NVIDIA RTX 4090 can have a Thermal Design Power (TDP) of 450W, so a powerful PSU in the enclosure is crucial. The Razer Core X V2, for instance, has a 650W universal power supply to handle demanding GPUs.
- Some enclosures can also provide power delivery (PD) to charge your laptop through the same Thunderbolt cable, typically up to 85W or 100W, adding convenience.
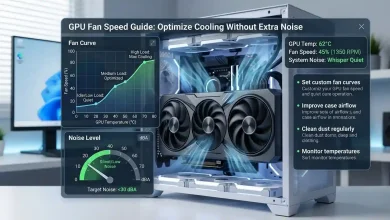
Cooling System
Adequate cooling is essential to prevent thermal throttling and maintain stable performance, especially during extended use.
- Enclosures with built-in active cooling systems (fans) are generally more efficient.
- Some, like the Razer Core X Chroma, offer excellent thermals. Others might feature dual-fan setups with vapor chamber heat spreaders for very demanding GPUs.
- Open-frame designs, such as some OCuLink docks, can also enhance airflow and reduce overheating risks by eliminating GPU size limits.
Physical Size and Portability
Consider the physical dimensions of the enclosure and your available desk space. While eGPUs are external, many are not designed for frequent portability and can be quite bulky.
- If portability is a concern, look for more compact enclosures or all-in-one eGPUs with integrated GPUs, like the OneXGPU or Sonnet eGFX Breakaway Puck models.
- Ensure the enclosure can physically accommodate the length, width, and height of your chosen desktop graphics card. Some enclosures support up to 330mm GPUs.
Popular eGPU enclosures that often receive positive reviews include the Razer Core X series, Sonnet eGFX Breakaway Box, and various OCuLink docks from brands like RIITOP and MINISFORUM. The TH3P4G3 is also noted as a reliable and cost-effective option for Thunderbolt eGPUs.
Selecting a Compatible Graphics Card
Choosing the right graphics card for your eGPU enclosure is just as crucial as the enclosure itself. The GPU will dictate your performance levels for games and applications.
Compatibility with Enclosure and System
Not all graphics cards are equally compatible with eGPU setups, particularly concerning the physical size, power requirements, and the operating system you are using.
- Physical Fit: Ensure the GPU’s dimensions (length, width, height) fit within the specified limits of your eGPU enclosure. Some enclosures are designed for larger cards, while others are more compact.
- Power Requirements: Match the GPU’s power demands with the enclosure’s Power Supply Unit (PSU) capacity. High-end cards require powerful PSUs; for example, an NVIDIA RTX 4090 has a TDP of 450W and necessitates a robust enclosure PSU.
- Operating System Support:
- Windows: Generally has broad support for both NVIDIA and AMD desktop graphics cards in eGPU enclosures.
- macOS: Primarily supports AMD Radeon GPUs. Apple has specific lists of recommended AMD Radeon RX series cards, such as the RX 470, 480, 570, 580, Vega 56, Vega 64, RX 5700 series, and RX 6800/6900 XT series, often requiring specific macOS versions. NVIDIA GPUs are largely unsupported on recent macOS versions.
- Linux: Support for eGPUs on Linux is generally good, but may require some manual configuration, including checking Thunderbolt authorization and ensuring kernel parameters for hot-plugging are set correctly.
Performance Considerations
While eGPUs provide a significant boost, remember that Thunderbolt’s bandwidth limitations (even Thunderbolt 5) mean you won’t always achieve 100% of a desktop card’s performance.
- Sweet Spot: For Thunderbolt 3/4 setups, cards like the NVIDIA RTX 3060/3060 Ti, RTX 4060/4070, or AMD RX 6600/6700 XT are often considered the “sweet spot” before diminishing returns due to bandwidth bottlenecks become too pronounced. The ASUS Prime GeForce RTX 4070 OC is recommended for eGPU builds due to its excellent performance and reasonable power demands.
- Higher-End Cards: While cards like the RTX 4080 or RTX 4090 can be used, the performance uplift might not be as dramatic as in a full desktop due to the interface bottleneck. However, they still offer considerable power for demanding tasks, especially when connected to an external monitor.
- VRAM: For tasks like video editing or 3D rendering, or even some modern games, a GPU with ample VRAM (e.g., 12GB or more) can be beneficial to minimize data shuffling over the Thunderbolt link.
When selecting, always check the eGPU enclosure manufacturer’s compatibility list and consider your specific use case. For a good balance of performance and value with current Thunderbolt limitations, mid-to-high-range cards are often recommended.
System Requirements and Compatibility Checks
Before investing in an eGPU setup, it’s essential to thoroughly check your host system’s compatibility to ensure a smooth experience. This involves assessing your laptop’s hardware, operating system, and drivers.
Host PC Requirements
The foundation of a successful eGPU setup is a compatible host computer, typically a laptop.
- Thunderbolt Port: Your laptop must have a Thunderbolt 3, 4, or 5 port. This is the primary high-speed connection required for most eGPU enclosures. Verify this in your laptop’s specifications or device manager. Note that not all USB-C ports are Thunderbolt-enabled.
- Processor (CPU): For Windows PCs, Intel Core processors from the 7th generation or newer typically support Thunderbolt 3, while 11th generation or newer support Thunderbolt 4. Macs with Intel processors and Thunderbolt 3 are compatible.
- Operating System:
- Windows 10/11 (64-bit): Ensure your Windows installation is up-to-date, preferably Windows 10 version 22H2 or Windows 11 22H2 or later.
- macOS: Intel-based Macs running macOS High Sierra 10.13.4 or later are generally supported, with newer macOS versions supporting a wider range of AMD GPUs.
- Linux: eGPUs generally work well on Linux, but may require specific kernel parameters or user authorization for Thunderbolt devices.
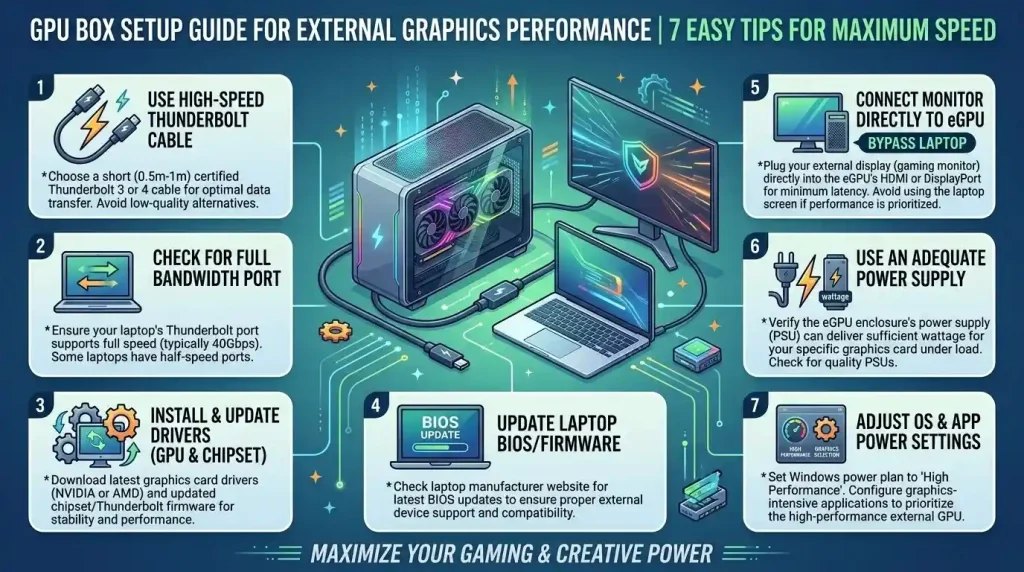
- BIOS/UEFI Firmware: It’s crucial to have an updated BIOS/UEFI firmware on your laptop. Some systems require Thunderbolt to be enabled in the BIOS, and in some cases, Thunderbolt Security settings may need adjustment (e.g., to “user” or disabled, or enabling Pre-Boot ACL).
- Thunderbolt Drivers and Firmware: Ensure your laptop’s Thunderbolt drivers and firmware are up to date. For Thunderbolt 4 controllers integrated into the CPU, Windows Update is usually the source for drivers.
| Component | Minimum Requirement/Recommendation | Notes |
|---|---|---|
| Host Port | Thunderbolt 3/4/5 or USB4 | Verify your laptop’s port capabilities; not all USB-C ports are Thunderbolt. OCuLink for specialized setups. |
| eGPU Enclosure PSU | 400W or higher | Dependent on GPU power draw. High-end GPUs may require 650W+ PSUs. |
| Graphics Card (GPU) | Full-size desktop GPU (NVIDIA RTX 30/40 series, AMD RX 6000/7000 series) | Check physical fit and power needs. macOS primarily supports AMD Radeon cards. |
| Operating System | Windows 10/11 (latest 64-bit), macOS 10.13.4+, Linux (recent distributions) | Keep OS updated for best compatibility and driver support. |
| BIOS/UEFI & Firmware | Latest version | Ensure Thunderbolt is enabled and firmware is up-to-date. |
| External Monitor | Recommended | Connect directly to eGPU for optimal performance, especially for gaming. |
Potential Bottlenecks and Considerations
- Bandwidth Limitations: Even with Thunderbolt 4, the 40 Gbps bandwidth is significantly less than a desktop PCIe x16 slot, which can lead to a performance hit, especially in CPU-bound games or when using very high-end GPUs. The performance loss can be around 10-30% compared to an internal desktop installation.
- Internal vs. External Display: For optimal performance, especially in gaming, connect your external monitor directly to the eGPU’s video outputs rather than routing the signal back through the laptop’s internal display. Using the internal display can incur an additional performance penalty due to the data having to travel back over the Thunderbolt connection.
- CPU Bottleneck: While an eGPU boosts graphics, an older or lower-power laptop CPU might still bottleneck the overall system performance, preventing the eGPU from being fully utilized.
- Driver Conflicts: If your laptop has a built-in discrete GPU (dGPU), you might encounter driver conflicts. Sometimes disabling the integrated or discrete GPU in Device Manager (for Windows) can help ensure the eGPU is the primary graphics handler. For NVIDIA users, if your laptop has an NVIDIA Quadro (professional) GPU and you install a GeForce (gaming) GPU in the eGPU, you may need to uninstall the Quadro driver and install the GeForce driver.
By carefully checking these system requirements and understanding potential limitations, you can ensure a smoother and more effective eGPU setup.
Step-by-Step eGPU Setup Process
Once you have selected your eGPU enclosure and compatible graphics card, the setup process is relatively straightforward, involving hardware installation, connection, and driver configuration.
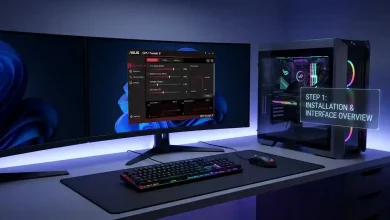
1. Install the Graphics Card into the Enclosure
- Open the Enclosure: Carefully open your eGPU enclosure according to the manufacturer’s instructions. Most modern enclosures are designed for tool-free or minimal-tool installation.
- Insert the GPU: Gently insert your chosen desktop graphics card into the PCIe slot within the enclosure. Ensure it is seated firmly.
- Secure the GPU: Secure the graphics card with any provided screws or clips inside the enclosure.
- Connect Power Cables: Plug in all necessary PCIe power cables from the enclosure’s internal power supply to your graphics card. High-end GPUs often require multiple 6-pin or 8-pin connectors.
- Close the Enclosure: Once the GPU is securely installed and powered, close the enclosure, ensuring all connections are tight and nothing is obstructing fans or cables.
2. Connect the eGPU to Your Laptop
- Power On Enclosure: Plug the eGPU enclosure’s power cable into a wall outlet and turn on its power switch.
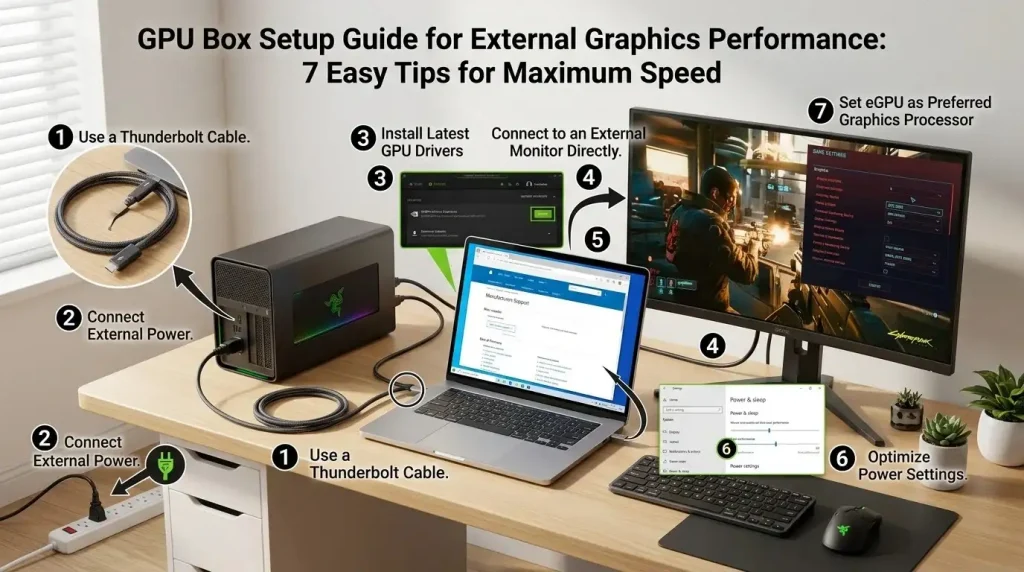
- Connect Thunderbolt/USB4 Cable: Use a high-quality Thunderbolt 3/4 or USB4 cable to connect the eGPU enclosure to your laptop’s corresponding port. Ensure the cable is securely plugged into both devices. For optimal performance, use the shortest possible high-quality cable.
- Initial Recognition: Your laptop should recognize the new Thunderbolt device. Follow any on-screen prompts to authorize the connection, especially on Windows where you might see a message asking to allow the device. For Linux, you might need to manually authorize the Thunderbolt device using
boltctlor ensure Thunderbolt Security is set appropriately in BIOS.
3. Install Graphics Drivers
This is a critical step for ensuring your eGPU functions correctly and delivers optimal performance.
- Disconnect from Internet: For Windows, it’s often recommended to disconnect from the internet (disable Wi-Fi, unplug Ethernet) to prevent Windows from automatically installing generic or outdated drivers.
- Download Latest Drivers: Visit the official website of your graphics card manufacturer (NVIDIA or AMD) and download the latest drivers for your specific GPU model.
- Clean Driver Installation (Recommended):
- If you have an existing discrete GPU in your laptop, or if you’re upgrading from a previous GPU, it’s often best to perform a clean driver installation. For NVIDIA, this option is usually available within the installer. For AMD, a tool like Display Driver Uninstaller (DDU) can be used in Safe Mode to completely remove old drivers before installing new ones.
- If your laptop has a built-in discrete NVIDIA Professional (Quadro) series GPU and you’re connecting an NVIDIA GeForce series GPU externally, you might need to uninstall the Quadro driver and then install the GeForce driver.
- Install Drivers: Run the downloaded driver installer. Follow the on-screen instructions. For Windows, if prompted, ensure you choose the custom installation and select the “clean install” option if available. Reconnect to the internet after installation is complete.
- Restart Your Laptop: Restart your laptop to ensure all changes take effect and drivers are properly initialized.
4. Verify and Configure
- Check Device Manager (Windows) / System Information (Mac):
- Windows: Open Device Manager (search “Device Manager” in Windows search bar), expand “Display adapters.” Your external GPU should appear without any error signs.
- macOS: Go to “About This Mac” > “System Report” > “Graphics/Displays.” Your eGPU should be listed.
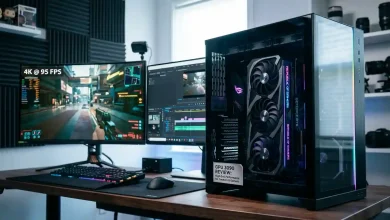
- Connect External Monitor (Optimal): For the best performance, connect your external monitor directly to the video outputs of the eGPU, not your laptop’s integrated ports. Set this external display as your primary display in your operating system’s display settings.
- Configure Graphics Settings:
- Windows: In Display Settings > Graphics Settings, you can manually assign specific applications (e.g., games or editing software) to use the “High performance” GPU (your eGPU). You can also disable the integrated GPU in Device Manager if you encounter issues or want to ensure the eGPU is always used.
- macOS: Some applications allow you to right-click and select “Prefer External GPU” from the “Get Info” menu.
- Test Performance: Run a graphics-intensive application, game, or benchmark to confirm the eGPU is working as expected and providing the desired performance boost.You can also use monitoring tools like GPU-Z or task manager to confirm GPU utilization during demanding tasks.
Optimizing Performance and Troubleshooting Common Issues
Even with a proper setup, you might encounter performance issues or unexpected behavior. Optimizing your eGPU setup and knowing how to troubleshoot common problems can significantly enhance your experience.
Optimizing Performance
Maximizing your eGPU’s potential often involves addressing the inherent bandwidth limitations of external connections and ensuring your system is configured correctly.
- Use an External Monitor: As previously mentioned, connecting your primary display directly to the eGPU’s video outputs (HDMI, DisplayPort) is the most significant performance optimization, especially for gaming. This bypasses the need to send processed frames back to the laptop’s internal display, reducing latency and bandwidth overhead. Performance can be 10-20% higher on an external monitor compared to the laptop’s screen.
- Update All Drivers and Firmware: Regularly update your laptop’s BIOS, Thunderbolt firmware, Thunderbolt drivers, and graphics card drivers. Outdated software can cause compatibility issues and performance degradation.
- Power Settings: Ensure your laptop’s power profile (in Windows Power Options) is set to “High performance” or “Best performance” when using the eGPU. Also, check “PCI Express” > “Link State Power Management” and set “On Battery” and “Plugged In” to “Off” to prevent power-saving features from throttling the eGPU.
- Disable Integrated/Discrete Laptop GPU: If your laptop has an integrated GPU (iGPU) or another discrete GPU (dGPU), consider disabling it in Device Manager when the eGPU is in use. This can prevent potential conflicts and ensure the eGPU is fully utilized. Re-enable it when you disconnect the eGPU for portability.
- Direct Application Assignment: In Windows Graphics Settings, explicitly assign performance-critical applications (games, editing software) to use the “High performance” GPU (your eGPU).
- Close Background Applications: Minimize other background applications that might consume CPU or memory resources, as a CPU bottleneck can limit eGPU performance.
- Thunderbolt Security Settings (BIOS): Experiment with Thunderbolt Security settings in your BIOS. Sometimes setting it to “User” mode or disabling it (if a “Legacy” mode is available) can improve detection and stability. Enabling “Pre-Boot ACL” in BIOS can also speed up eGPU connection.
- Cable Quality: Use a certified, high-quality Thunderbolt or USB4 cable, preferably the shortest practical length, to ensure stable data transfer. Faulty cables can lead to performance issues or dropped connections.
Troubleshooting Common Issues
eGPUs can sometimes present unique challenges. Here are solutions for frequently encountered problems:
- eGPU Not Recognized:
- Check Connections: Ensure all cables (power, Thunderbolt/USB4) are securely connected. Try a different Thunderbolt/USB4 port or cable.
- Power Cycle: Turn off both the laptop and the eGPU, then power on the eGPU first, followed by the laptop. Some users report that physically powering off and on (rather than just restarting) helps.
- BIOS/Firmware: Update your laptop’s BIOS, Thunderbolt firmware, and drivers to the latest versions. Check BIOS settings to ensure Thunderbolt is enabled